Participant
March 23, 2019
Answered

How do I connect 2 straight lines with a perfect curve?

  • March 23, 2019
  • 2 replies
  • 1291 views

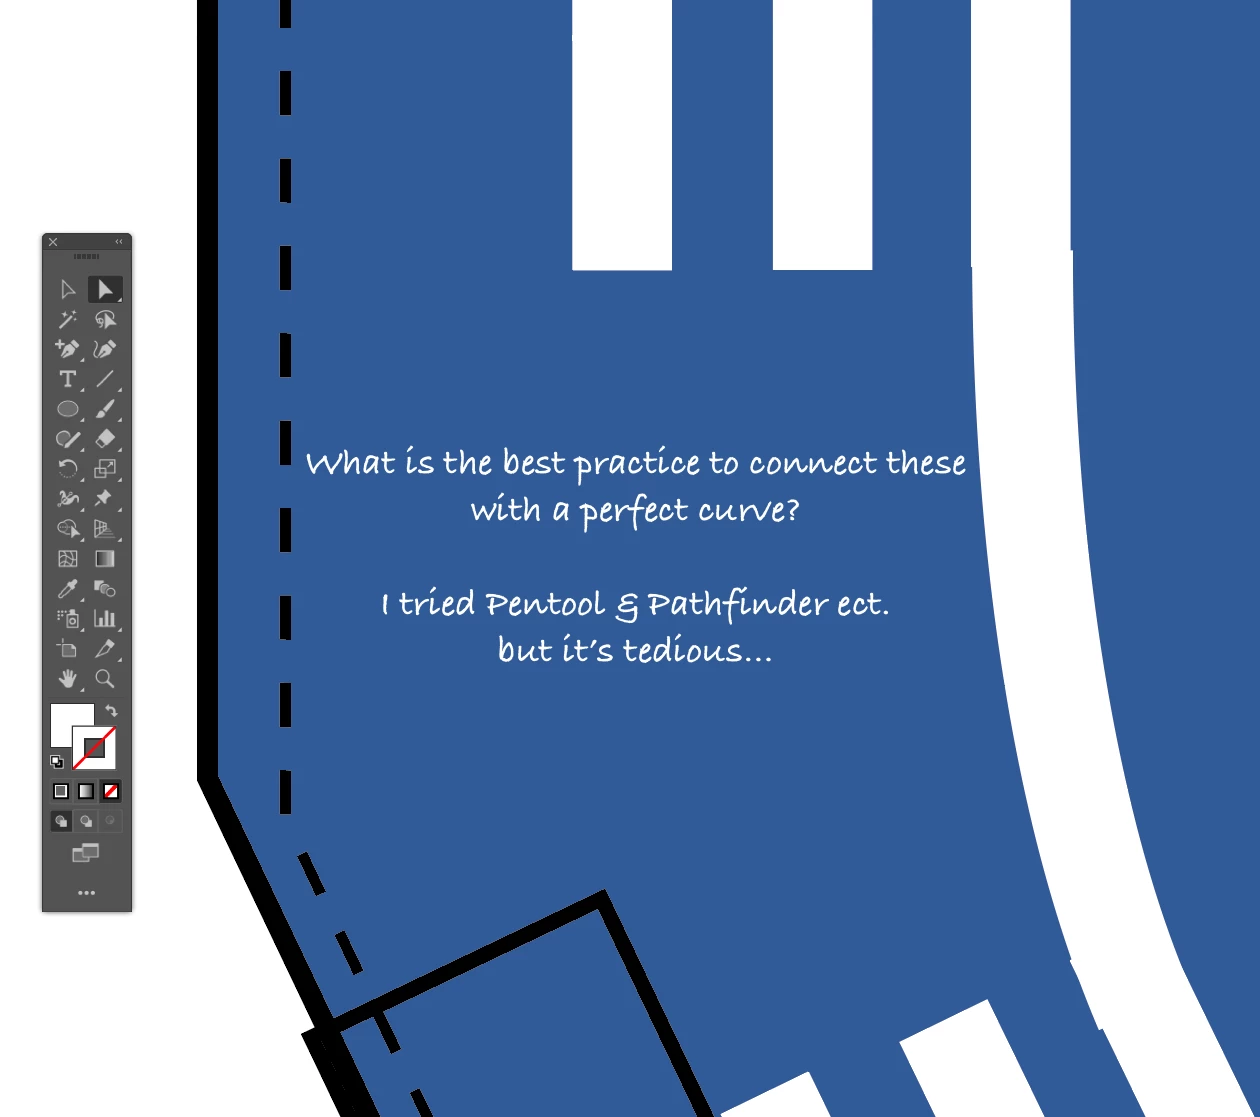
Hi Illustrators. This is actually a collar for a wooden sailor figure. But how do I connect the white lines with a perfect curve, maintaining the exact width?

This topic has been closed for replies.
Correct answer Jacob Bugge

BMC,

For perfection it is best to start with stroke/nofill paths rather than rectangular filed paths and having identical Stroke Weights with Butt Ends (it is possible to work similarly on rectangular filled paths with more steps, by copying the rightmost segments of the rightmost paths to join and take it from there).

You can do the following for each set of lines to be joined, but assuming parallel equidistant lines (as they seem to be), it is better and easier to just do it for the rightmost set of lines, then continue as described at the end.

For the the rightmost (or each if you must) set of lines to be joined you may, Smart Guides being your friends:

1) With the Line Segment Tool ClickDrag from the end Anchor Point a suitably long (see below in 2)) distance along the (spine of the) path for each of the paths to be joined, use a different colour and a small Stroke Weight;

2) Deselect, then ClickDrag each of the new lines by the farthest end Anchor Point to snap to the corresponding end Anchor Point, this should give you a set of temporary extension lines towards the other path, these should cross;

3) Lock both the new lines;

4) Choose a starting path and with the Pen Tool ClickDrag from the end Anchor Point and some distance along the extension line, then ClickDrag from the end Anchor Point of the ending path some distance along the path;

This should join the two paths with smooth transitions at their end Anchor Points, ready for final adjustment;

5) Deselect and for both former end Anchor Points with the Direct Selection Tool ClickDrag the Handles along the new lines to shorten or lengthen each Handle until you are satisfied with the shape.

Having the rightmost set of lines joined into one, you can:

6) Select the rightmost joined line and Object>Path>Offset Path with the Offset equalling the distance to the next line (set), as measured between the spines; this should give you a closed shape with the leftmost segment forming the right shape for the next set of lines to join; then deselect and with the Direct Selection Tool ShiftClick the other three segments and press delete; then lock the new path and delete the original paths when you have seen the match;

7) Repeat 6) only doubling the Offset for the last set of lines.

2 replies

Jacob Bugge
Community Expert
Jacob BuggeCommunity ExpertCorrect answer
Community Expert
March 24, 2019

BMC,

For perfection it is best to start with stroke/nofill paths rather than rectangular filed paths and having identical Stroke Weights with Butt Ends (it is possible to work similarly on rectangular filled paths with more steps, by copying the rightmost segments of the rightmost paths to join and take it from there).

You can do the following for each set of lines to be joined, but assuming parallel equidistant lines (as they seem to be), it is better and easier to just do it for the rightmost set of lines, then continue as described at the end.

For the the rightmost (or each if you must) set of lines to be joined you may, Smart Guides being your friends:

1) With the Line Segment Tool ClickDrag from the end Anchor Point a suitably long (see below in 2)) distance along the (spine of the) path for each of the paths to be joined, use a different colour and a small Stroke Weight;

2) Deselect, then ClickDrag each of the new lines by the farthest end Anchor Point to snap to the corresponding end Anchor Point, this should give you a set of temporary extension lines towards the other path, these should cross;

3) Lock both the new lines;

4) Choose a starting path and with the Pen Tool ClickDrag from the end Anchor Point and some distance along the extension line, then ClickDrag from the end Anchor Point of the ending path some distance along the path;

This should join the two paths with smooth transitions at their end Anchor Points, ready for final adjustment;

5) Deselect and for both former end Anchor Points with the Direct Selection Tool ClickDrag the Handles along the new lines to shorten or lengthen each Handle until you are satisfied with the shape.

Having the rightmost set of lines joined into one, you can:

6) Select the rightmost joined line and Object>Path>Offset Path with the Offset equalling the distance to the next line (set), as measured between the spines; this should give you a closed shape with the leftmost segment forming the right shape for the next set of lines to join; then deselect and with the Direct Selection Tool ShiftClick the other three segments and press delete; then lock the new path and delete the original paths when you have seen the match;

7) Repeat 6) only doubling the Offset for the last set of lines.

Participant
April 7, 2019

Dear Jacob - and Mohammad
Thank you so much for really taking your time to explain a soulution clearly, but it still sounds like russian to my ears, despite I'm scandinavian.-).

But I treid to follow your instructions chronically, and ended up with a fine result, despite I almost broke my neck on this little look-easy task wich were more a technical drawing. And in frustrations moments like this when your lack of skills hit the wall hard, it's so amazing with guys like you!

Jacob Bugge
Community Expert
Community Expert
April 7, 2019

For my part you are welcome, BMC.

Mohammad.Harb
Community Expert
Community Expert
March 23, 2019

If you are using the latest versions of illustrato,

try using the “ join Tool” , another workaround:

draw a straight line then with the Anchor point ( shift + C)

in the middle of the line adjust the curve .