Known Participant
September 8, 2022
Answered

How to evenly distribute a shape over a path

  • September 8, 2022
  • 2 replies
  • 1619 views

Dear Community,

Good morning 🙂

I need your help in distributing an object over a path, in a way that the objects adjust themselves to the right angle. I tried to follow some answers, here in the community and videos on Youtube, but did not manage.

I am an absolute beginner so any step-by-step help would be very appreciated.

The illustration is the following:

where I have adjusted the objects manually, and the layer is the below:

Thanks in advance and best regards 🙂

Alberto

This topic has been closed for replies.
Correct answer Jacob Bugge

Hi Jacob,

Many thanks for your kind reply.

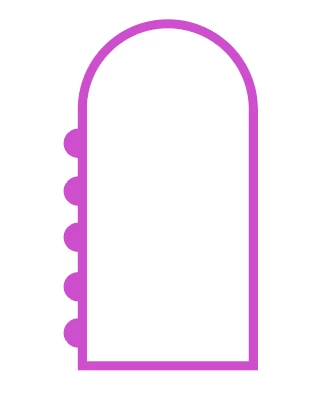
I managed to do up to Replace Spine.

Can you please detail a bit more from Path Offset onwards? I do not know what path to offset and results are messy.

Here is where I arrived:

Best regards and many thanks again 🙂

Alberto


You are welcome, Alberto.


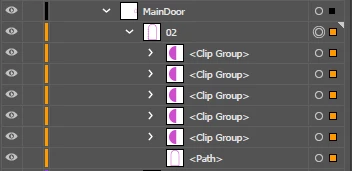
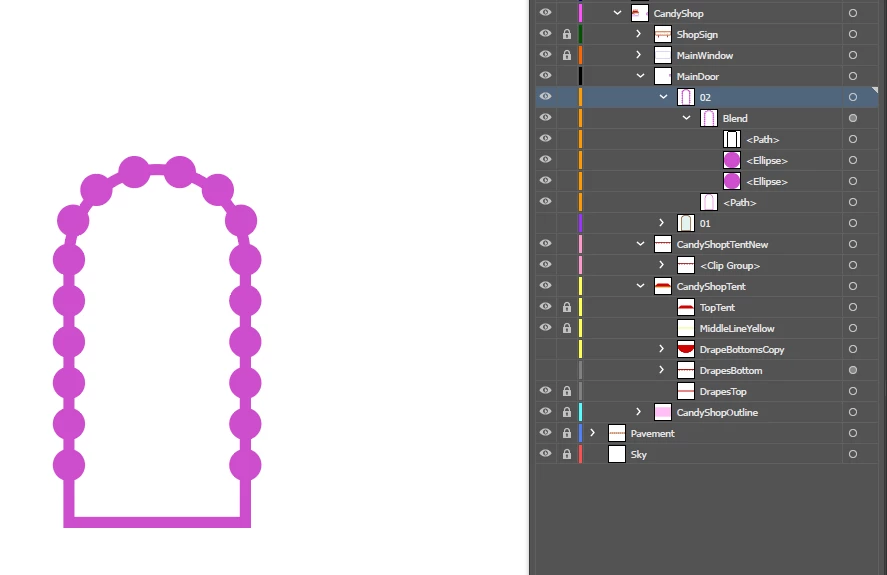
Your next step is with the door frame path (beneath the Blend that is just called <Path>).


You can, on the Artboard:


1) Click the <Path> to select it, then in the Object dropdown use Path>Offset Path with a negative Offset equalling half the Stroke Weight;


Because of your complex Layer it is best to do the next step in the expanded Layer rather than on the Artboard:


2) ClickDrag the selected offset path up to place it just above the Blend;


Back on the Artboard:


3) Switch from Stroke to Fill in the Toolbox, then make the fill black;


Now things ought to correspond to the second last image in my post, and then:


4) Make the Opacity Mask in the Transparency panel.


I have a question: As I see your original image, you have half of each circle outside the door frame path, in other words the centre is at the outer edge of the Stroke. In your latest image you have each circle centred on the door frame path, in other words less than half of it outside.


Which is your wish?


Based on the original image I suggested the Stroke Aligned to Inside rather than to Centre (in the first step); obviously, this makes a difference in the size of the actual door frame path equalling the Stroke Weight, for both width and height, so this leads to two possible solutions, if you wish to have half of each circle outside:


Either you can shrink the door frame and leave the Blend in place, or you can expand the spine of the Blend.


2 replies

Jacob Bugge
Community Expert
Community Expert
September 8, 2022

Alberto,


There are different ways depending on your requirements.


The crucial questions are whether

1) You wish to have stricly semicircular shapes with no distortion (stretching) where the path is rounded (at the top), rather than a crertain distortion, and

2) whether you wish to have the semicircular shapes as additions to the actual original path.


If you wish to have both of the above, one way is to make with a combination of the original path, a Blend, and an offset version of the original path, as an Opacity Mask (more convenient if you wish a specific number of semicircular shapes).


Another way is to make it with a combination of the original path with a New (dashed) Stroke, and an offset version of the original path, as an Opacity Mask (more convenient if you wish a specific (approximate distance between the semicircular shapes).


Below is a simple sample of the former way; the latter can be made to look the same.


Click/RightClick to get closer


Known Participant
September 8, 2022

Hi Jacob,

I need the shapes not to be stretched.

Would you be so kind, if possible, to guide me step-by-step in doing this please?

I am a beginner and would not know from where to start on my own. I read about blending, but all results were nonsensical 😞

Thanks and best regards,

Alberto

Jacob Bugge
Community Expert
Community Expert
September 9, 2022

Alberto,


Apologizing for the delay, here it is.


I have used magenta, along with green for contrast.


As you can see, you keep working with the arch path once created (as you have).


The numbers are the ones I used, based on your screenshot; I assume you wish to have 15 semicircular paths, one at the very top, and the bottom ones at the same distance from the bottom as the distance between the paths.


You can use your own numbers, and/or change them and see how things change.


Instead of the reversible Opacity Mask in the last two steps, you can create an irreversible Compound Path which will look the same as the last step; I can describe that.


You can look up the terms here,

https://helpx.adobe.com/search-results.html?q=&scope=%5B%22helpx%22%5D&subscope=%5B%5D&limit=10&start_index=0&sort_orderby=relevancy&sort_order=desc&post_facet_filters=%7B%22applicable_products%22%3A%5B%5D%7D


and if needed, I can add a description of the steps.


Click/RightClick to get closer and Click again to get closer still.


Legend
September 8, 2022

You could do this with a Pattern brush. 

With your shape selected, choose New Brush under the Brushes menu, and then select Pattern Brush as the type.

You can choose corner options in the next dialog, but if you have only rounded shapes, that will not matter.

Known Participant
September 9, 2022

Hi SJRiegel,

Thanks for your answer.

I tried to follow your steps, but did not get the results I wanted.

What I did:

1. With my shape selected (it is a half-circle), I created a New Pattern Brush

2. I left everything as it is and saved the new brush

3. Here is the new brush

But then, I do not know how to proceed.

If I select my path:

and apply the brush (in the screen below, the one in the middle for example)

I get this

What am I doing wrong?

Thanks 🙂

Alberto


Legend
September 12, 2022

For the brush to work like my example you would need to rotate your pattern piece by 90 degrees, and include a portion of the line in the brush definition.