Participant
December 25, 2016
Question

How to flip compass lines to face out not in?

  • December 25, 2016
  • 2 replies
  • 787 views

Hello all,

I am a Photoshop guy but need to make a tool for the art I do. My buddies CNC router needs specific vector outputs to cut the template. I found an ai template online that is perfect except I need all the compass lines facing outward instead of inward. Number stay on the outside as shown.

You can download the template here.

Bonus Questions:

1. How do I make all the lines thinner?

2. Move lines so the 5 degree lines have the middle size lines (currently marking every other 10th degree) and move the larger lines (currently marks every 20th degree) for every other 10th degree?

3. How do I add numbers 10, 30, 50, 70, ...?

If anyone can help it would be greatly appreciated. Feel free to edit the ai file or post instructions on how to do this. Thanks in advance and MERRY CHRISTMAS AND A HAPPY NEW YEAR

So instead of the lines facing in as shown

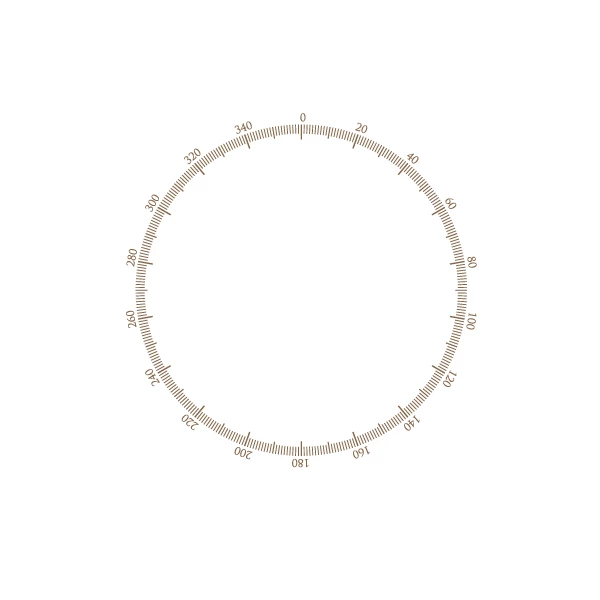
I need them to face out as shown in this image

    This topic has been closed for replies.

    2 replies

    Jacob Bugge
    Community Expert
    Community Expert
    December 25, 2016

    mpjbay,

    As I (mis)understand it, you wish to have something like the second image, with the 360 1 degree lines going in from the circle, and the 5 degree lines as well as the longer 10 degree lines along with the number going out from the circle.

    If different from the image (such as the 1 degree lines also going out), you may adjust the following suggestion.

    You may (View>Smart Guides are your friends):

    1) Create the circle with the desired size;

    2) Ctrl/Cmd+C+F, then increase the W value in the Transform palette and press Ctrl/Cmd+Enter, to create a concentric temporary circle that is large enough to encompass everything including the numbers, then Ctrl/Cmd+C+F twice to create two copies;

    3) Switch to the Line Segment Tool (bundled with the Shape Tool), then Click somewhere on the Artboard and set the Length to the desired length of the 1 degree lines and the Angle to 90 degrees, then Click somewhere else to deselect, then ClickDrag by the top Anchor Point to snap to the top Anchor Point of the original circle (Smart Guides say anchor when you are within snapping distance), this will place the top 1 degree line accurately;

    4) Switch to the (normal) Selection Tool (black arrow), deselect, then Alt/OptionShiftClickDrag the line by the bottom Anchor Point to snap to the top Anchor Point of the circle, then if you wish the 10 degrees lines to have a different length Click the bottom Reference Point in the Transform palette and set the desired H value, this will give you the top 10 degree line;

    5) Ctrl/Cmd+C+B, then set the H value to the desired length of the 5 degree lines, this will give you the top 5 degree line beneath the top 10 degree line;

    6) In the Paragraph palette (bundled with the Character palette) click to select Align center, then in the Character palette set the desired number size, then switch to the Type Tool and type the number 0, then switch to the Selection Tool, then ShiftClick the 0 and the top 10 degree line, then Click the 10 degree line once again, then open the Alignment palette (bundled with the Transform palette) and Click first Horizontal Align Center then Vertical Align Center, then deselect and Click the 0 and move it up to the desired position (you may ShiftClickDrag it upwards or go back to the Transform palette and add the desired upward move to the Y value or in other ways);

    With this you have all the elements to build the compass accurately;

    7) Lock all the objects in the Layers palette and unlock them as needed so they can be selected and worked with in the following steps, you should be able to see that you select the right ones:

    8) Unlock the first temporary circle (second from the bottom) along with the top 1 degree line (fifth from the bottom), then ClickDrag over everything to select them, then Effect>Distort & Transform>Transform and set the Rotate to 1 degree and 359 copies and press Enter, this should show all the 1 degree lines in place, then Object>Expand Appearance, then press Ctrl/Cmd+Shift+G twice to Ungroup, then ClickDrag over a bit of the temporary circle and press Delete (to get rid of the set no longer needed), then ClickDrag over everything to select all the 1 degree lines and Ctrl/Cmd+G to Group them, then lock the Group in the Layers palette;

    9) Unlock the next temporary circle along with the top 5 degree line and repeat the steps in 8 only with Rotate 5 degrees and 71 copies;

    10) Unlock the last temporary circle along with the top 10 degree line and also the number 0 and repeat the steps in 8 only with Rotate 10 degrees and 35 copies;

    11) With the Type Tool click on top of each number to be changed and change all the way round (just click the left arrow to move the cursor to the start and type the need number (1 to get 10, 2 to get 20, and so on ending with 35 to get 350);

    12) Unlock the original circle, ClickDrag over everything, and Ctrl/Cmd+G to Group everything.

    This should give you the whole compass as a Group.

    mpjbayAuthor
    Participant
    December 26, 2016

    Thank you for the lengthy and detailed reply. I will try it out and let you know how it went.

    "As I (mis)understand it, you wish to have something like the second image, with the 360 1 degree lines going in from the circle, and the 5 degree lines as well as the longer 10 degree lines along with the number going out from the circle." Correct, I'd like the degree lines to look like the second image. Re: because I will need to use the inner part of the circle for measurements. It will basically be a full circle protractor.

    Jacob Bugge
    Community Expert
    Community Expert
    December 26, 2016

    mpjbay,

    After posting I realized that I had overlooked the CNC aspect and there are overlapping lines (all the even 5 degree lines under the 10 degree lines), so below is a set of instructions which is a bit cleaner without overlapping lines (steps 9) and 10) are amended):

    You may (View>Smart Guides are your friends):

    1) Create the circle with the desired size;

    2) Ctrl/Cmd+C+F, then increase the W value in the Transform palette and press Ctrl/Cmd+Enter, to create a concentric temporary circle that is large enough to encompass everything including the numbers, then Ctrl/Cmd+C+F twice to create two copies;

    3) Switch to the Line Segment Tool (bundled with the Shape Tool), then Click somewhere on the Artboard and set the Length to the desired length of the 1 degree lines and the Angle to 90 degrees, then Click somewhere else to deselect, then ClickDrag by the top Anchor Point to snap to the top Anchor Point of the original circle (Smart Guides say anchor when you are within snapping distance), this will place the top 1 degree line accurately;

    4) Switch to the (normal) Selection Tool (black arrow), deselect, then Alt/OptionShiftClickDrag the line by the bottom Anchor Point to snap to the top Anchor Point of the circle, then if you wish the 10 degrees lines to have a different length Click the bottom Reference Point in the Transform palette and set the desired H value, this will give you the top 10 degree line;

    5) Ctrl/Cmd+C+B, then set the H value to the desired length of the 5 degree lines, this will give you the top 5 degree line beneath the top 10 degree line;

    6) In the Paragraph palette (bundled with the Character palette) click to select Align center, then in the Character palette set the desired number size, then switch to the Type Tool and type the number 0, then switch to the Selection Tool, then ShiftClick the 0 and the top 10 degree line, then Click the 10 degree line once again, then open the Alignment palette (bundled with the Transform palette) and Click first Horizontal Align Center then Vertical Align Center, then deselect and Click the 0 and move it up to the desired position (you may ShiftClickDrag it upwards or go back to the Transform palette and add the desired upward move to the Y value or in other ways);

    With this you have all the elements to build the compass accurately;

    7) Lock all the objects in the Layers palette and unlock them as needed so they can be selected and worked with in the following steps, you should be able to see that you select the right ones:

    8) Unlock the first temporary circle (second from the bottom) along with the top 1 degree line (fifth from the bottom), then ClickDrag over everything to select them, then Effect>Distort & Transform>Transform and set the Rotate to 1 degree and 359 copies and press Enter, this should show all the 1 degree lines in place, then Object>Expand Appearance, then press Ctrl/Cmd+Shift+G twice to Ungroup, then ClickDrag over a bit of the temporary circle and press Delete (to get rid of the set no longer needed), then ClickDrag over everything to select all the 1 degree lines and Ctrl/Cmd+G to Group them, then lock the Group in the Layers palette;

    9) Unlock the next temporary circle and along with the top 5 degree line and select them, then Object>Transform>Rotate by 5 degrees, then repeat the steps in 8) from Effect on, only with Rotate 10 degrees and 35 copies;

    10) Unlock the last temporary circle along with the top 10 degree line and also the number 0 and select them all, then repeat the steps in 9) from Effect on;

    11) With the Type Tool click on top of each number to be changed and change all the way round (just click the left arrow to move the cursor to the start and type the need number (1 to get 10, 2 to get 20, and so on ending with 35 to get 350);

    12) Unlock the original circle, ClickDrag over everything, and Ctrl/Cmd+G to Group everything.

    This should give you the whole circle protractor as a Group, with the 5 degree lines in between the 10 degree lines and no overlap.

    Monika Gause
    Community Expert
    Community Expert
    December 25, 2016

    Forget editing that file. All strokes are outlined.

    Make a new one.

    Mark the center with guidelines. Create one of the lines. Duplicate and rotate around the center.

    See here:

    How to rotate and reflect objects in Illustrator

    Scroll to: "Rotate an object by a specific angle"

    mpjbayAuthor
    Participant
    December 26, 2016

    Thank you I will have a look at your tutorial and reply with the solution I used.