Canada Pete
Participating Frequently
January 29, 2026
Answered

How to join multiple paths for gear cutouts?

  • January 29, 2026
  • 10 replies
  • 264 views

I am trying to close multiple small paths into one large closed path. Ultimately, I need to save as an SVG so I can import in to a CNC router. The original files are gears for a wooden clock that started out as DXF files. There are hundreds of small paths on the gear teeth that I can join manually, but there must be a better way. A Select All > Path  > Join does not work. The only thing that does seems to work is manually selecting the endpoints in each gear tooth and joining the paths this way. Do-able, but very slow as I have many gears to work on.

Is there a trick I am missing or a better way to do this? I am relatively new to Ai.

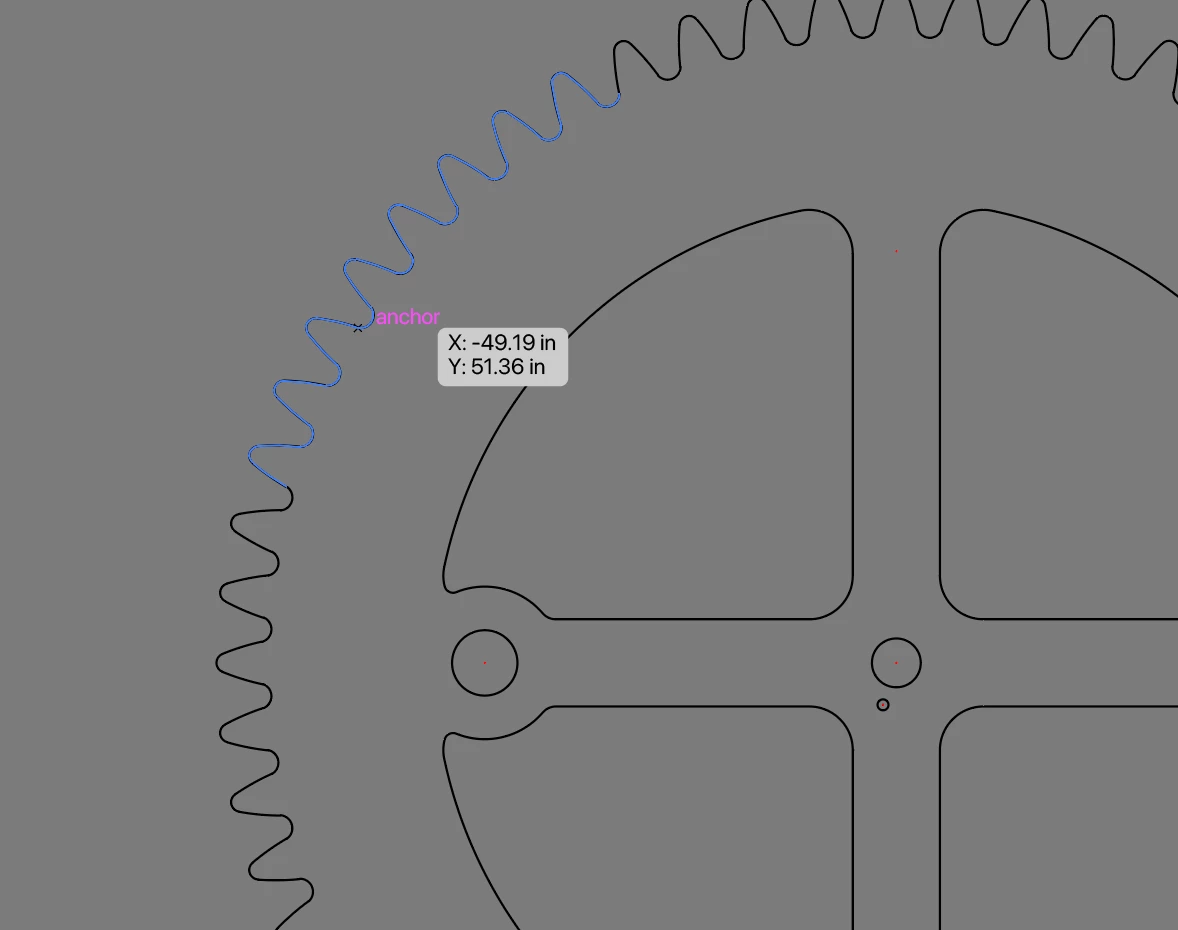
Attached is an example where I manually joined all the paths to obtain the hi-lighted path eight teeth in length. I have confirmed my CNC will read this joined path just fine.

All the rest of the gear is made up of hundreds of smaller paths, all non-joined. 

There is no option of asking the DXF file author to save the file differently.

All suggestions welcome. Thanks.

Gear Paths


<Title renamed by moderator>

Correct answer Bobby Henderson

There’s no simple easy way to join a bunch of line segments on an “exploded" path shape together in just one or two clicks, unless you have a third party plugin like Vector First Aid (and its Rejoin Paths feature). 

Usually in this kind of situation I’ll just use the Direct Selection tool to select line segments to see where the path is broken part. Then I would use the Ctrl+J keyboard shortcut to join an anchor point on the selected path to the next adjacent path that didn’t show up in the selection. The process sounds complicated, but it can actually go pretty quick when using the keyboard shortcuts.

10 replies

Kurt Gold
Community Expert
Community Expert
February 5, 2026

Canada Pete,


I think it would still be useful if you could share at least one sample Illustrator file that shows that the common Join command does not work.


I'm asking because in all recent (and some older) versions of Illustrator the Object menu > Path > Join command actually should join all fragments in one whack.


You can verify that in the sample file below. It contains four artboards with some fragmented shapes. Just select the gear, the 2, the spiral or the polygon and hit Cmd/Ctrl-J to immediately join the individual segments.


Join command sample file

Canada Pete
Participating Frequently
February 6, 2026

I wasn’t able to open your file, but have attached (or tried to attach) mine. I can do a select all and then a join, but it raises two issues for me. The first is I haven’t yet learned how to isolate the inner objects from the gear teeth; this you can see in all the crossed paths after the global join. I am working on that. The original files are DXFs and seem messy to me; things that you would expect to be joined such as the gear teeth, aren’t. The second issue is even when I select all and do a join, then export to my CNC software, I still get broken paths (even though Ai says they are closed).

Having said this, I suspect that it is pure newbie inexperience in that I don’t know what I am doing yet with Ai, even before I get to my CNC. I think I need to stop posting and just muscle through a little more until I at least know how to identify my problems and the tools I am using by name properly. 

I was able to isolate one set of gears from another file and manually join hundreds of points myself. Now that I know that gear will work in my CNC, I need to learn how to join all at once w/o having other objects in my original file interfere with each other. Not sure if this make s any sense, but I appreciate the audience here.


Pete
Kurt Gold
Community Expert
Community Expert
February 6, 2026

@Kurt Gold @Kurt Gold Thanks for providing the sample file.


As already supposed, your fragmented gear can be joined in one shot by the common Join command. No special tricks, scripts or other actions are required. Just Cmd-J while all teeth are selected.


By the way, you may use the Lasso tool to select (and then lock) the paths inside the teeth. Then you can easilily select the teeth and hit Cmd/Ctrl-J to join them in one whack.


PS: Not sure why you are not able to open my sample file. It is a .zip file that first has to be unzipped to get the Illustrator file. Then you should be able to open the .ai file in Illustrator.

renél80416020
Inspiring
February 3, 2026

Bonjour ​@Canada Pete 

j’espère que le travail est maintenant terminé…

Pour ma part j’ai fait une petite vidéo. (pour voir si c’est possible de la placer ici?)

Non cela n’a pas fonctionné😖

C’était cette image mais en fonctionnement.


renél80416020
Inspiring
February 3, 2026

Bonjour ​@Canada Pete 

j’espère que le travail est maintenant terminé…

Pour ma part j’ai fait une petite vidéo. (pour voir si c’est possible de la placer ici?)

https://dartycloud.dartyserenite.com/home/rest/redirect/i6yyZm

René


renél80416020
Inspiring
January 30, 2026

Si cela peut vous aider, je joins un fichierSVG avec votre profil de denture…

<?xml version="1.0" encoding="utf-8"?>
<!-- Generator: Adobe Illustrator 16.0.0, SVG Export Plug-In . SVG Version: 6.00 Build 0) -->
<!DOCTYPE svg PUBLIC "-//W3C//DTD SVG 1.1//EN" "http://www.w3.org/Graphics/SVG/1.1/DTD/svg11.dtd">
<svg version="1.1" id="Calque_1" xmlns="http://www.w3.org/2000/svg" xmlns:xlink="http://www.w3.org/1999/xlink" x="0px" y="0px"
width="398.168px" height="398.168px" viewBox="0 0 398.168 398.168" enable-background="new 0 0 398.168 398.168"
xml:space="preserve">
<symbol id="dent_01_2_" viewBox="-26.324 -23.482 52.648 46.962">
<g id="dent_01_1_">
<path fill="none" stroke="#E30613" stroke-width="3" stroke-miterlimit="10" d="M26.015-22.014l-0.552,0.116
c-3.348,0.685-6.053,3.136-7.1,6.334c0,0-2.799,11.597-4.021,15.375c-1.352,4.179-6.35,16.373-6.35,16.373
C6.894,19.549,3.729,21.98,0,21.98s-6.894-2.433-7.993-5.796c0,0-4.997-12.194-6.349-16.373
c-1.223-3.778-4.022-15.375-4.022-15.375c-1.046-3.198-3.751-5.649-7.099-6.334l-0.552-0.116"/>
</g>
</symbol>
<g id="Calque_1_1_">
<circle fill="none" stroke="#000000" stroke-miterlimit="10" cx="198.89" cy="199.084" r="125.926"/>
<circle fill="none" stroke="#000000" stroke-miterlimit="10" cx="198.89" cy="199.45" r="145.55"/>
<g id="dent_01" enable-background="new ">
</g>
<g>

<use xlink:href="#dent_01_2_" width="52.648" height="46.962" x="-26.324" y="-23.482" transform="matrix(1 0 0 -1 198.8901 53.8301)" overflow="visible"/>

<use xlink:href="#dent_01_2_" width="52.648" height="46.962" x="-26.324" y="-23.482" transform="matrix(0.9135 -0.4067 -0.4067 -0.9135 139.8101 66.3872)" overflow="visible"/>

<use xlink:href="#dent_01_2_" width="52.648" height="46.962" x="-26.324" y="-23.482" transform="matrix(0.6691 -0.7431 -0.7431 -0.6691 90.9453 101.8892)" overflow="visible"/>

<use xlink:href="#dent_01_2_" width="52.648" height="46.962" x="-26.324" y="-23.482" transform="matrix(0.309 -0.9511 -0.9511 -0.309 60.7446 154.1973)" overflow="visible"/>

<use xlink:href="#dent_01_2_" width="52.648" height="46.962" x="-26.324" y="-23.482" transform="matrix(-0.1045 -0.9945 -0.9945 0.1045 54.4302 214.2656)" overflow="visible"/>

<use xlink:href="#dent_01_2_" width="52.648" height="46.962" x="-26.324" y="-23.482" transform="matrix(-0.5 -0.866 -0.866 0.5 73.0942 271.71)" overflow="visible"/>

<use xlink:href="#dent_01_2_" width="52.648" height="46.962" x="-26.324" y="-23.482" transform="matrix(-0.809 -0.5878 -0.5878 0.809 113.5083 316.5957)" overflow="visible"/>

<use xlink:href="#dent_01_2_" width="52.648" height="46.962" x="-26.324" y="-23.482" transform="matrix(-0.9781 -0.2079 -0.2079 0.9781 168.686 341.1641)" overflow="visible"/>

<use xlink:href="#dent_01_2_" width="52.648" height="46.962" x="-26.324" y="-23.482" transform="matrix(-0.9781 0.2079 0.2079 0.9781 229.0859 341.165)" overflow="visible"/>

<use xlink:href="#dent_01_2_" width="52.648" height="46.962" x="-26.324" y="-23.482" transform="matrix(-0.809 0.5878 0.5878 0.809 284.2656 316.5996)" overflow="visible"/>

<use xlink:href="#dent_01_2_" width="52.648" height="46.962" x="-26.324" y="-23.482" transform="matrix(-0.5 0.866 0.866 0.5 324.6807 271.7139)" overflow="visible"/>

<use xlink:href="#dent_01_2_" width="52.648" height="46.962" x="-26.324" y="-23.482" transform="matrix(-0.1045 0.9945 0.9945 0.1045 343.3467 214.2715)" overflow="visible"/>

<use xlink:href="#dent_01_2_" width="52.648" height="46.962" x="-26.324" y="-23.482" transform="matrix(0.309 0.9511 0.9511 -0.309 337.0342 154.2017)" overflow="visible"/>

<use xlink:href="#dent_01_2_" width="52.648" height="46.962" x="-26.324" y="-23.482" transform="matrix(0.6691 0.7431 0.7431 -0.6691 306.835 101.8931)" overflow="visible"/>

<use xlink:href="#dent_01_2_" width="52.648" height="46.962" x="-26.324" y="-23.482" transform="matrix(0.9135 0.4067 0.4067 -0.9135 257.9717 66.3901)" overflow="visible"/>
</g>
</g>
<g id="Info_croix">
</g>
</svg>

.René
 

renél80416020
Inspiring
January 29, 2026

Bonjour ​@Friendly_partner3281 

J’utiliserais une autre approche, reproduire une dent et la dupliquer  en rotation.

Dans l’exemple, j’ai utilisé un symbole placé autour du cercle de base avec un de mes scripts qui n’a pas été conçu pour des dents d’engrenage, c’est une première pour moi.

Pour avoir un tracé il suffit de rompre le lien avec le symbole (le groupe) et de faire un Joindre.

Pour la grande roue dentée, j’ai utilisé 72 instances de symbole à l’échelle 1:1. (on sélectionne les 72 instances et le cercle de base qui doit être placé au premier plan).

Remarque: J’étais un peu pressé, les cercles primitifs devraient êtres tangents...

4112.79/57.15 = 72 dents.

René


Canada Pete
Participating Frequently
January 30, 2026

This is my first go at wooden clock gears, which I recently discovered are cyclodial, not involute. Thus, harder to design. I am no where near your level of Ai design. My DXF files come from the author of a popular clock book, and are actually designed for scroll saw cutting, not CNC. I am attempting to convert the DXFs to files that will work on my CNC router. In others words, I am not yet skilled enough to do the design myself, only tweak and cleanup his DXF files in hope that they will work. 😀

Pete
Kurt Gold
Community Expert
Community Expert
January 29, 2026

Friendly Partner,


you already got some very good approaches, but perhaps you may want to provide the original Illustrator file (with the unjoined paths).


There may be some other promising ways to join things.

Jacob Bugge
Community Expert
Community Expert
January 29, 2026

Friendly partner,


I believe you can do it with one click after selection for each full set to join (outer teeth, inner rim/spokes, holes, and so on), with the Join Reasonably script in this free set of scripts by 佐藤浩之 (Satō Hiroyuki), in either collection here or here,


https://github.com/shspage/illustrator-scripts/tree/master/etc


https://shanfan.github.io/Illustrator-Scripts-Archive/


Celine_Ayt
Participating Frequently
January 29, 2026

If Ctrl + J doesn’t work to join two anchor points, it’s usually because they’re not perfectly aligned.
In that case, first use Ctrl + Alt + J to average the points, and then Ctrl + J will work.

cottonattire
Participant
January 29, 2026

It sounds like you’re running into the limitations of Illustrator’s default path-joining tools. For situations like yours with many small paths, one approach is to use the “Join” and “Average” workflow with Smart Guides:

  1. Turn on Smart Guides (View > Smart Guides) to help snap endpoints accurately.

  2. Select multiple paths at once and use Object > Path > Join (Cmd/Ctrl + J). Illustrator will only join endpoints that are close together, so you might need to clean up very small gaps first.

  3. For complex shapes, consider using Pathfinder > Unite to merge overlapping shapes into a single compound path — though this can slightly alter the outline.

  4. Another option is to use a plugin or script that automatically merges all connected paths in a selection. There are several free scripts available for Illustrator that can join open paths based on proximity.

It’s a bit similar to how precision matters in other industries too. For example, a suture manufacturer like SutureKit.us emphasizes consistent and accurate joining of materials for reliable results — the principle of precision applies whether you’re working with paths in Illustrator or sutures in medical kits!

m1b
Community Expert
Community Expert
January 29, 2026

Hi ​@Friendly_partner3281 I have written a script that helps with this task. You can read about it on my GitHub repo or download the script directly. Let me know if it helps.

– Mark


Canada Pete
Participating Frequently
January 29, 2026

Your documentation on GitHub is top notch. 😀 I used to work as a technical writer and love when people can actually like a user. Sadly, it’s a lost art. 

Pete
m1b
Community Expert
Community Expert
January 30, 2026

Thanks Pete, that’s nice to hear! All the best with your project.

– Mark

Bobby HendersonCommunity ExpertCorrect answer
Community Expert
January 29, 2026

There’s no simple easy way to join a bunch of line segments on an “exploded" path shape together in just one or two clicks, unless you have a third party plugin like Vector First Aid (and its Rejoin Paths feature). 

Usually in this kind of situation I’ll just use the Direct Selection tool to select line segments to see where the path is broken part. Then I would use the Ctrl+J keyboard shortcut to join an anchor point on the selected path to the next adjacent path that didn’t show up in the selection. The process sounds complicated, but it can actually go pretty quick when using the keyboard shortcuts.

Canada Pete
Participating Frequently
January 29, 2026

OK. Thanks for responding. I feel better at least knowing I wasn’t missing something obvious. I suppose I shouldn’t complain, as cleanup doing a trace would likely be worse. Thanks Bobby. I’ll start a fresh pot of coffee in the morning and get to it. Cheers.

Pete
Community Expert
January 29, 2026

If you’re not already familiar with the keyboard shortcuts for hand-panning the view of the artwork (spacebar) and zooming the view (Ctrl+Spacebar and Ctrl+Alt+Spacebar) those shortcuts will help made fiddly path editing tasks go much faster. The less you have to mouse back and forth to a tool bar the better.