Inspiring
April 19, 2018
Answered

Illustrator CS 6: Can't add fill to Gradient mesh

  • April 19, 2018
  • 2 replies
  • 4093 views

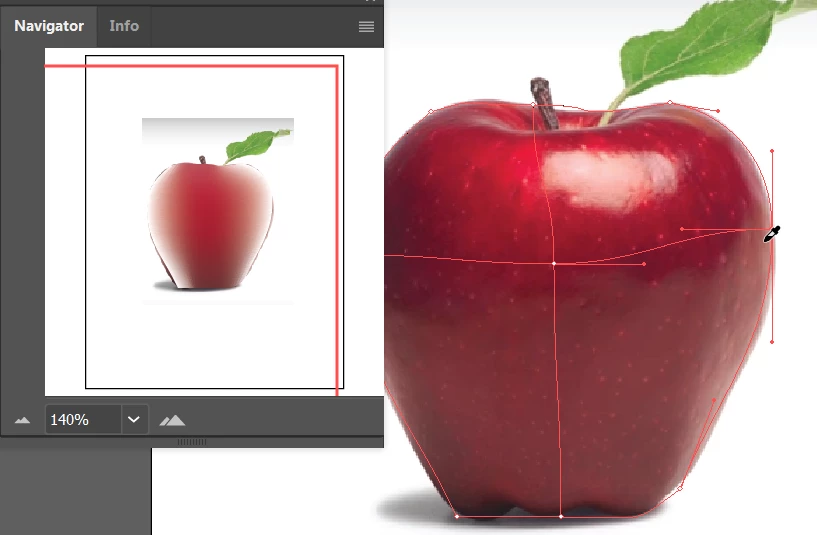
I've got a shape I created with the pen tool and then I added a mesh to it. My problem is; when I try to ad color to the mesh points nothing happens.

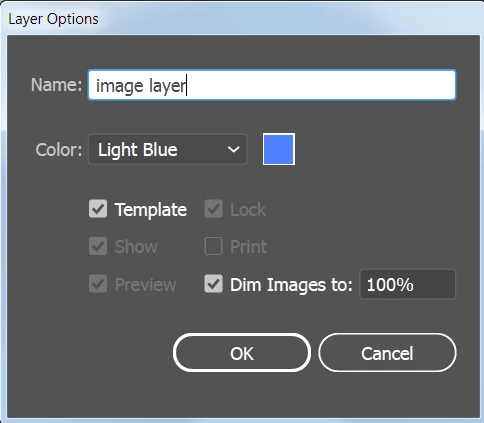
When I created the mesh I set the opacity of each point to "0" so I could see my sample underneath. So when I'm trying to color each point I first turn the opacity to 100% an then click on the color swatch but I get nothing. I've checked everything I can think of. All the layers are turned on , None are locked, I selected the layer that has the mesh. I know when I've selected a point because it turns solid leaving all others hollow. But I'm unable to add color to anything in the mesh.

Any thoughts about what I'm missing.

    This topic has been closed for replies.
    Correct answer barbara_a7746676

    You've discovered a limitation of the Gradient Mesh. If you make the whole mesh object zero percent transparency, each individual point in the mesh will be zero transparency. When you click on one individual point in the mesh, it will display as 100% opacity in the Transparency panel, even though you made all points zero transparency.

    Of course, knowing this doesn't solve the problem of trying to see an image below the mesh so that you can put the correct colors in the mesh.

    This is a workaround, but it takes some getting used to because you'll need to keep your eye on both the image and a panel.

    Place the image on a layer, double-click the layer and change it to a template layer with 100% dim.

    Make a new layer above the template layer.

    Choose View > Outline. Now you can see the image, but when you apply colors to the mesh, they won't be visible.

    To get around that, choose Window > Navigator. The Navigator panel will display the colors in the gradient mesh.

    To speed things up, you can click on the Direct Selection tool. Then click on the Eyedropper tool. Whenever you hold down Ctrl (Windows) or Command (Mac) you will temporarily enable the Direct Selection tool. That will allow you to quickly switch from Direction Selection and Eyedropper.

    Select an individual point on the mesh, then hold down Ctrl or Cmd to get the Eyedropper and click on a nearby color on the image. Keep repeating this process.

    2 replies

    barbara_a7746676
    Community Expert
    barbara_a7746676Community ExpertCorrect answer
    Community Expert
    April 20, 2018

    You've discovered a limitation of the Gradient Mesh. If you make the whole mesh object zero percent transparency, each individual point in the mesh will be zero transparency. When you click on one individual point in the mesh, it will display as 100% opacity in the Transparency panel, even though you made all points zero transparency.

    Of course, knowing this doesn't solve the problem of trying to see an image below the mesh so that you can put the correct colors in the mesh.

    This is a workaround, but it takes some getting used to because you'll need to keep your eye on both the image and a panel.

    Place the image on a layer, double-click the layer and change it to a template layer with 100% dim.

    Make a new layer above the template layer.

    Choose View > Outline. Now you can see the image, but when you apply colors to the mesh, they won't be visible.

    To get around that, choose Window > Navigator. The Navigator panel will display the colors in the gradient mesh.

    To speed things up, you can click on the Direct Selection tool. Then click on the Eyedropper tool. Whenever you hold down Ctrl (Windows) or Command (Mac) you will temporarily enable the Direct Selection tool. That will allow you to quickly switch from Direction Selection and Eyedropper.

    Select an individual point on the mesh, then hold down Ctrl or Cmd to get the Eyedropper and click on a nearby color on the image. Keep repeating this process.

    ceyhun_akgun
    Legend
    April 20, 2018

    My suggestion to you: We assign the same image to two different layers on top of each other. The top layer is the visual map you get. For you to see what you need. When you use the mesh function, it is not possible to see the bottom image in detail.

    Graphic Designer Educator / PrePress Consultant
    sharp_hands16B8
    Community Expert
    Community Expert
    April 19, 2018

    Does the appearance panel, when you have the object selected, have the opacity/transparency property set to 0% when you select it? Versus selecting each individual point. I'm wondering if there is a conflict between two appearance properties in this instance.