Known Participant
May 14, 2023
Question

Need Help Converting Image from Raster to Vector Cutting

  • May 14, 2023
  • 2 replies
  • 1136 views

Hello, I have attached two different versions of my company's logo, one as a PDF and one as a TIFF.


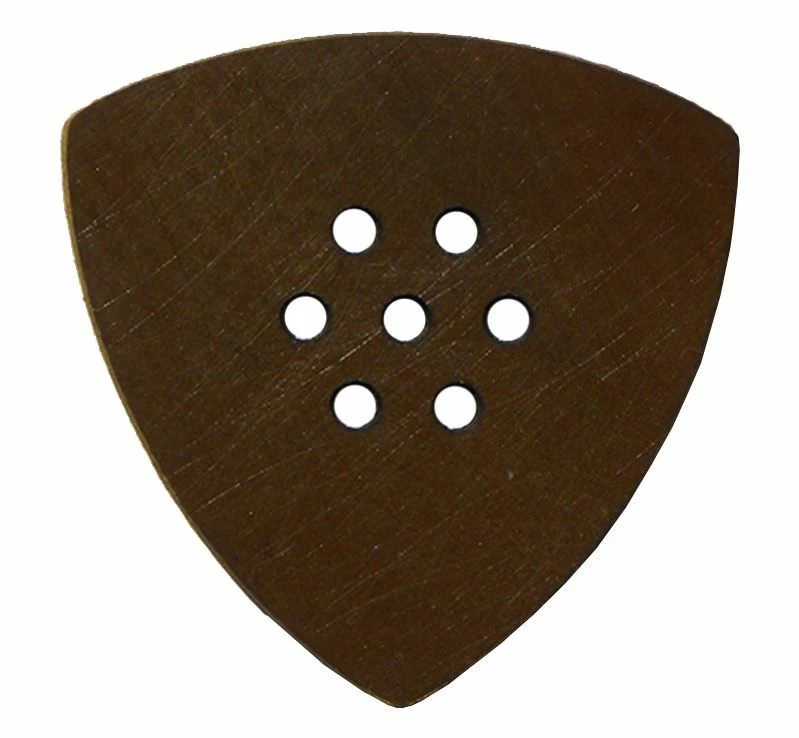
I own a company that manufactures high-end guitar picks. Normally we engrave our logo onto the surface of the pick. However, I am trying to do something different with this pick model

Below is a model that is very popular. The holes are known as "grip holes'; they increase grip so the guitarist has more control over the action of the pick. These holes machine very easily with a laser cutter


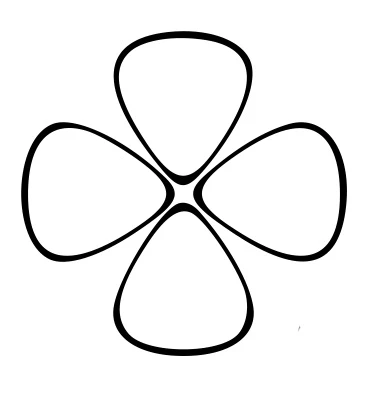
What I want to do is to remove the hole in the center and replace it with your Shamrock logo. I want to cut it, not engrave it. The other holes will remain the same, but the one in the center will tell customers that this is our product. 

No matter what I do, when the Shamrock is loaded and opened into AI it is formatted for engraving (raster), and no matter what I do I cannot convert it to Vector (cutting) mode.


I assume this is very easy to do for someone familiar with AI. Any ideas?


Thanks Very Much.

This topic has been closed for replies.

2 replies

Jacob Bugge
Community Expert
Community Expert
May 14, 2023

Scott,


As I remember it, you have a vector version of the Shamrock, ready to adapt.


However, using it as it is will make it extremely fragile and likely to break very soon, so I would suggest your combining it with a smaller version of the centre hole, and adapting the two parts mutually and in relation to the other grip holes; maybe something like the image, based on the inner (white) Shamrock shapes to maximize the distance between the leaf parts, here shown at 1.4 times the original grip hole size and with the grip hole reduced to 0.6 times its original size in an attempt to weigh appearance against durability; Pathfinder>Unite is your friend.


Scott5F8FAuthor
Known Participant
May 25, 2023

I just wanted to get back to you and thank you for your idea. You make a good point on the fragility of the corners, something I hadn't thought about. I have another design idea that might work. I'll work on it and post it. 


Thanks very much, Jacob. 


Jacob, would you be interested on helping me a bit on some of these designs, for some compensation? I don't have a ton of budget, but time is money, and this would save me time. I'll drop you a PM. Thanks again.

Jacob Bugge
Community Expert
Community Expert
May 30, 2023

For my part you are welcome, Scott. By the way, I also thought that thin spiky parts would be tough on the fingers.


I for one look forward to our seeing your design.

Monika Gause
Community Expert
Community Expert
May 14, 2023

Take the pen tool and draw the logo.

You could auto trace it, but the quality might not be sufficient for cutting.

c.pfaffenbichler
Community Expert
Community Expert
May 14, 2023

To add to that: It should suffice to do half of the pick-shape and then use Effect > Distort & Transform > Transform to generate the »mirror« and then the three other pieces off of that. (Though it may be necessary to expand and merge the shapes in the end.) 


I wonder about the size and the stroke, though. 

I assume the Stroke is irrelevant and the outer line should define the hole? 

Community Expert
May 14, 2023

It depends on the software doing the cutting. Some applications prefer vector objects with a flat, uniform fill and no line strokes. The routing table software my workplace uses such artwork. There are others that want a cut line using objects that have no fill and a small line stroke. These setups often call for the cut line to be given a custom spot color and color name (such as "CutContour") to use in print and cut jobs.