Participant
July 30, 2022
Question

Problems with Offset Path

  • July 30, 2022
  • 3 replies
  • 2421 views

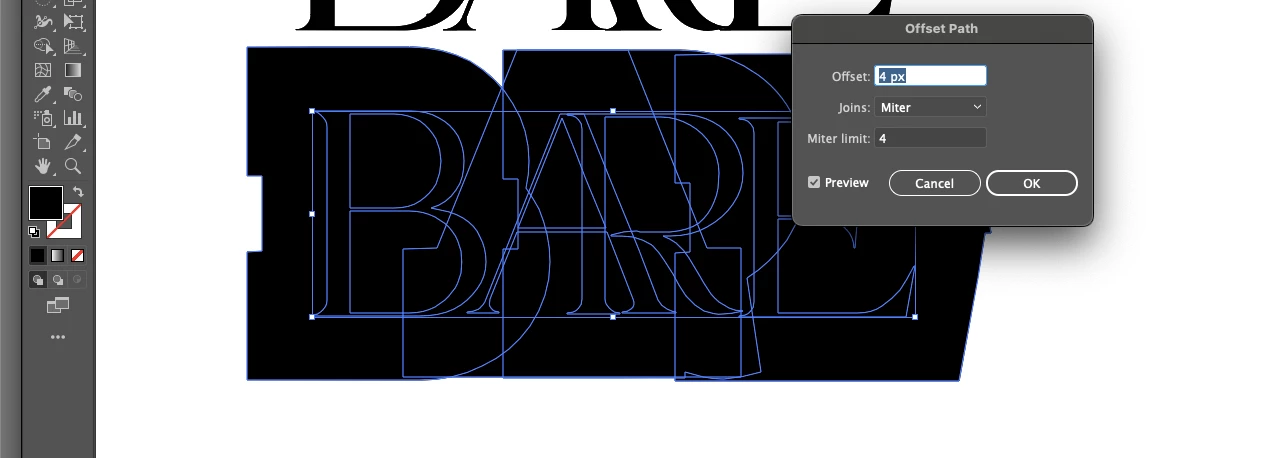
So I have used offset path in order to overlap and cut out text before, but the past couple of times, its been giving me problems. No matter how big I make my offset, it turns it into a big blob. I will post a picture of what I am trying to do and then whathappens when I try to use the offset path function.


So I made outlines and ungrouped this text, then I smushed the A and the AR together.


I want to do the cut outs pictured below but its not working! (I just use procreate of my ipad to quickly show what I want the end result to be.)


When I choose offset path, it just turns it into a big blog. Ive used this technique before with no problems! What am I doing wrong???

This topic has been closed for replies.

3 replies

Jacob Bugge
Community Expert
Community Expert
July 30, 2022

Hannah,


I agree with Theresa that the letters must by wee, and it will be better to work at a much larger size.


Apart from that, the offset is far too large to avoid the big blob.


To look like the image with the desired appearance, the offset must be about 1/40 of the (approximate) letter height.


However, as I (mis)understand it, offsetting is never going to work as desired because it will give unwanted cutouts: the bar of the A will also make apparent cutouts from the stem of the R, and the (right) stroke of the A will give a cutout from the leg of the R.


If you wish to only have apparent cutout from the stem of the R, you can do it as follows, with the A above the R (in the stacking order, as can be seen in the expanded Layer in the Layers panel), Smart Guides being your friends helping you to snap, images shown with a fair font at 72pt on a yellow background, and a Stroke Weight of 2pt.


You can use Helpx search to see more about the terms and ways at the bottom.


0) Select the A and move it above the R in the expanded Layer in the Layers panel, then switch from black fill/nostroke to nofill/red stroke with a Stroke Weight that is twice the desired cutout, this will also give an apparent cutout from the stroke of the A but only temporarily; 2pt Stroke Weight shown in the images, the red stroke colour is chosen so you can see what you are doing;

1) With the Line Segment Tool ClickDrag from the top right corner Anchor Point of the (right) stroke of the A (Smart Guides say anchor when you are within snapping distance) and along the right side of the stroke down past the stem of the R (Smart Guides say path when you are within snapping distance) and let go, then ;

2) Repeat 1) for the left side of the, only between two points on the left side on either side of the stem of the R (Smart Guides say path when you are within snapping distance);

3) Group the two red stroked paths from 1) and 2) and drag the Group down in the Layers panel between the A and the R;

4) Switch from red to white stroke colour, then ShiftClick the R, then in the Transparency panel click Make (Opacity) Mask with Invert Mask ticked.


This ought to knockout/hide the desired parts of the stem of the R.


Click/RightClick to see in full, Click again to get closer, Click Here to see in Chrome 


Edit: Addition of the suggestion I had in mind when I had to leave for a while.


Edit edit: Elaboration of steps and addition of images and Helpx search.


You can use Helpx search to see more about the terms and ways here:


This link is about the Layers panel,

https://helpx.adobe.com/search-results.html?q=layers+panel+illustrator&scope=%5B%22helpx%22%5D&subscope=%5B%5D&limit=10&start_index=0&sort_orderby=relevancy&sort_order=desc&post_facet_filters=%7B%22applicable_products%22%3A%5B%5D%7D


and the first entry is this,

https://helpx.adobe.com/illustrator/using/layers.html


This link is about the Line Segment Tool,

https://helpx.adobe.com/search-results.html?q=line+segment+tool+illustrator&scope=%5B%22helpx%22%5D&subscope=%5B%5D&limit=10&start_index=0&sort_orderby=relevancy&sort_order=desc&post_facet_filters=%7B%22applicable_products%22%3A%5B%5D%7D


and the first entry is this,

https://helpx.adobe.com/illustrator/using/drawing-simple-lines-shapes.html


Participant
July 30, 2022

Yes I was working with too small of an artboard! See my comment above for an additional question.

Jacob Bugge
Community Expert
Community Expert
July 30, 2022

Hannah,


I had to leave for a while and posted before suggesting the way I had in mind, then went back and added my suggestion, editing the post.


Taylor5C60
Participating Frequently
July 30, 2022

Seperate each letter in a layer and offset individually. 

Taylor5C60
Participating Frequently
July 30, 2022

Also try grouping them first .

Theresa J
Community Expert
Community Expert
July 30, 2022

If a 4px offset is that large your artboard and text is probably very small. What happens if you scale the text up to a much larger size, then try a 4px offset?

Participant
July 30, 2022

yes! This worked. Thank you! I was working with too small of an artboard. Is there a better way to to do this though? There are still certain parts that I want to cut out that arent popping up in the off set. The erase tool doesnt end up being precise enough.


Theresa J
Community Expert
Community Expert
July 30, 2022

You want to use the Shape Builder tool for this, not the eraser.