MysticKnight
Known Participant
October 11, 2019
Question

Simple Mask Allows Part of the Bottom Image to Show Through

  • October 11, 2019
  • 9 replies
  • 2335 views

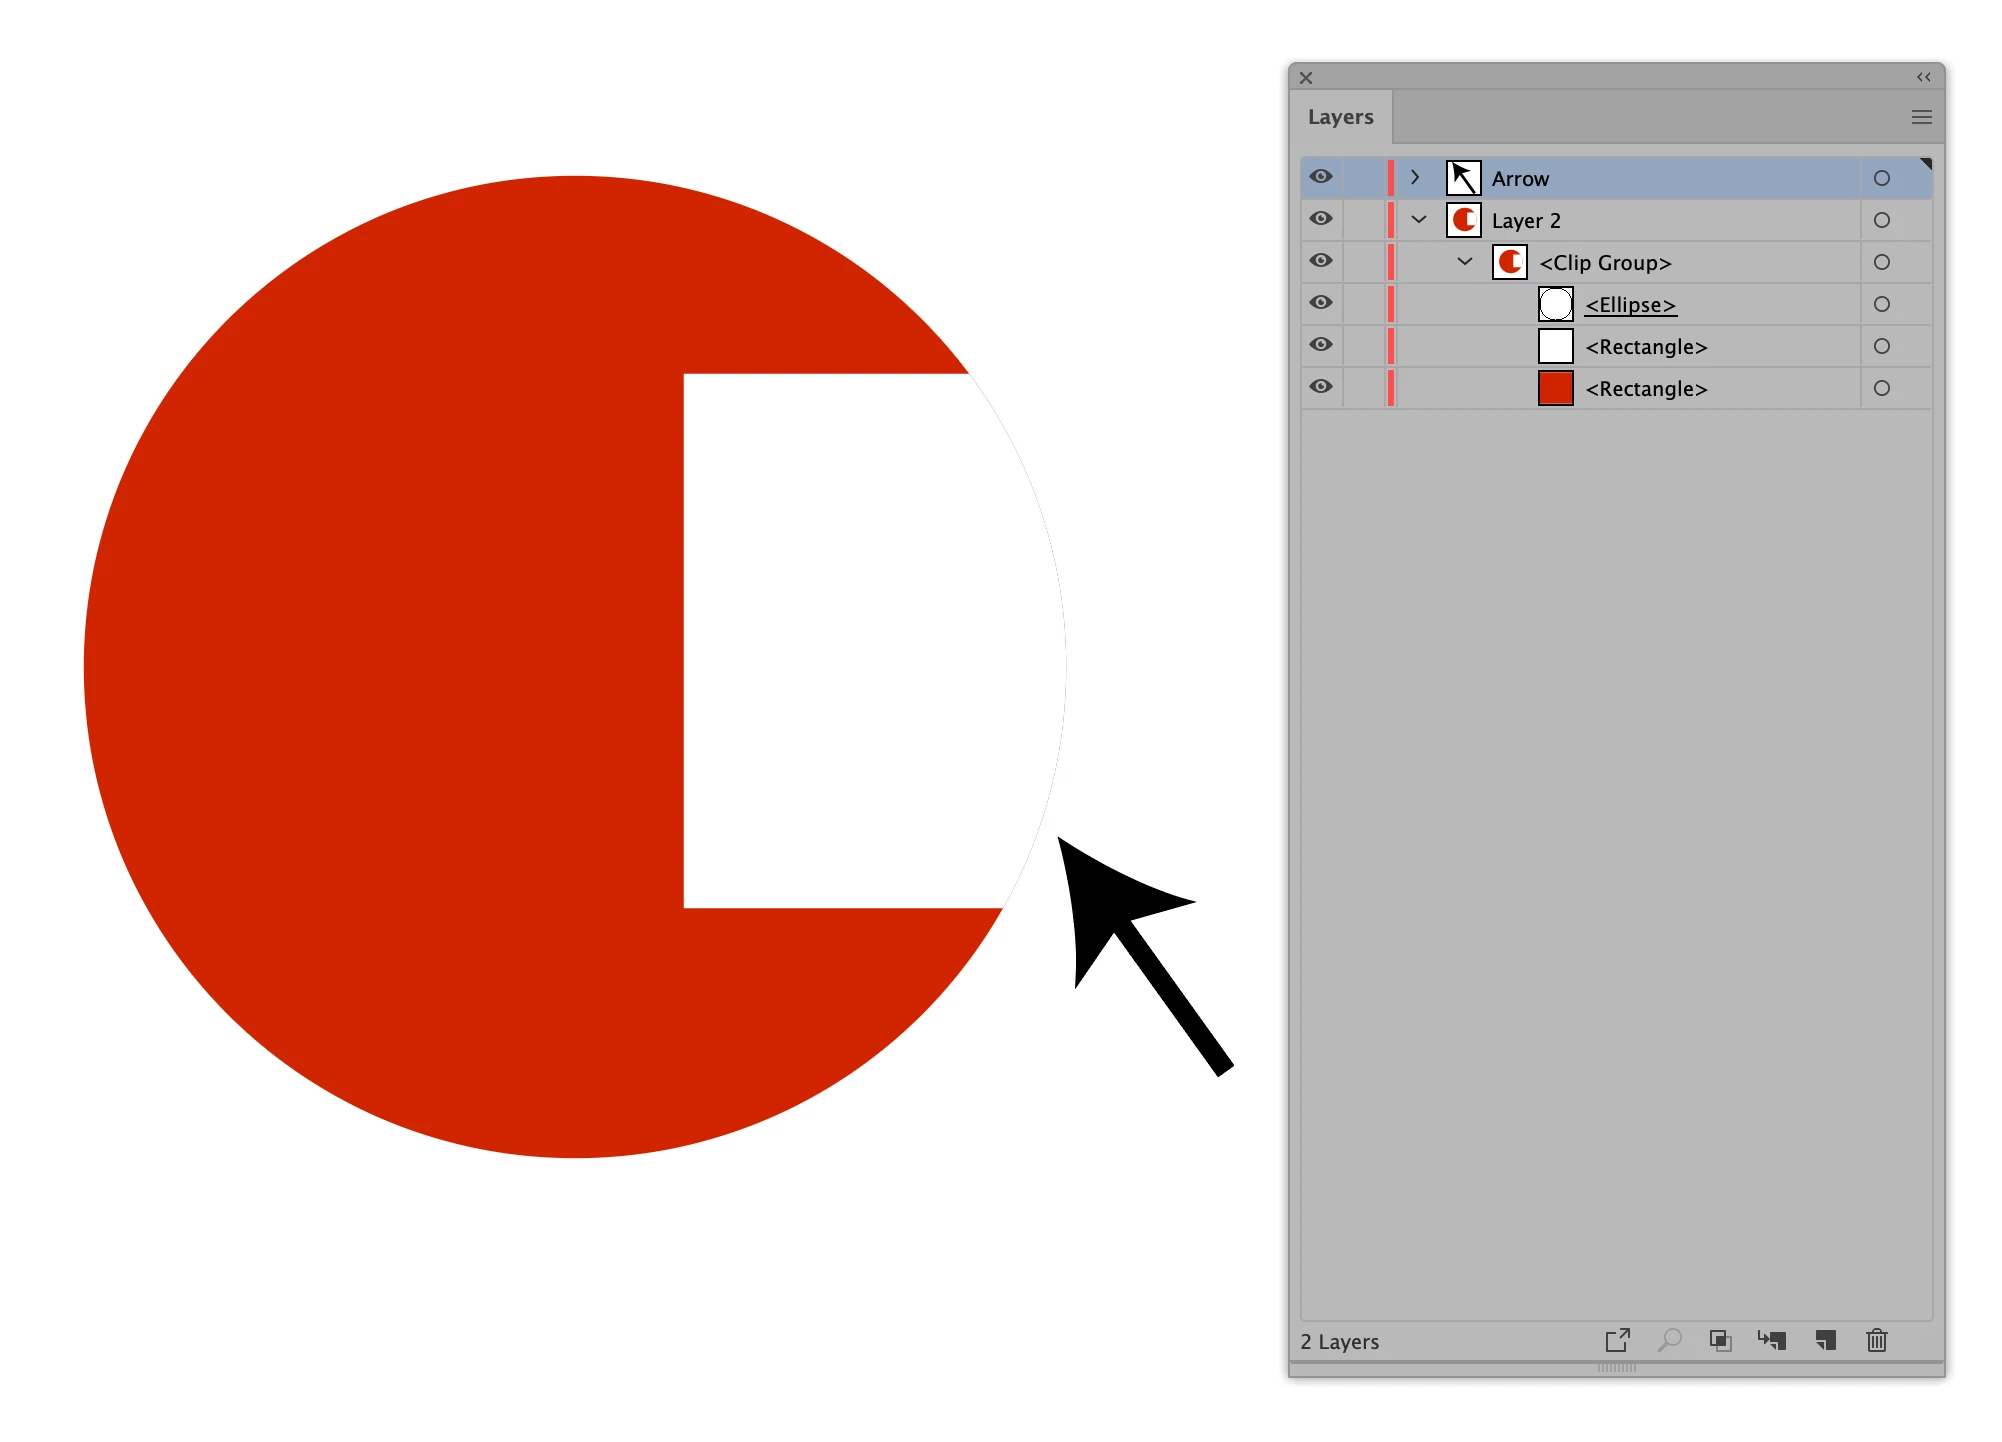
This is a simple image that consists of 2 rectangles, one red and one white. I applied an Ellipse mask to the 2 rectangles and it's allowing some of the red rectangle at the bottom to show on the right side. You can see the thin line around the right side.


If the mask is masking both rectangles and the white rectangle is on top, why is any of the red rectangle from the bottom showing through and is there anything I can do about it?


See image...


    This topic has been closed for replies.

    9 replies

    Ton Frederiks
    Community Expert
    Community Expert
    October 16, 2019

    "If you want, you can call it a display issue or anything else you want to call it, but the fact remains when it exports the image, the fringe red line is visible."

    That seems logical. A vector object has to be rasterised to display it on the pixels of a monitor screen and to export it as an image. If there is an issue with the rasterization, it may show also on export.

    In your case an opacity mask does not have that problem.

    Legend
    October 16, 2019

    Definitively it's just a display effect or issue. Try to zoom in or out and the red line keeps its width. Or export to PDF and experiment something similar.

    As Ton Frederiks points as precisely, it is an anti-aliasing rendering problem, on the display

    MysticKnight
    Known Participant
    October 16, 2019
    If you want, you can call it a display issue or anything else you want to call it, but the fact remains when it exports the image, the fringe red line is visible.
    Inspiring
    October 12, 2019

    Start again. Build the peices and then use the top object (ellipse) to create the clipping mask. Everything in that layer will clip to the mask. If you do not want it part of the masked items, put it into another layer. The process is rather simple. The red object is there since you put it there. I assumed you did not want the red object but the logo is clearly red so red has to be there hence I put it on the mask. Sometimes starting over and rebuilding clean is the best way to fix the problem. (I have done the same many times in my life)

    MysticKnight
    Known Participant
    October 12, 2019

    ANSWER: What I thought was the answer, rebuiding Illustrator preferences, was not.


    Doing more research again.

    MysticKnight
    Known Participant
    October 12, 2019

    All this started when I couldn't get the ellipse to mask my new logo that I was creating. I'm now using that new logo as my icon for the Adobe support forums. 😀

    Ton Frederiks
    Community Expert
    Community Expert
    October 11, 2019

    If you want to keep everything editable, you could try an Opacity mask.

    Group everything below your circle.

    Select the group and the white circle and click Make Mask in the Transparency panel.

    MysticKnight
    Known Participant
    October 12, 2019
    I think an opacity mask is the same thing as a clipping mask except that you can control the opacity (hence the name). I don't need to control the opacity in this case.
    Monika Gause
    Community Expert
    Community Expert
    October 12, 2019
    Opacity masks control the visibility by using opacity. In some cases they are easier to handle than clipping masks. the image you show doesn't include the actual complexity of your artwork. And since it looks like you can't get clipping masks to work then why don't you at least try opacity masks?
    Ton Frederiks
    Community Expert
    Community Expert
    October 11, 2019

    Did you try Pathfinder Merge?

    MysticKnight
    Known Participant
    October 11, 2019
    No, but I don't want to merge paths. I have 10 layers that I want to be contained by a circle. I thought that's exactly what a clipping mask was for.
    MysticKnight
    Known Participant
    October 11, 2019
    Does anyone know if the clipping mask is working the way it should in my original example?
    Inspiring
    October 11, 2019

    Ok. How about if you do not want the red object on the bottom. Make the Clipping mask red. In this example I used the Draw Inside options. The Clipping mask can have properties like a fill and a stroke. The stroke always sits on top of all other properties and the fill is behind all other shapes. 


    Draw Inside Option:

    This makes a clipping mask group (not a clipping mask layer)

    1. Select the ellipse. (Mine has a color fill and a color stroke)

    2. Select the Draw Inside button in the tool panel

    3. Deselect the selection.

    4. Change the properties of the next shape to be drawn and draw the shape. The new shape will clip to the Draw inside shape. 


    Changing properties of a Clipping Mask after it is created:

    If you use the Make/Release Clipping mask option   in the layers panel or use Object>Clipping Mask> Make, you will make a clipping mask but without properties. You can always choose the clipping mask and add properties back in after.

    1. Select just the Clipping mask: Target or select it with the Group Selection tool.

    2. Change the properties. (Fill and Stroke)

    The fill can be covered up by other fills and strokes inside the clipping path but the stroke on the clipping path is above all other properties.


    Does this sound like more what you are trying to do?

    MysticKnight
    Known Participant
    October 11, 2019

    I'll experiment with it, but it sure feels like a band-aid and I'm afraid of covering up things that I want displayed.

    For instance, if I set that mask to a circle, that means I want everything in that circle displayed. If I have to add a stroke to cover the line that should have been masked already, I'm afraid it will cover parts that shouldn't be covered.

    Inspiring
    October 11, 2019

    The image shown was created was two rectangles of two different colors (red and white), with a elliptical clipping path to create the final object. 


    If you are creating a logo, then you probably do not need a clipping mask. Use the Pathfinder panel instead. You can use just the ellipse and one rectangle to accomplish the same goal. If you keep the rectangle on top then select both the ellipse and rectangle, you can use the Minus Front button from the Pathfinder panel which in this case would create a new simple path. If you wanted more freedom, hold the option/alt key when you choose the button. This will create a clipping mask which let's you change the object more easily after the fact since the two original shapes are there in the object.

    MysticKnight
    Known Participant
    October 11, 2019
    First Katie, your help is amazing. I still need to digest it to figure out if it solves my problem, but your effort alone is pretty amazing.
    MysticKnight
    Known Participant
    October 11, 2019
    I don't think this is going to solve my problem only because the simple version that I uploaded is only to make it easy to describe. When I first ran into the problem, it was with a file that has many layers that need to be masked by the ellipse. I'll still experiment more with your suggestion.
    Ton Frederiks
    Community Expert
    Community Expert
    October 11, 2019

    I see what you mean.

    Looks like an anti-aliasing rendering problem.

    Pathfinder Merge or Export as an image with Art Optimized seems to get rid of it.

    MysticKnight
    Known Participant
    October 11, 2019

    But the white image is on top, the red image shouldn't even be part of the equation.

    Inspiring
    October 11, 2019
    The red rectangle is there to make the logo red… I believe. And the white rectangle is there to make it look like it is cutout. But it is not hence, I suggested another way! Feel free to connect once you digest it all.