Inspiring
July 26, 2018
Answered

Adjustement Layer

  • July 26, 2018
  • 8 replies
  • 1103 views

I've been trying to teach myself Luminosity Adjustment Layers, with some success. As you may have seen on another post.

I've hit a slight problem. I hope you can follow this.

When I select RGB in Channels (Ctrl + Left click) I get the dancing ants showing my selection, as it should.

Then save selection as a channel.

Then select that channel with Ctrl + Left click.

Then I select 'Create new adjustment layer' at the bottom. From this I select the option 'Curves'.

When I select 'curves' from the list, the dancing ants (My selection) is removed and the whole photo is selected. Any adjustemnt then adjusts everything and not just my selection.

Any help folks?
    This topic has been closed for replies.
    Correct answer Mike_Gondek10189183

    If you losing your selection, you may just not be releasing CTRL for the 2nd click. To make a luminosity mask is easy with only 2 steps

    1) Ctrl Click on a channel preview to select by that channels luminosity

    2) Release Ctrl and click to add a new curves adjustment layer  A mask is added per your current selection to your newly created curves adjustment layer.

    8 replies

    BigDingusAuthor
    Inspiring
    July 26, 2018

    Having now downloaded and installed a fresh install. PS is now working as advertised.

    When I follow the videos everything looks the same on my PS as it does online.

    Thanks to everyone for helping.

    BigDingusAuthor
    Inspiring
    July 26, 2018

    Mike, I understand your fustration. I'm feeling it too.

    I followed the link you gave. Keystroke by keystroke. Although with a strong accent he gave a really good example.

    However, even though I did it exactly as he did, my PS didn't behave as his did.

    I'd be happy with ANY mask working.

    I decided to remove and reinstall PS and try it again.

    Mike_Gondek10189183
    Community Expert
    Community Expert
    July 26, 2018

    Glad you got this working. Yes Nemanja has strong accent but his Photoshop is very good.

    BigDingusAuthor
    Inspiring
    July 26, 2018

    Mike I did as you said, but again the new mask isn't as per my selection. It selects the whole image.

    My selection disappears.

    c.pfaffenbichler
    Community Expert
    Community Expert
    July 26, 2018

    What are you talking about?

    The Layer Mask (Curves 1) and the saved Channel (Alpha 1) look pretty much identical.

    BigDingusAuthor
    Inspiring
    July 26, 2018

    It’s at this point it all goes silly.

    When I now make an adjustment using the curves it’s not just my selected part of the image that gets adjusted but the whole image.

    BigDingusAuthor
    Inspiring
    July 26, 2018

    Just a quick reply before I try Mike's suggestion.

    Barb.......Quote "You found my cow! He always makes me laugh ...  " Unquote.............. HE..... COW.

    D Fosse
    Community Expert
    Community Expert
    July 26, 2018

    Mike's way is the way to do it. 2 steps only.

    Just to avoid further confusion here: The marching ants just shows the 50% boundary. That's not the selection. The selection is a continuous-tone image, the lighter, the more selected. That selection is identical to the L channel in a Lab version of the image.

    Mike_Gondek10189183
    Community Expert
    Mike_Gondek10189183Community ExpertCorrect answer
    Community Expert
    July 26, 2018

    If you losing your selection, you may just not be releasing CTRL for the 2nd click. To make a luminosity mask is easy with only 2 steps

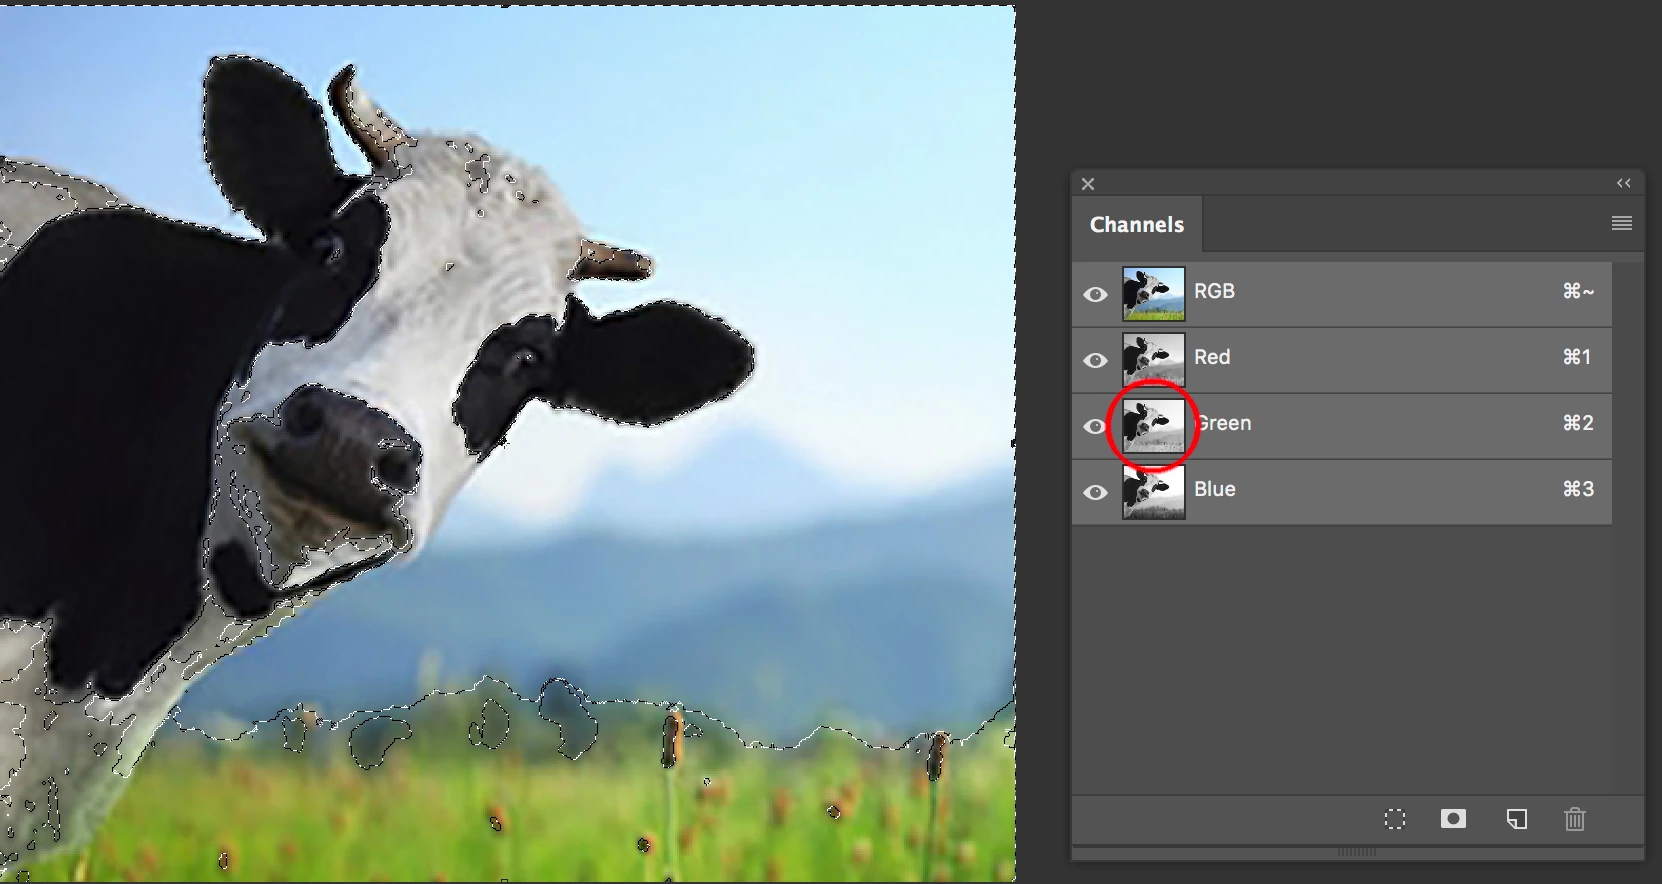
    1) Ctrl Click on a channel preview to select by that channels luminosity

    2) Release Ctrl and click to add a new curves adjustment layer  A mask is added per your current selection to your newly created curves adjustment layer.

    BigDingusAuthor
    Inspiring
    July 26, 2018

    Barb, many thanks. Such an easy way to show me. I'll do the same and let you see my results. Click by click.

    I got a similar image to the one you used.

    Notice my icon doesn't show as black and white as yours does. This is before I even select curves.

    Also notice the marching ants are all over my image. (Different image quality)

    Barb Binder
    Community Expert
    Community Expert
    July 26, 2018

    You found my cow! He always makes me laugh.

    Ok, back to work...

    I began with a "good" cow selection—I started with the Quick Selection tool, and then used Select and Mask to (quickly) refine the edge. Since selecting the cow isn't part of your question, keep it simple. Just add a rectangular or elliptical selection as your starting point, then continue from there.

    ~Barb

    ~Barb at Rocky Mountain Training
    Barb Binder
    Community Expert
    Community Expert
    July 26, 2018

    Hi BigDingus:

    I keystroked this for you:

    1. When I select RGB in Channels (Ctrl + Left click) I get the dancing ants showing my selection, as it should.
      I have a selection—marching ants visible. (OK, not so visible in the screen shot, but they are visible on my screen). I have the RGB composite view selected.
    2. Then save selection as a channel.
      I saved the selection as "Cow".
    3. Then select that channel with Ctrl + Left click.
      If you click the channel you will load it for editing. Skip this step and move on to step 4.


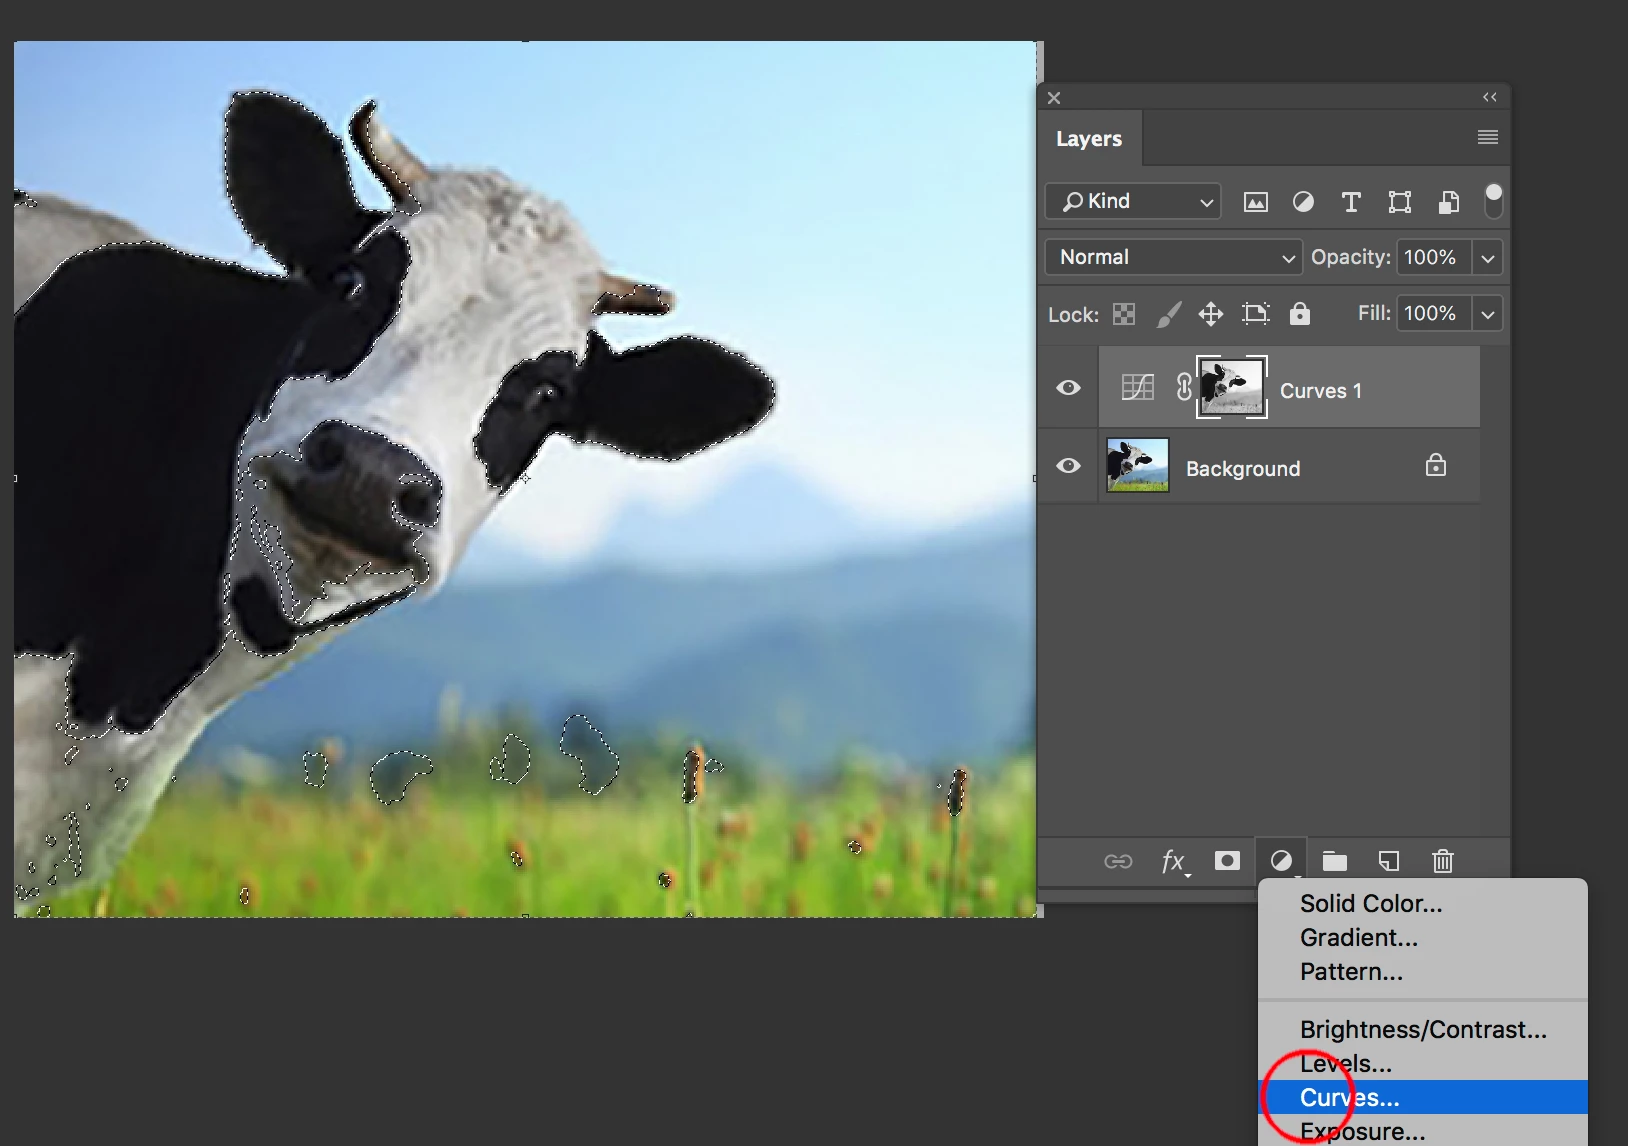
    4. Then I select 'Create new adjustment layer' at the bottom. From this I select the option 'Curves'.
      Back in the RGB composite view, select Curves from the Adjustment button at the bottom of the Layers panel.
    5. When I select 'curves' from the list, the dancing ants (My selection) is removed and the whole photo is selected. Any adjustemnt then adjusts everything and not just my selection.
      At this point the marching ants will disappear, and a new adjustment layer with a layer mask that represents the original marching ants selection will appear above the selected layer. Adjust the curve in the Properties panel, and the mask ensures that it targets the original selection, and not the entire image.


    ~Barb

    ~Barb at Rocky Mountain Training
    c.pfaffenbichler
    Community Expert
    Community Expert
    July 26, 2018

    Please post a screenshot including all pertinent Panels.

    Do the saved Channel and the newly created Layer Mask of the Curves Layer look identical or not?