January 21, 2019
Answered

Another, but more specific, Color Management question

  • January 21, 2019
  • 2 replies
  • 1308 views

I know that Color Management has been done quite a bit in here and on the net as I've read a number of posts and threads, and although I think I may almost have gotten it (finally!), I have a couple of questions.

This is my set up:

  1. I have calibrated my monitor using a i1Display device. That created a profile called 20190119_S1.icm.

  2. My camera is a Sony A7iii. My understanding (kind of) is that the Sony "embeds" the color profile AdobeRGB into RAW stills that it takes. This is an important point to my question as this could be a misunderstanding on my part.

  3. In Photoshop, I have set my Color Management as follows (using my 20190119_S1.icm calibration):  
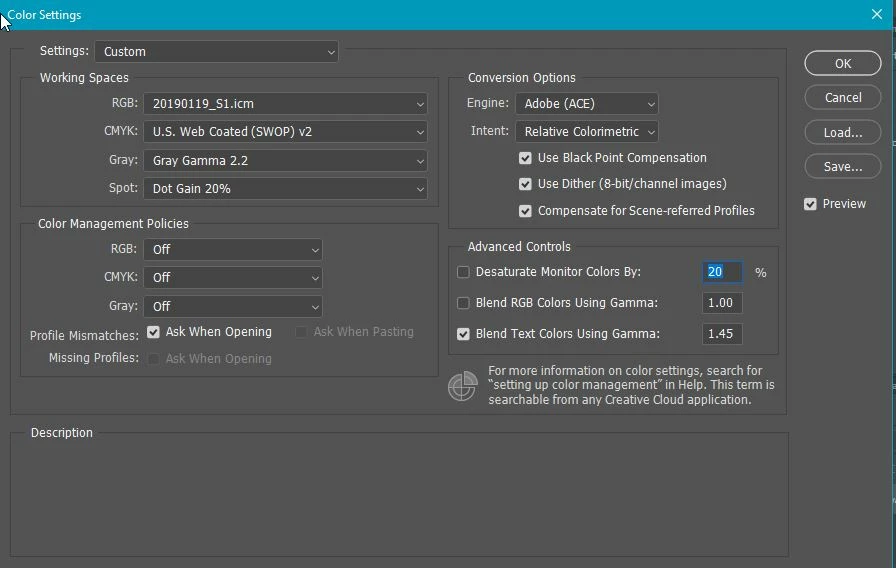
  4. When I check, the Color Settings are "synchronised" across all Adobe apps, most importantly (for me) that means Adobe Photo Raw.

My Questions:

  1. Have I configured this correctly to get consistent colors across the board? The reason for doing this set up is that I find that at times, exported photos are slightly darker with more crushed shadow detail than in the original edits.

  2. I must admit, the point 2 I made above above about the Sony a7iii embedding AdobeRGB into the Raw photos seems wrong to me as I though Raw photos would have no "color settings" as such. But the reason I assumed that the camera was stamping Adobe RGB into the photos was that even with color settings synched across Photoshop and Photo Raw, when I open a Raw photo in Photo Raw and then immediately open in Photoshop, I get this warning:

    So I was guessing that the Adobe RGB must be coming from the original photo.

    Assuming I want to work throughout the entire workflow with 20190119_S1, what should I chose when I get the above warning? 

  3. When exporting my photos to .png or .jpg, I seem to have two options: One is to "Convert to sRGB" and the other is to include the "Embedded Profile". From my tests, it seems that in order to preserve the same colors and tones from the original edits into the exported files, I should not "Convert to sRGB" (causes the picture to darken and crush shadow details), but should instead use the "Embedded Profile" option. Is this correct and if so, is there a way in Photoshop to default to this (no option for "Embedded Profile" in Edit -> Preferences -> Export).

Many thanks

    This topic has been closed for replies.
    Correct answer Per Berntsen

    mf_gleeson2  wrote

    Are you saying that I have the Color Management Policies in my Color Settings wrong? I think I picked the default options, but now that you mention it, I guess the settings in screen shot below may be more correct?

    Yes,the settings are wrong.

    First, set the RGB working space to a standard color space like sRGB or Adobe RGB. You should never use the monitor profile as a working space – it effectively disables color management.

    Then change all Color Management Policies to Preserve Embedded profiles. Since Photoshop is color managed, it will display images correctly with the embedded profile, whatever profile that is.

    Once you've done all this, restart Photoshop.

    When exporting my photos to .png or .jpg, I seem to have two options: One is to "Convert to sRGB" and the other is to include the "Embedded Profile". From my tests, it seems that in order to preserve the same colors and tones from the original edits into the exported files, I should not "Convert to sRGB" (causes the picture to darken and crush shadow details), but should instead use the "Embedded Profile" option. Is this correct and if so, is there a way in Photoshop to default to this (no option for "Embedded Profile" in Edit -> Preferences -> Export).

    When exporting, always check both Convert to sRGB and Embed profile.

    The darkening you mention probably happened because you had the monitor profile set as the RGB working space.

    My camera is a Sony A7iii. My understanding (kind of) is that the Sony "embeds" the color profile AdobeRGB into RAW stills that it takes.

    Raw files are greyscale files and don't have a color profile. When the raw file is rendered and opened in Photoshop, it will have the profile you have chosen in the Workflow settings in Camera raw. (click the underlined text at the bottom of the screen)

    The color profile settings in the camera are for jpgs only.

    2 replies

    JohanElzenga
    Community Expert
    Community Expert
    January 21, 2019

    1: You have set your working profile to the monitor profile. That is not correct. Choose AdobeRGB, ProPhotoRGB, sRGB or one of the other working color spaces, not your monitor color profile.

    2: The camera setting is irrelevant when you shoot in raw. Camera settings are ignored. The color profile is only determined by the Camera Raw settings. From the 'Embedded Profile Mismatch' dialog we can conclude that Camera Raw is set to AdobeRGB right now.

    3: I don't know what you finally choose in this dialog, but if you choose 'Discard the Embedded Profile' (like the screenshot shows), then you turn off all color management. The result will be that the colors are wrong.

    Maybe you should read this: https://www.color-management-guide.com/color-settings-photoshop.html

    -- Johan W. Elzenga
    Legend
    January 21, 2019

    Why do you have color management turned off?

    January 21, 2019

    Thanks for replying Lumigraphics,

    Are you saying that I have the Color Management Policies in my Color Settings wrong? I think I picked the default options, but now that you mention it, I guess the settings in screen shot below may be more correct? I'm not sure I fully understood what the "Color Management Policies" meant. I thought they had to do with exporting, but thinking about it more now, I guess they don't. They have to do with working with photos?

    Are the above more correct?

    By the way, when I open the file in Photoshop and get asked how I want to handle the difference between the embedded and working color profile (second screen shot in my original post), I actually choose "Convert document's colors to working space". So I guess that does the same as the "Convert to working..." options under "Color Management Polices" in the above screen? Is that my missing link? I just need to set the screen as shown above?

    Thanks again.

    Per Berntsen
    Community Expert
    Per BerntsenCommunity ExpertCorrect answer
    Community Expert
    January 21, 2019

    mf_gleeson2  wrote

    Are you saying that I have the Color Management Policies in my Color Settings wrong? I think I picked the default options, but now that you mention it, I guess the settings in screen shot below may be more correct?

    Yes,the settings are wrong.

    First, set the RGB working space to a standard color space like sRGB or Adobe RGB. You should never use the monitor profile as a working space – it effectively disables color management.

    Then change all Color Management Policies to Preserve Embedded profiles. Since Photoshop is color managed, it will display images correctly with the embedded profile, whatever profile that is.

    Once you've done all this, restart Photoshop.

    When exporting my photos to .png or .jpg, I seem to have two options: One is to "Convert to sRGB" and the other is to include the "Embedded Profile". From my tests, it seems that in order to preserve the same colors and tones from the original edits into the exported files, I should not "Convert to sRGB" (causes the picture to darken and crush shadow details), but should instead use the "Embedded Profile" option. Is this correct and if so, is there a way in Photoshop to default to this (no option for "Embedded Profile" in Edit -> Preferences -> Export).

    When exporting, always check both Convert to sRGB and Embed profile.

    The darkening you mention probably happened because you had the monitor profile set as the RGB working space.

    My camera is a Sony A7iii. My understanding (kind of) is that the Sony "embeds" the color profile AdobeRGB into RAW stills that it takes.

    Raw files are greyscale files and don't have a color profile. When the raw file is rendered and opened in Photoshop, it will have the profile you have chosen in the Workflow settings in Camera raw. (click the underlined text at the bottom of the screen)

    The color profile settings in the camera are for jpgs only.