EmilyHawk55
Participant
March 12, 2019
Question

Best Way to Edit This Drawing in Photoshop?

  • March 12, 2019
  • 3 replies
  • 1410 views

Hey everyone,

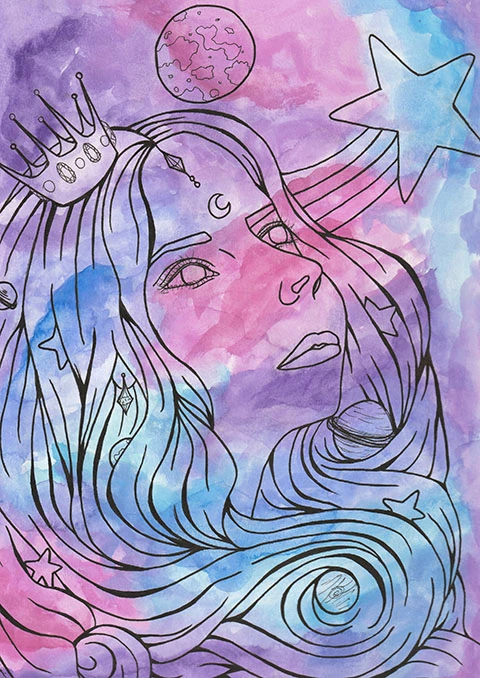
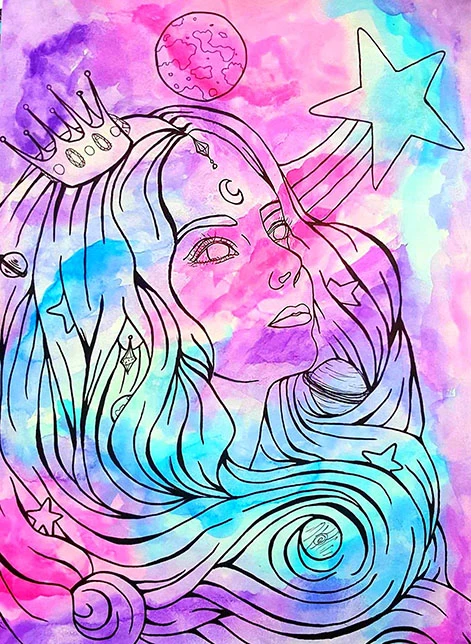
I've been struggling to figure out a solution for this and thought I would seek out some help. I made a watercolor painting a few years ago, and now wish to revise it. The original painting (left) has some issues with anatomy (and obviously dull colors, but that's an easy fix). In the Airbrush app that I have on my phone, I was able to achieve the following transformation using Airbrush's "stretch" tool (right):

However, I can't use the revised image as my final printing image because the resolution would be too low and the size is too small. Airbrush doesn't have advanced saving options like Photoshop, so the image is only suitable for a social media post. I'd have to scan in the painting at 300dpi and edit it in Photoshop to maintain its quality.

After scanning in the painting to my PC, what would be the best way to "stretch" or warp the lines so that it reflects the changes I made in the Airbrush revision, without damaging the background?

What I'm imagining in my head is essentially a selection around the lines that would allow me to manipulate and warp the lines while keeping the background intact. Does that exist?

I'm using Photoshop CC 2019.

Adobe Photoshop Version: 20.0.3 20190130.r.57

Thanks!!

    This topic has been closed for replies.

    3 replies

    EmilyHawk55
    Participant
    March 12, 2019

    Hi all,

    Thank you so much for the detailed responses. I originally wanted to do what two of you have suggested - isolate the lines, overlay the revision, and then re-ink them on a new layer to match the revision. However I don't have a pen tablet - all I have is a mouse. When I tried to re-ink it, it lost all the detail of the pressure in my original pen strokes and kinda looked like Clipart! Is there really a reasonable way to re-stroke the lines with pressure using a mouse?

    Trevor.Dennis
    Community Expert
    Community Expert
    March 12, 2019

    I've been thinking about this, and looking various ways to use the revised as a template, but I've decided that the way I would approach it is to enlarge the revised version to match the size, and re-ink the lines of the face on a new layer.  Then composite that onto the high res original to cover the not so good face.

    davescm
    Community Expert
    Community Expert
    March 12, 2019

    Hi

    Take a look at puppet warp. It will allow you to pull areas of your image around while fixing others. If your image is all on one layer then the background colours will also move but looking at the nature of teh background that should not be an issue.

    Convert to a smart object first so you can go back and edit teh warping if needed.

    If you want to use the other image as a guide - add it to teh layer stack (place embedded) and turn the opacity down so your main image shows through.

    Dave

    Sebastian Bleak
    Community Expert
    Community Expert
    March 12, 2019

    Hi Emily,

    I'm sure there's many ways to do something like this. This first thing that comes to mind would be to select the illustration (black lines) and bring it up to it's own layer. While you have the illustration on its own layer, you could use Liquify or some drawing tools to make the changes.

    For your multi colored background, you can use some of the retouching tools to fill in any gaps that might appear.