Inspiring
July 24, 2018
Answered

How to create a transparent knockout through a background?

  • July 24, 2018
  • 4 replies
  • 2219 views

Hi,

Im still fairly new to Photoshop and i've been doing small projects over the years and learn new stuff every time. Things seem to be going ok but now im faced with a problem that I can't solve myself.

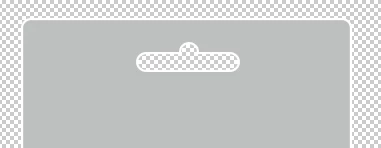
Im creating a retail looking product that you hang on a retail hook (see example).

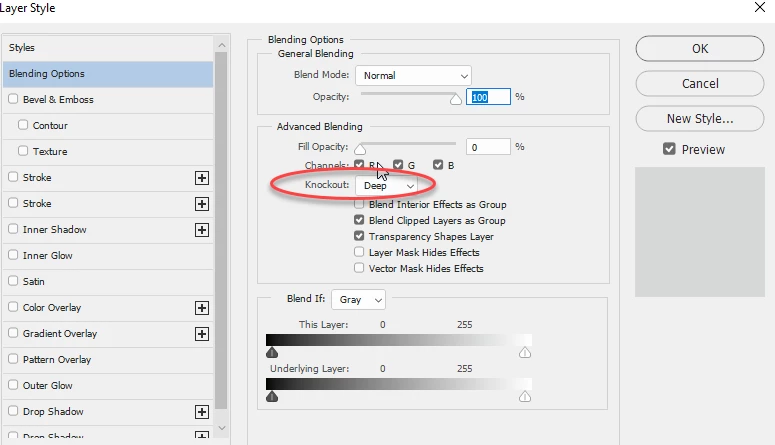
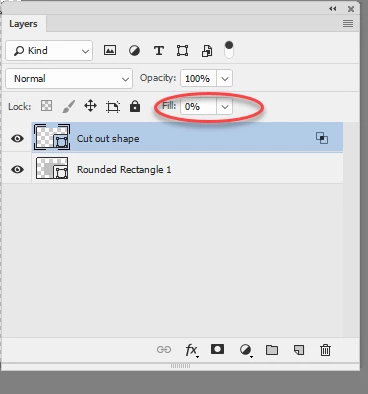
Everything is going ok with my project except one thing. I can't solve the knockout part and make the inside of it looking transparent.

This is a test project (not the actual one):

2018-07-24_15-14-04.png?raw=1

Now what I want to do is to make the inside of the hook part transparent, instead of showing the white background. Im confused. I think what im looking for has something to do with masks? which I know nothing about. I looked through some tutorial videos but I couldn't find something related to what im trying to achieve here.

Help please? I can't do this with the quick selection tool because it'll take a long time to make a perfect selection. Im sure there's an easier way but as I mentioned before im still learning.

Thanks in advance

    This topic has been closed for replies.
    Correct answer davescm

    Hi

    Try this

    Set a fill colour for your cutout shape, the colour does not matter but it must not be no fill.

    Right click the shape in the layers panel and in blending options set knockout to deep

    In the layers panel set Fill to 0%

    That's it:

    Dave

    4 replies

    Sl6nAuthor
    Inspiring
    July 24, 2018

    Oh wow thank you so much guys I didn't expect to get this much attention! Now I learned 2 new ways of doing this method thanks to Dave & Terri.

    My only source of information was following video tutorials and playing around until I figure something out. I didn't expect this much help here, so this is great I can now continue with my project!

    Thanks to everyone who replied & especially who helped by posting a step by step screenshot. I choose Dave as a best answer since it's the easiest way for a newbie like me.

    Terri Stevens
    Legend
    July 24, 2018

    be sure to come back if you have further problems.

    Terri

    Norman Sanders
    Legend
    July 24, 2018

    The slot for the hook as a Selection.

    Tap the keyboard Delete key

    or

    The slot for the hook as a Selection.

    Select > Inverse the Selection and strike the Mask symbol at the bottom of the Layers panel

    Sl6nAuthor
    Inspiring
    July 24, 2018

    I tried playing around with what you suggested, but I couldn't get it to work. Maybe the way I created my shapes isn't the right way?

    2018-07-24_18-01-58.png?raw=1

    1- I used the rounded rectangle tool to create the large rounded background.

    2- I use the rounded rectangle tool once again to create the empty hook part. No fill, only a gray stroke. I then created a circle inside of it to give it that bump from the top. I then merged these two layers together.

    3- The one you see is the result.

    What am I doing wrong?

    ScooterD76
    Legend
    July 24, 2018

    The shape you've already made is what you need. Selec it using the magic wand, move to your main layer and hit delete.

    ( hide the top layer after)

    c.pfaffenbichler
    Community Expert
    Community Expert
    July 24, 2018

    I can't do this with the quick selection tool because it'll take a long time to make a perfect selection. Im sure there's an easier way but as I mentioned before im still learning.

    Are you familiar with the Path Tools yet?

    What are you really trying to do – create a mock-up, create the actual print-data, …?

    Sl6nAuthor
    Inspiring
    July 24, 2018

    Im not that good with the pen tool.

    Im only doing a mock-up, not creating an actual product for print.

    c.pfaffenbichler
    Community Expert
    Community Expert
    July 24, 2018

    Please post a screenshot including the Layers Panel.