Participating Frequently
January 30, 2018
Answered

How to Fade Edges of Image... Seriously!?

  • January 30, 2018
  • 9 replies
  • 246431 views

Hi Photoshop community,

I feel really annoyed and stupid.  I cannot fade the edges of an image to save my life!

I have been searching through the forums and use cases yet everything is extremely complicated and ineffective.

This seems like such an easy task.  I want to fade the edges of my images all at the same standard, while keeping the image shape (in this case a square).


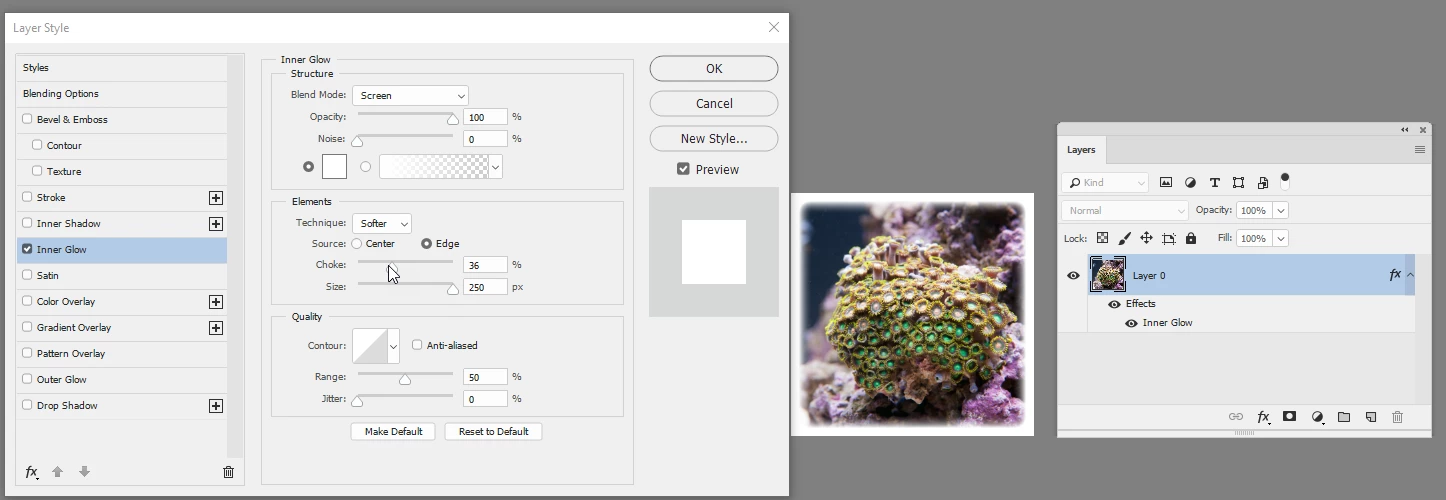
can someone provide me a how to to create images like this...

I did this in word (sadly):

My Goal:

Create a square shape with the proper feather edges and then layer mask each image I want to fade in, so that I can produce these type of images (in single serving) rapid fire.

Can someone PLEASE explain to me how to properly feather edges in photoshop?

This has been my Achilles heel.

Thank you very much for the support!

Correct answer davescm

jordans1818718  wrote

Hi Trevor,

I am using photoshop CC, but I don't seem to have fx... is this a filter you downloaded online?

Hi

Trevor's description should have read Filter > Camera Raw Filter> fx > Vignette or Post Crop Vignette

Dave


Of course you could just use a layer style adding a white inner glow from the edge

You can then save that style (click on New Style) and add it to your library for other images

Dave

9 replies

Participant
June 19, 2024

How to feather the edges of a layer from solid to 0% opacity. Select the layer to be affected. From the menu, go to Select, Select and Mask. The tool should open on the right side to a blank layer.

Press and drag in that layer to fill in the image/layer.

Modify the feather and smooth options until you are satisfied with the look.

Select Ok when you are finished. You will notice the affect is not showing, just a selection marquee. That's normal. With a selection tool active, right click in that selection marquee and choose Select Inverse. Now Choose the eraser and start erasing that inverse area and you will see it erase up to your feather options you made earlier.

Finally, Save it as a PNG and it will load with that feather opacity.

Participant
November 13, 2023

The correct answer below just illustrates how complicated and unintuitive Photoshop is. I would never think of searching on "Inner Glow" to find out how fade an edge. And then "blend mode" is "screen"? I would never have found that either. There has to a simpler way to do something so common and obvious. 

Participant
February 23, 2021

Hi Dave, I am working on a in memory of project and I have a couple layers. I am trying to use this method, but I can't get it to work. I used your exact settings from your screen shot above and I still have the square box. Do you have any idea what it is I am doing wrong, or how I fix it? I have attached a screen shot. The light blue box with the white clouds is what I am trying to do. 


jane-e
Community Expert
Community Expert
February 23, 2021

Hi @Casey5FED 

Please show a screen shot of the Effects panel for Layer 2 so we can see your settings. Also, what are the Effects you have on the Layer called "Rectangle 1"?

~ Jane


Participating Frequently
January 3, 2021

I agree. Why is it so hard to feather in Photoshop? I have been selecting the elliptical marquee to select an area of a jpeg image. Then going to the Quick Mask mode and using Gaussian Blur to select my pixel area. Then toggling out of Quick Mask and going to inverse image. Now I am ready to get rid of the unwanted pixels. IMPOSSIBLE. I have hit backspace and CTL-D like the tutorial said but CTL-D is deselect! So I tried backspace and delete. Nope. I tried just delete. Nope. I tried cursing, that didn't work either but it made me feel better. This was much easier in Fireworks but it is a challenge in Photoshop. So - bring back Fireworks!

jane-e
Community Expert
Community Expert
January 3, 2021

Hi @Manual 


Try the methods in this thread from @davescm , @Trevor.Dennis , and @DeanUtian . If you get stuck, tell us where and show a screen shot.


Sadly, Fireworks will never come back, and as volunteers who do not work for Adobe, we have no influence over that. You can change your keyboard shortcuts in Edit > Keyboard Shortcuts. You didn't say which tutorial you were following, but Ctrl+D has always been Deselect in Photoshop.

If you deselected and then tried to delete the unwanted pixels, then you might have to undo first to get your selection back. Or, better, apply a non-destructive layer mask to your selection. Show a screen shot and we may be able to assist.


~ Jane

Participating Frequently
January 3, 2021

Thank you Jane. Here is a link showing you what I am trying to do. Thanks.  https://youtu.be/-onWlg_9nUE

Participant
January 24, 2019

I am so with you!!! None of the people who responded to you gave the right answers. They all 5-7 steps which were not clear. Why is this so difficult on Photoshop? I still cannot figure it out

davescm
Community Expert
Community Expert
January 24, 2019

Joepotsmusic  wrote

................... None of the people who responded to you gave the right answers.

Hi

There are several methods shown in this thread, all of which work. Which have you tried and what steps are you struggling with?

Dave

Trevor.Dennis
Community Expert
Community Expert
January 24, 2019

davescm  wrote

Joepotsmusic   wrote

................... None of the people who responded to you gave the right answers.

Hi

There are several methods shown in this thread, all of which work. Which have you tried and what steps are you struggling with?

Dave

I have to back Dave on this.  It really isn't difficult, regardless of which of the many methods you chose to use.  If you are struggling with anything, then just ask.  The regular posters to this forum volunteer their time to help folk, because they love Photoshop, and we frequently learn new things ourselves.

Participating Frequently
January 13, 2019

There are many users who want to know about how they can fade the edges of an Image/Shape on Adobe Photoshop but don’t know exactly how to do it. No worries because here we will let you know how you can do it but in case you want to go for detailed description then you can visit this site https://appuals.com/how-to-blur-fade-edges-of-an-image-shape-on-adobe-photoshop/.
Pick any image that you want to utilize as your design. In case you pick a flower from the internet and made a bunch out of it to make it look dark.  It is significant that you work on various coatings. This will assist you to edit your work more easily in case you make any mistakes on any of the coatings, so you would always have the original layer saved. You can include a new coating after the background. In case you want to draw an oval around the bouquet of flowers you can utilize the ellipses tool from Adobe Photoshop.

You also have this facility to change the shape according to the bouquet, managed the image and add a color to the shape to make it noticeable. If you feel like including a fading effect on the edges of the oval then you can add a coating mask on this layer. You can do it by choosing the layer of the shape, and tap on the icon fixed by the arrow. You will see that layer mask will display an empty mask in front of the ellipse’s layer. At the end press on the layer mask which is the white layer in the ellipse’s layer. By tapping it you would be able to see a properties box and from here you can improve the shape and make other variations.

Participating Frequently
January 30, 2018

So I found a technique that (almost works).  I am able to fade the edges, but when I click "OK" my changes disappear.  I have attached a video to show what is happening.

Here are the instructions I used: Create a Soft Fade Vignette in Adobe Photoshop CC

  1. 1. Open a photo in Photoshop.
  2. 2. Convert the background to a layer by double-clicking on it in the layers palette. When an image is opened in Photoshop it always opens as a locked background layer. When you double click the layer the New Layer dialog box will open and you can either choose to name the layer or leave the name - Layer 0 - as is. If you don't do this you won't be able to complete the rest of this tutorial.

    A common practice is to also convert the layer to a Smart Object. This is a non-destructive technique which preserves the original image.

  3. 3. With the layer selected in the Layers panel, select the Elliptical Marquee tool.and drag a marquee selection around the area of the photo you want to keep.
  4. 4. Click the "Add Layer Mask" button at the bottom of the layers palette. The Add Layer Mask icon is the "Box With The Hole" at the bottom of the Layers panel. When you release the mouse, the Layer will sport a chain and a new thumbnail. The new thumbnail is the mask.
  5. 5. Double-click the layer mask thumbnail in the layers palette.This will open the Properties panel for the mask.
  6. 6. If it isn't open, twirl down the Global Refinements area. What we are going to do is to fade the edges of the mask to create the vignette effect.
  7. 7. There are four sliders designed to let you get things just right. Here's what they do:
  • Smooth: This slider makes the edge transition less sharp.
  • Feather: Moving this in or out will increase or decrease the fade at the edges of the mask.
  • Contrast: Moving this slider makes the edge of the selection sharper and more defined.
  • Shift Edge: Sliding this in or out increases or decreases the diameter of the selection area set in Step2. When finished, click OK to return to the Layers panel.
    Add a new layer under the photo and fill it with the desired background color.
Community Expert
January 30, 2018

Here's how you could do what you want, as I understand it.

1. Use the Rectangular Marquee Tool to select your square shape. Press the Shift key when selecting your area to ensure the selection stays square in proportion.

2. From the Select drop-down menu choose - Select > Modify > Feather (Shift + F6).

3. Enter the number of pixels for the Feather Radius and click OK.

4. Next - Select > Inverse.

5. In a new layer, you could then fill (Edit > Fill) this area with white.

Hope that addresses what you're after.

Participating Frequently
January 30, 2018

Hi Dean,

I tried your method and it did not work.

Also, I'm not sure what you mean going from step 4 to 5 can you elaborate?

Community Expert
January 30, 2018

Hi,

Apologies for the confusion. Screenshots are always helpful so will try with a few now. Was having a few problems on taht side but hopefully what's below will fill the gaps.

1. Use the Rectangular Marquee Tool to select your square shape. Press the Shift key when selecting your area to ensure the selection stays square in proportion.

2. From the Select drop-down menu choose - Select > Modify > Feather (Shift + F6).

3. Enter the number of pixels for the Feather Radius and click OK.

I chose 3 for the above image which is quite small (100x100 pixels).

4. Next - Select > Inverse.


New step
5. Create a new later by clicking the Create new layer icon as below or the 4 horizontal lines icon in the top right corner and then choose New Layer..., or Shift+Ctrl+N.

New step
6. Choose Edit > Fill. (Shift+F5)
7. Choose White as Contents.

Result should be something like below:

Looking at other options, if you wanted a feather from the exact edges of your image, using an Inner glow effect would be the quickest.

Hopefully the above helps your broader understanding of Photoshop possibilities.

Trevor.Dennis
Community Expert
Community Expert
January 30, 2018

If you are using Photoshop CC, go Filter > fx > Vignette or Post Crop Vignette.  Move the amount slider to the right which will produce a white feather.  The other controls let you control the shape etc.

Note: this works on the layer selected.  If you have several layers, then add a copy merged layer to the top of the stack (Shift, Ctrl, Alt, E).  If you make that layer into a Smart Object (from the right click menu) it will be non-destructive.

Participating Frequently
January 30, 2018

Hi Trevor,

I am using photoshop CC, but I don't seem to have fx... is this a filter you downloaded online?

davescm
Community Expert
Community Expert
January 30, 2018

jordans1818718  wrote

Hi Trevor,

I am using photoshop CC, but I don't seem to have fx... is this a filter you downloaded online?

Hi

Trevor's description should have read Filter > Camera Raw Filter> fx > Vignette or Post Crop Vignette

Dave