GonarioSirboni
Participant
April 5, 2019
Answered

How to got layer dimensions (with transparent border)?

  • April 5, 2019
  • 2 replies
  • 2507 views

Hi to everybody, this is my first post.

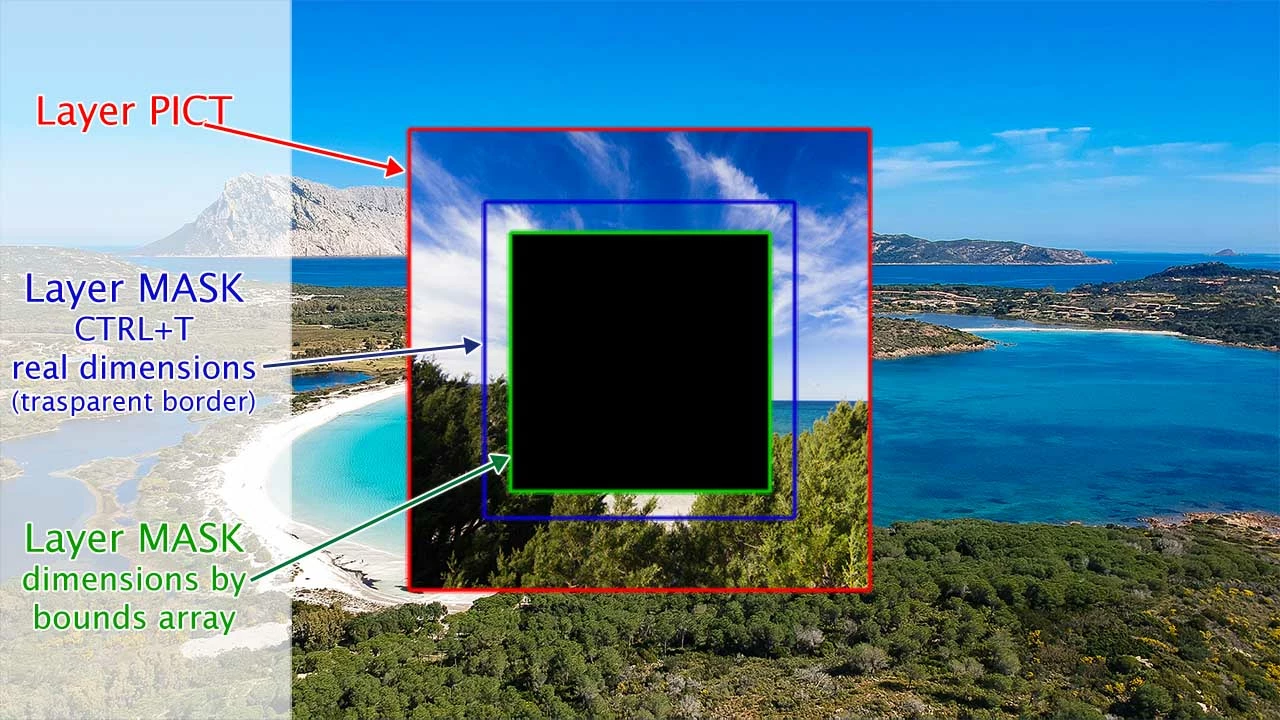
I need to know the really dimensions of a layer with border trasparent for resize it to same dimensions of other layer.

well, if use the bounds datas, i got the dimensions of the pixels, but not the really dimensions of the layer.

With this script i would like resize the "mask" layer and the "frame" layer to the same size of the picture layer, but like i work with transform command (CTRL+T).

there are anybody know how to do?
Thanks
G.

--- Script ---

var doc = app.activeDocument

var thisLayer = doc.activeLayer;

// got the group of layers

var thisGroup = thisLayer.parent;

//main layer (photo)

var thisPict = thisGroup.layers[2];

var ThisPictBounds = thisPict.bounds;

var thisPictW = ThisPictBounds[2].as('px')-ThisPictBounds[0].as('px');

var thisPictH = ThisPictBounds[3].as('px')-ThisPictBounds[1].as('px');

//mask layer

var thisMask = thisGroup.layers[1];

var ThisMaskBounds = thisMask.bounds;

var thisMaskW = ThisMaskBounds[2].as('px')-ThisMaskBounds[0].as('px');

var thisMaskH = ThisMaskBounds[3].as('px')-ThisMaskBounds[1].as('px');

// frame layer

var thisFrame = thisGroup.layers[0];

var ThisFrameBounds = thisFrame.bounds;

var thisFrameW = ThisFrameBounds[2].as('px')-ThisFrameBounds[0].as('px');

var thisFrameH = ThisFrameBounds[3].as('px')-ThisFrameBounds[1].as('px');

// rename all layers

thisPict.name = thisGroup.name + '>' + 'Pict';

thisMask.visible = false;

thisMask.name = thisGroup.name + '>' + 'Mask';

thisFrame.name = thisGroup.name + '>' + 'Frame';

// resize mask and frame layers

thisMask.resize ((thisPictW/thisMaskW)*100,(thisPictH/thisMaskH)*100, AnchorPosition.MIDDLECENTER);

thisFrame.resize ((thisPictW/thisFrameW)*100,(thisPictH/thisFrameH)*100, AnchorPosition.MIDDLECENTER);

// ### example ###

// thisMaskW = 489 (974 - 485 ) >> Real width layer dimension usig CTRL+ T command

// thisMaskH = 316 (519 - 203) >> Real height layer dimension usig CTRL+ T command

// thisMaskW = 258 (769 - 511 ) >> Pixel width dimension got by bouds data

// thisMaskH = 259 (492 - 233) >> Pixel height dimension got by bouds data

// How got real layer dimension?

This topic has been closed for replies.
Correct answer r-bin

If you are recording a series of actions, there is an application that translates the steps into a script.

In this way I can try to understand how Photoshop handles the CTRL + T command activity and what commands are they that make the vertex of the level I'm transforming into the level that interests me.

Because I can't find documentation of how to execute commands anywhere.


Get Layer Transform X Y Top Left Coordinate Position

2 replies

JJMack
Community Expert
Community Expert
April 5, 2019

If you step back and look at how Photoshop works may may find a way to handle what you want to accomplish.   You problems seem to be with Transparent boarders an Image file that supports transparency can present to automation.   I have never found a perfect way to deal with the problems that manifest itself in two.   A layer bounds is rectangle that side are horizontal and vertical boundaries of the pixels in the layer. A layer does not have pixels outside its bounds a layer does not have transparent borders a layer can have transparency that is within it bounds.    Image Files on the other hand has a Canvas Size and larger then layers.  So it is posible that an Image file is a image with transparent borders for its canvas size cab be larger then image lyers bounds on all four sizes.       

This presents quite a problem when it come to automating things like Photo Collages and Mockups.   You need to use  things like  Place and Copy and Paste.    Place renders pixels for the object files and uses those pixels for the layers content for the smart object layer. The layer will not have transparent borders is as though Place Trimmed the Image files transparent borders.  If you open an image files that is an image with transparent borders the image in Photoshop image window will have  transparent boarders but the layer does not. So if you do a select all the Full canvas will be selected if you do a Copy or Copy merge all selected Pixels will be copied to the clipboard.  The pixels in the clipboard will not have transparent borders.  So Paste will not paste in a layer with transparent borders. Layers do not have transparent boarders.

In my mockup scripts I address the Copy Paste issue when I replace object via editing the Smart object.  However if the Replace Content option is used to replace object content.  Replace Content uses Photoshop Place so all Photoshop Place issues are not address.  Photoshop Place issues are  outside of my control.

It is easy to address the transparent border issue by preprocessing the image to make them have sudo transparent borders. I simple add two pixels that are gray 1% opacity to the top left canvas corner and one into the bottom right canvas corner. 

JJMack
GonarioSirboni
Participant
April 6, 2019

If you like, I uploaded the files with the example of the work I should get to this address.

I made two small recordings of the work I do and I would like to automate and work on the script I have developed.

http://www.goldhookmarinaservice.it/helpme.zip

Currently the MASK layer uses only the visible pixels to create the mask in the PICT layer. Alternatively, I could modify the files I use for the mask, turning them into grayscale, without trasparent parts. This way I can resize the two levels to the same size. But the problem would remain in the FRAMES, this level has transparent margins that I can't modify.

The only solution is to understand how to find the coordinates of points A and B in this image, that is the vertices of the level when pressing CTRL + T.

JJMack
Community Expert
Community Expert
April 7, 2019

The script you show does not do the place images as you use of Photoshop on either of your videos.   Place is also has issues you have to deal with when scripting it use.   Place may resize the file image because of differences in file print resolution when  creating the smart object layer.   Place may also scale the smart object layer created to fit on canvas.  If you are not careful you may not gets the correct size of the object because Photoshop has scaled the layer to fit on canvas.  you will get the scaled size not the actual image size.  When I first start scripting Photoshop Collage  back when CS2 was released  Selection Bounds had a bug and did not work I had to develop a work around that bug.  And place drove me up the wall till I figured our what Adobe was actually doing.  IMO the resizing Adobe does when print resolution does match is a major problem and degrades your image quality.    I feel you need to script Place amd find out how it works and then come up with a design that will crerate the composite you want to crerate. 

JJMack
Legend
April 5, 2019

Badly understood the question and your picture.
Perhaps using your "boundsNoMask" property for the layer for the AM version of the code will help.
Or for the DOM version you can set the layer's "layerMaskDensity" property to zero and take the bounds of the layer at that moment.