I don’t think there’s any provision for a link icon for a vector mask on a fill layer (this doesn’t just affect Color Fill, it also applies to Gradient Fill and Pattern Fill). I don’t know what the reason is, but Photoshop definitely treats the fill layer category differently than other layer categories.
Traditionally, for other layer types, the only purpose of mask linking was to set whether a mask moves with its layer. For a vector mask on a Solid Color fill layer there’s no way to prevent the mask from moving when you drag a Solid Color fill layer with the Move tool, but it is possible to move the vector mask independently of any fill type of layer: Select the vector mask path(s) and reposition it with the Path Selection or Direct Selection tool.
Maybe part of what Adobe was thinking is that for a Solid Color fill layer, separating a layer move from its mask is completely irrelevant because it’s solid, so it looks the same no matter where you position it! The only possible thing to move is the mask, so that’s what moves when you drag a Solid Color fill layer with the Move tool.
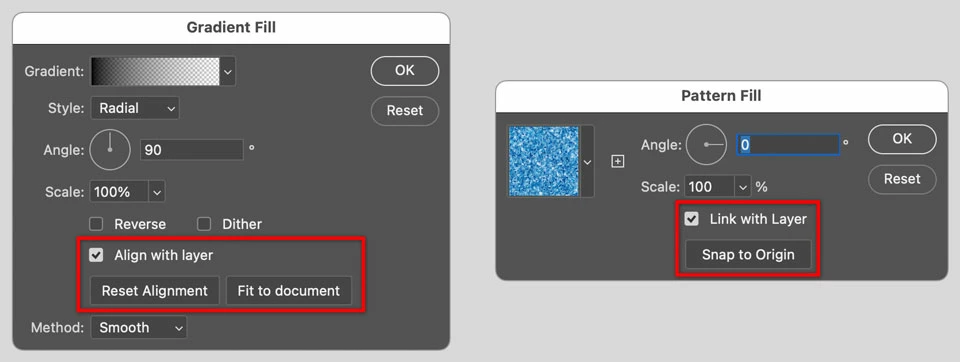
For a Gradient fill, a gradient isn’t uniform across the canvas and it can have its own position relative to the layer content, so here there is a case for optionally unlinking their positions when you move the layer. But the way you do that isn’t with a link icon, instead you deselect Align to Layer in Gradient Options so that if you drag it with the Move tool, you’re actually dragging its mask while the gradient (layer content) stays in place. It works similarly with a Pattern fill layer, it’s controlled by Link with Layer.
It would be fair to suggest to Adobe that it’s weird that mask positioning is done with inconsistent UI and naming for three different kinds of fill layers. You could certainly make an argument that Align to Layer for gradient fill layers, and Link with Layer for pattern fill layers, should both be represented by a simple link icon in the Layers panel. If you want to suggest something to Adobe you can submit a feature request in the Ideas section of this community, and see if gets enough votes versus the other submitted requests.
But there probably is still no point in a link between a Solid Color fill layer and its mask, because unless I’m missing something (feel free to point it out if I am), there still wouldn’t be any visual difference linking or unlinking a vector mask for a layer type where the content is uniform across the canvas.
The link icon is not visible on a Color Fill layer, but its function is still active. To toggle the link between the Color Fill layer and its vector mask, simply hold down the Shift key and click on the Vector Mask thumbnail. You'll see a tiny 'X' appear on the mask thumbnail, indicating that the mask is unlinked.
By @creative explorer
The X isn’t for linking. It’s for whether the mask is enabled/disabled (visually applied or not). Shift-click is a shortcut for the command Layer > Layer Mask (or Vector Mask) > Enable/Disable. You can see this in the History panel. Shift-clicking a mask doesn’t create a History step for Layer > Layer Mask (or Vector Mask) > Link/Unlink.
That’s why pixel layers have both a link and an X that work independently, because they’re technically different things.
Also, Shift-click does not do anything on a Solid Color fill layer, which is the subject of this thread. Shift-click only affects a pixel or vector mask when it has its own thumbnail icon separate from its layer content.


