Inspiring
April 10, 2020
Answered

Object's edge as brush texture

  • April 10, 2020
  • 3 replies
  • 4261 views

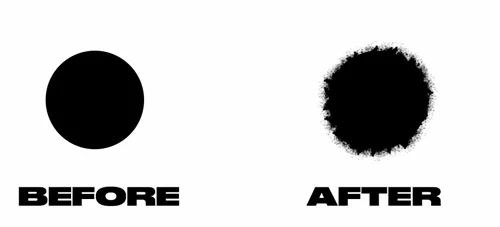
Let's say I have a circle shape. Now I have this speckles brush and I want the edge of my circle to be all rough, using the brush. I can obviously do this manually by painting around the circle, but is there an easier, faster and eventually automatic way to do this? I would like to apply this to any object: shape, rasterized, text, etc.


Here's the before and after:

This topic has been closed for replies.
Correct answer Semaphoric

Load your shape as a selection, and invert the selection. In the Paths panel menu, Make Work Path, followed by Stroke Path.


3 replies

PECourtejoie
Community Expert
Community Expert
April 10, 2020

Hi, a combination of filters like torn edges, as David Ash shows it here http://www.tipsquirrel.com/creating-torn-edges-in-photoshop-and-photoshop-elements/ would let you apply it to any shape.

Inspiring
April 10, 2020

Hi,


Thanks for the reply. I was really looking for a controlled way to do this, with my own brushes.

My idea is to apply some texture to shapes, text, etc, but using the brush texture and so the reply before yours was exactly what I was looking for.


But thanks for yours as well, because I can use that trick as well for some torn paper texture. I was actually thinking about creating some templates of torn paper myself, so it's also handy 😉


Stay safe!

Semaphoric
Community Expert
SemaphoricCommunity ExpertCorrect answer
Community Expert
April 10, 2020

Load your shape as a selection, and invert the selection. In the Paths panel menu, Make Work Path, followed by Stroke Path.


Inspiring
April 10, 2020

Hi,


This was a really good workflow and does pretty much what I expected. I wish there was a real tool for that where we could change the brush and see the changes in real time, but oh well...


A few notes to add to your workflow that maybe some other people can find useful:

1 - You don't really need to invert the selection. It works with the selection of the object without inverting

2 - To make the Stroke Path, we need a) To rasterize our object or b) Create a new layer to then apply the stroke, since that operation doesn't work with shapes and unrasterized text. I know most people already know that, but since I don't use that feature that much, I had to Google why mine was greyed out.


Again, thank you so much for your reply and it really helped me achieve what I was looking for!

Stay safe!

Semaphoric
Community Expert
Community Expert
April 11, 2020

I put in the Invert step because I made the selection by Control clicking the composite channel, which makes the white background the selection, not the subject. Other methods, such as Select Subject, do not have that issue.

I've been wanting those updateable live strokes for years.

Chuck Uebele
Community Expert
Community Expert
April 10, 2020

I would create a brush with the rough edges and paint with that rather than a smooth brush.

Inspiring
April 10, 2020

My issue is not the type of brush, as I have many brushes, but the process of doing it manually vs making it automatically.

This was just an example, but this would apply to other situations, so I'm looking for an answer as to whether this is possible to do automatically or if the only way is to do it manually.

For example, when you want to create a text around a circle, you don't do it manually, there's a way to make it so the text follows the path. I was wondering if there's a way to do the same with brushes. This would be a super useful feature where we could pick the shape/object and then apply different brushes, sizes of brushes, with or without Dynamics, etc so we could add a more organic feel to our design