Trevor.Dennis
Community Expert
Community Expert
March 18, 2022
Question

SFTW 158 — A Matter of Perspective

  • March 18, 2022
  • 15 replies
  • 5674 views

It's my turn to put up a starter for SFTW, and I am going with something a little bit different.  Basically a blank canvas. Regular posters know I am a fan of Lazy Nezumi Pro, and specifically its Vanishing Lines preset as a guide for matching a scene's perspective, but LNP does not work with OSX systems.  The Greatest Living Photoshop Artist, Bert Monroy, has always used Macs, so all he uses for his perspective guides is two or more three point work paths with the central point on the Vanishing Points.  In fact he uses Illustrator to lay out his perspective guide lines with his huge illustrations like Times Square.


Download the attached JPG and open in Photoshop.  Note: you have to obtain the starter image this way to have the work paths.  It will look something like this:

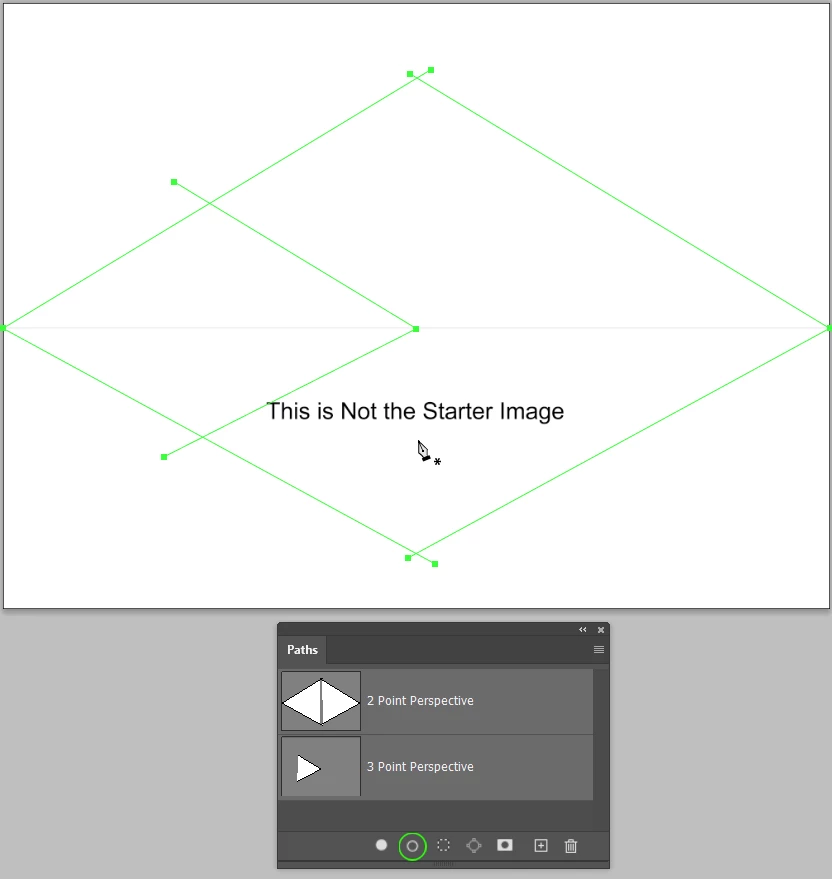
The way I do it is to place a layer at the top of the stack, move the work path end points into position and with a one pixel fully hard brush selected, click on the Stroke icon at the bottom of the Paths panel.  You might need to right click a path and chose Stroke the first time you do this to make sure the Brush is selected.


Tip: Did you know that with the  Move tool selected, you can hold down Ctrl (Cmd) and move work path points?  


Well keep things simple and assume that verticals are perfectly vertical so we can use Guides for those.


I don't want to put ideas into peoples heads, but a blank canvas might be a bit daunting, so this could be a simple way to fill a 2 point perspective.  Note that its rule of thumb that if we assume the terrain is flat, then people's eye lines will coincide with the horizon. 

My tip is to find each image element and paste into a new document so you can use Perspective Crop to square it up.  Make it a Smart Object — this makes the corner handles remain at the corners through multiple use of Free Transform.


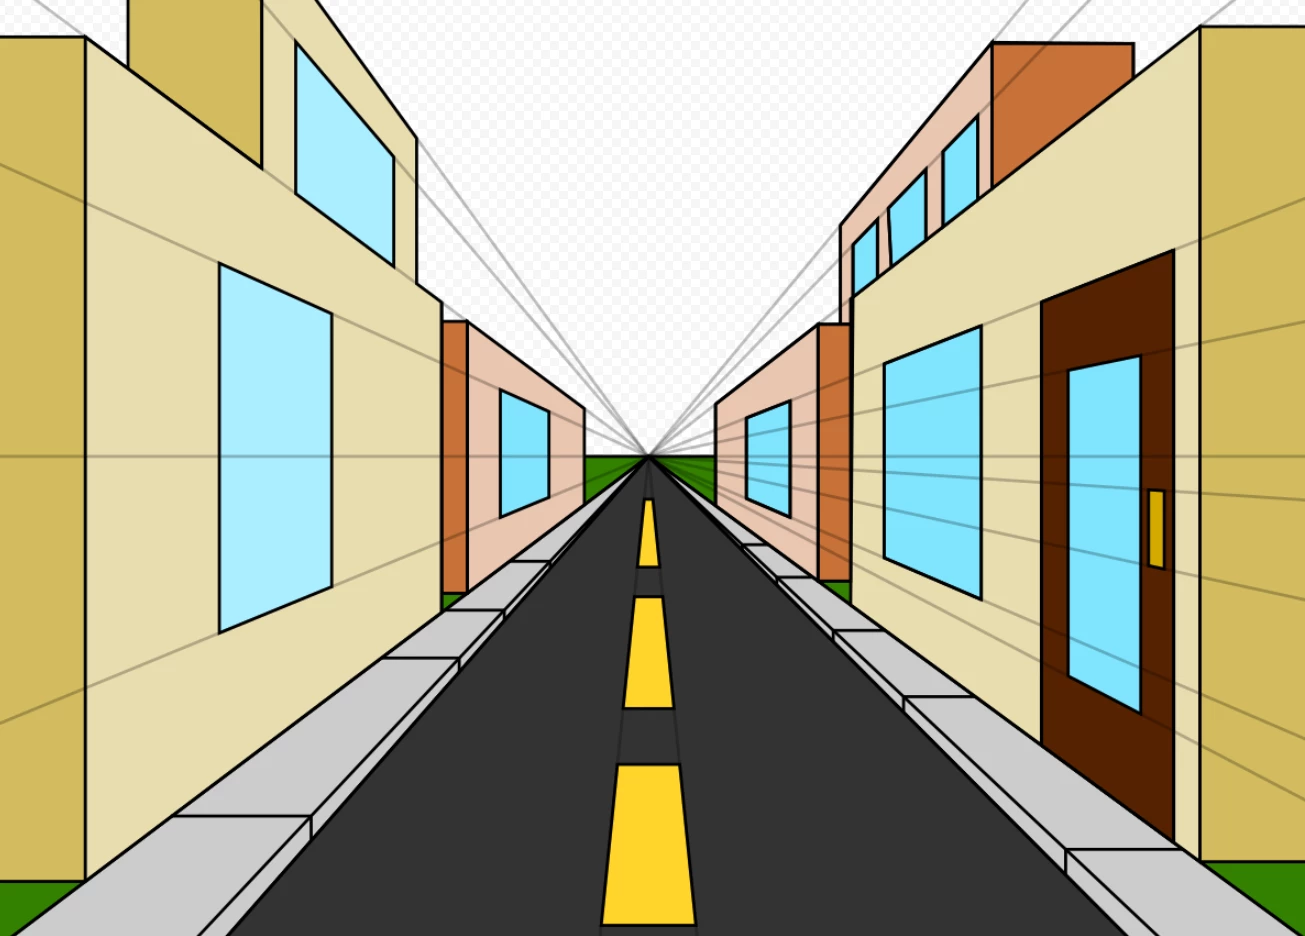
You use either the Two Point Perspective as above, or use the central work path and make it a Single Point Perspective, so your image might look something like this (from Google):


The “rules”:

  • Anything goes as long as it meets the forum rules on decency copyright etc.
  • Anyone and everyone is welcome to have a go whether you are a complete beginner or a Photoshop expert. This is not just for our forum “regulars”, and other applications can be used.
  • There are no prizes apart from the chance to practice show off or bring a bit of humour and fun. Don't be shy join in and have a go!


When posting back your image — please use the blue reply button in this first post. If posting a comment on someone else’s entry then please use the grey reply button next to their image post.


Have fun!

Trevor

Fingers crossed that the attachment loads OK, because I can't seee it! 

This topic has been closed for replies.

15 replies

Jacob Bugge
Community Expert
Community Expert
March 19, 2022


Click/RightClick to get closer, or Click Here to see in Chrome 


jane-e
Community Expert
Community Expert
March 19, 2022

@Trevor.Dennis 


I think I need a bit of guidance! Should our drawing use the guides and paths? I don't see how yours fits?


I also tried bringing it into Illustrator where I made everything a guide. Now I'm stuck. 😕😕


Jane

Trevor.Dennis
Community Expert
Community Expert
March 20, 2022

Jane, it might because I have cropped out the work path vanishing points.


The guides are entirely arbitrary you have to use your judgement as to how much foreshortening the perspective is going to cause.  I expect there is math that can be used, but I am not aware of it.  You can keep changing each element to get it to look about right, which is another reason to make them Smart Objects.  I think it would be close to impossible to do otherwise.


I hadn't realised that the guides also saved to JPG, and that is likely to have caused confusion because they would have been used for the example I gave with the starter post, and had no relevance to the Curry House upload.  I have draged the unused vertical guides out of frame in the screen shot below.


You can use the same trick with elliptical image elements of course, as they will have recangular bounding boxes when you transform them.  There is a wee gotcha with this though.  If we look at the round window in the example I uploaded you can see the compression that Free Transform > Perspective creates (Note: this is true whether you use FT > Perspective or drag corner handles to Distort the bounding box).  Unfortunately, this does not gell with reality.  The window is recessed so we should see lees of the frame on its left side.     

You can fix that by masking the area that would be out of view, or our best approximation of it.  It's still wrong because we'd be about to see the frame on the left side.


Jacob, I'm getting a file not found error with your link.

jane-e
Community Expert
Community Expert
March 20, 2022


@Trevor.Dennis wrote:

Jane, it might because I have cropped out the work path vanishing points.


I hadn't realised that the guides also saved to JPG, and that is likely to have caused confusion because they would have been used for the example I gave with the starter post, and had no relevance to the Curry House upload.  I have draged the unused vertical guides out of frame in the screen shot below.


This is very helpful, Trevor, and I'll give it another try.


Illustrator has two things that make it easy to draw in perspective:

  • a perspective grid (1- , 2- , and 3-point — all customizable)
    I'm going to avoid this grid for your project because it makes it too easy and too quick
  • guides for the vanishing point
    Any path can be converted to a guide, so angled guides can be used instead of paths for the vanishing points
    Objects can be duplicated and scaled proportionally along the guides toward the vanishing point


I'll extend the paths that got cropped, but it will be easier do this in Illustrator because of the screen tips that let you see that you are keeping the same angle. Fortunately copying and pasting paths works well between the applications.


Jane


davescm
Community Expert
Community Expert
March 19, 2022

A great idea Trevor, thanks for posting it. You do of course realise that, despite not having a lot of time this week, I won't be able to resist this one 🙂


Cheers

Dave

Trevor.Dennis
Community Expert
Community Expert
March 19, 2022

This might not have been such a good idea.  This took me longer than I usually spend of SFTW, and it is still shite. 😞

If you want to move the vanishing points feel free.  Strictly speaking they should be on the horizon, but we are not enforcing Scotties' Law (Ya canna' change the laws of physics captain.)


jane-e
Community Expert
Community Expert
March 19, 2022

"Dave's Curry House"! Are we all invited for a curry dinner?


Jane


Trevor.Dennis
Community Expert
Community Expert
March 18, 2022

The Attachment appears to have uploaded OK and the work paths are there.   I hesitate to offer advice to the regular posters, but I have lost count of the times I have tried to use Free Transform on a layer and wondered why the bounding box was in the wrong place.  Then realised I had, yet again, had a work path selected and Free Transform always seems to favour work paths over layers.  The same is true when deleting layers.  If you happen to have a work path selected, then its gone, and you won't necessarily notice untill you have done a lot more work.  This is another one of those 'Don't ask me how I know' situationsSo I tend to drag important work paths to the New Path icon to make a copy, and use the copy.


When I have a lot of layers, and especially when some of those layers are being used twice like the brown & cream building above, I like to Use Filter > Camera RAW to apply shading etc. because it keeps it self contained in the layer (Assuming you have made it a Smart Object).  This is in preference of cliping Curves or Levels layers because you are bound to need to move layers up and down the stack, and it is too easy to leave the clipped adjustment layer behind.  That is to say it is if you are an old bugger like me. 😞

jane-e
Community Expert
Community Expert
March 18, 2022

Great idea, Trevor!

Jane