Participant
June 22, 2023
Answered

Trying Frequency Separation but going gray...

  • June 22, 2023
  • 3 replies
  • 2664 views

I've just updated to the latest version of photoshop, 24.6.0 (22/06/23)

I'm trying to do frequency separation on some headshots but the texture layer is just turning gray without showing any detail.
These are the settings I was using 

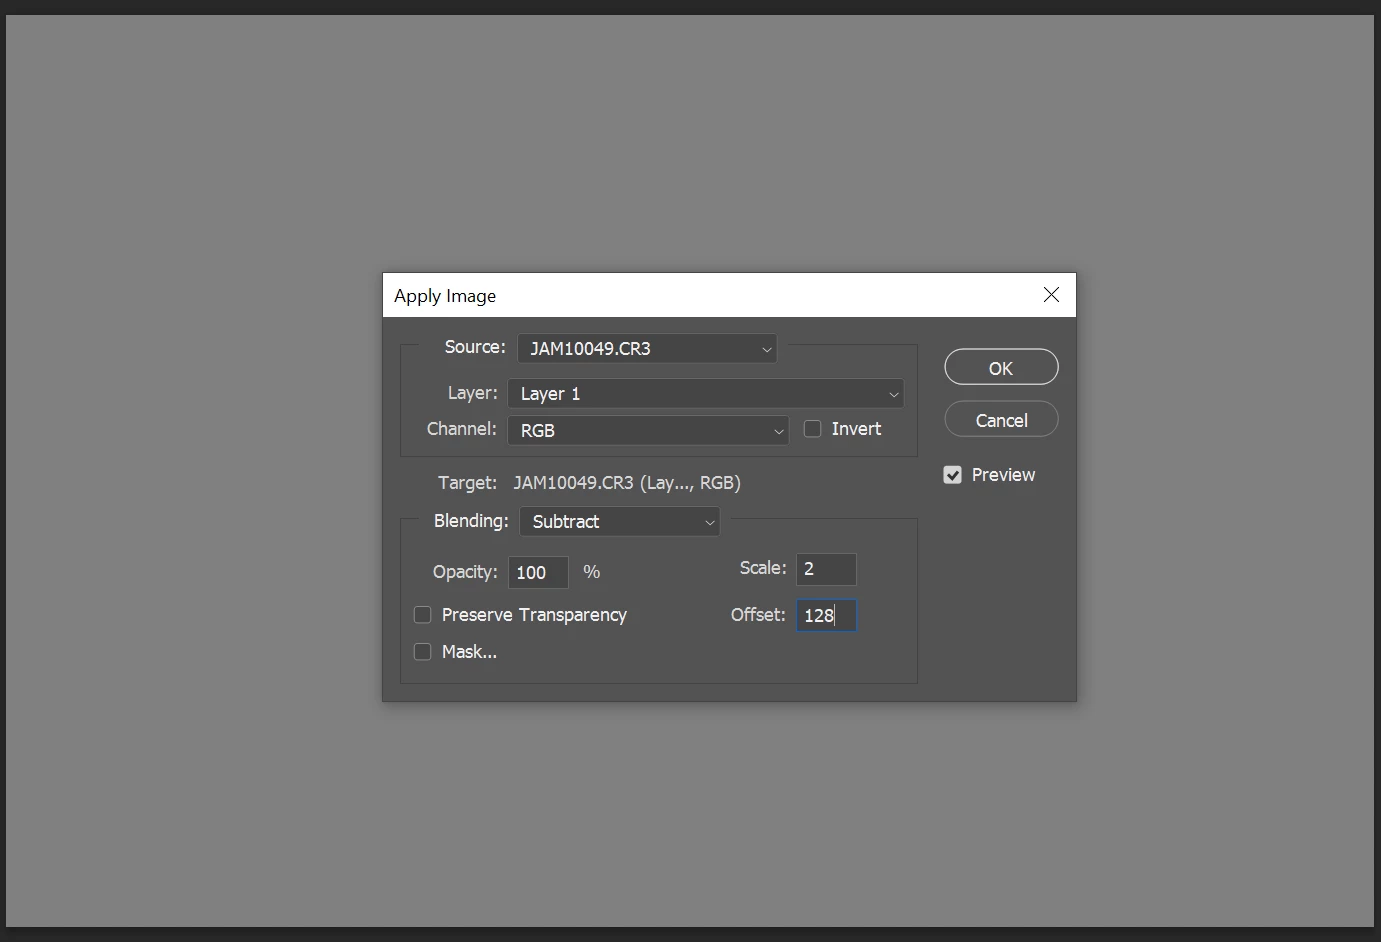
In my layers section, I have the background at the bottom, then layer 1 (colour layer) and then layer 1 copy (texture layer) at the top.

Please help!

Correct answer davescm

The source in apply image should be the blurred layer.


Try this step by step :

1. Make 2 duplicates of your image layer (Ctrl+J)
Name the lower copy - "Low frequency"
Name the upper copy - "High Frequency"

2. Select the Low frequency layer and use Filter Gaussian Blur (around 6.0)

3. Select the High frequency layer
Go to menu Image > Apply Image
Set the source layer to Low Frequency
Set the blending mode to Subtract
Set Scale to 2 *
Set offset to 128 *
Click OK

4. Change the blending mode of the high frequency layer to Linear Light

5. Now you can clone out blemishes on the high frequency layer and lighten or darken areas on the low frequency layer


* Note - the above steps are for 8 bit/channel images. For 16 bit/channel step 3 changes slightly

3. Select the High frequency layer
Go to menu Image > Apply Image
Set the source layer to Low Frequency
Check "Invert" next to channel
Set the blending mode to Add
Set Scale to 2
Set Offset to 0
Click OK

Now carry on with step 4 above


Dave


3 replies

Legend
February 29, 2024

My action starts by me manually selecting the Background layer. I show the blur dialog to set the radius but usually leave it at 6 px. This is for 16-bit images.


Known Participant
March 4, 2024

I believe in the Apply Image Step for 16bit you need to select invert


Legend
March 4, 2024

I've been using this for years and it works perfectly.

davescm
Community Expert
davescmCommunity ExpertCorrect answer
Community Expert
June 22, 2023

The source in apply image should be the blurred layer.


Try this step by step :

1. Make 2 duplicates of your image layer (Ctrl+J)
Name the lower copy - "Low frequency"
Name the upper copy - "High Frequency"

2. Select the Low frequency layer and use Filter Gaussian Blur (around 6.0)

3. Select the High frequency layer
Go to menu Image > Apply Image
Set the source layer to Low Frequency
Set the blending mode to Subtract
Set Scale to 2 *
Set offset to 128 *
Click OK

4. Change the blending mode of the high frequency layer to Linear Light

5. Now you can clone out blemishes on the high frequency layer and lighten or darken areas on the low frequency layer


* Note - the above steps are for 8 bit/channel images. For 16 bit/channel step 3 changes slightly

3. Select the High frequency layer
Go to menu Image > Apply Image
Set the source layer to Low Frequency
Check "Invert" next to channel
Set the blending mode to Add
Set Scale to 2
Set Offset to 0
Click OK

Now carry on with step 4 above


Dave


SmileyJSTAuthor
Participant
June 22, 2023

It worked! Thank you so much!

davescm
Community Expert
Community Expert
June 22, 2023

You're welcome 🙂

Dave

c.pfaffenbichler
Community Expert
Community Expert
June 22, 2023

Could you please post screenshots with the pertinent Panels (Toolbar, Layers, Options Bar, …) visible taken at View > 100%? 


To which tutorial are you referring anyway? 

Why aren’t you using Smart Filters? 

SmileyJSTAuthor
Participant
June 22, 2023


Is that better?

I am following this tutorial, https://www.youtube.com/watch?v=hNxJ16NY4a8&t=307s
and what are smart filters? 

c.pfaffenbichler
Community Expert
Community Expert
June 22, 2023
quote

what are smart filters? 

Smart Filters are Filers applied to a Smart Object; as far as I can tell most of the default Filters and Adjustments can be applied as Smart Filters. 

They remain editable – if you ever had to re-edit an image (especially years after its original creation) that can prove hugely beneficial.