Till Krueger
Inspiring
March 20, 2017
Answered

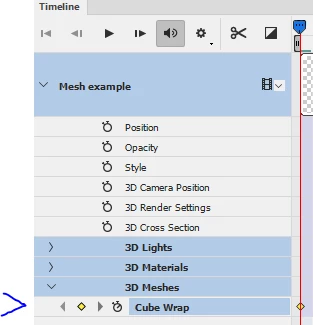
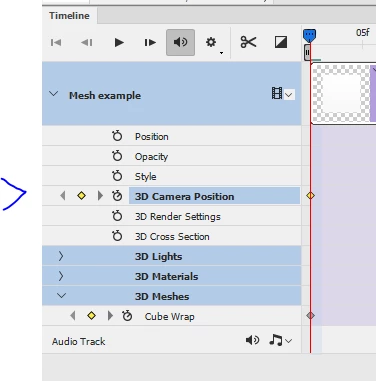
What replaced the former "3D Scene Position" timeline?

  • March 20, 2017
  • 1 reply
  • 4058 views

I have spent my entire Sunday trying to find a solution to what should be a super-simple task: to animate the rotation of a 3D Moon object around its own Y axis.

It seems that all the tutorials I found use old versions of Photoshop (CS6 and CC) which still have a timeline called "3D Scene Position", but this item has gone away shortly after, it seems, and all the forum posts that I could find addressing its puzzling absence, some going back to 2014, have been ignored by Adobe staff.

I used to be a 3D animator by profession and usually know my way around 3D software rather quickly, but to not be able to keyframe the Y rotation (or any other positional parameters) of an object is about as necessary and basic for 3D animation as it gets. I must be missing something obvious here as I cannot imagine Adobe removing this timeline without making its functions accessible in some other way. But how does one accomplish something as simple as an animated globe rotation around its own pivot point now? Could someone help me out and point me to the answer?

A new project requires me to animate certain layers of a rather complex Photoshop file that I created for a client, and while it's possible, in theory, to pick up some new skills for - say - Cinema 4D, it would be sooo much simpler to animate the elements I need in Photoshop itself...and that is what its 3D module is supposed to let you do, no?

Hope there is a solution!

This topic has been closed for replies.
Correct answer davescm

Hi

See screenshot below (Photoshop CC2017.0.1).

The object is called Mesh Example which was just a preset Cube map.

In timeline, use Create Video timeline -then :

To move the object :

Click on the down arrows next to the object in the timeline till you see 3D meshes then click on the clock symbol and add you keyframes to the timeline. Note if you move the timeline cursor then move the object - the keyframes will be added autonamtically

To move the camera :

As above, then enable the clock next to camera position and add keyframes

Note : Once you have added your keyframes , there is a current bug (it has been reported) , which means you have to click on another track (e.g. the audio track), before hitting play. Otherwise you won't see the movement. Not a big deal but it can have you scratching your head until you know how to get around it.

Dave

1 reply

davescm
Community Expert
davescmCommunity ExpertCorrect answer
Community Expert
March 20, 2017

Hi

See screenshot below (Photoshop CC2017.0.1).

The object is called Mesh Example which was just a preset Cube map.

In timeline, use Create Video timeline -then :

To move the object :

Click on the down arrows next to the object in the timeline till you see 3D meshes then click on the clock symbol and add you keyframes to the timeline. Note if you move the timeline cursor then move the object - the keyframes will be added autonamtically

To move the camera :

As above, then enable the clock next to camera position and add keyframes

Note : Once you have added your keyframes , there is a current bug (it has been reported) , which means you have to click on another track (e.g. the audio track), before hitting play. Otherwise you won't see the movement. Not a big deal but it can have you scratching your head until you know how to get around it.

Dave

Till Krueger
Inspiring
March 20, 2017

Oh Dave, what a relief! Such a simple solution made difficult only by not finding the place where this action had to take place. Brilliant!
I'll try to take the next steps now and hope that you won't mind if I ask another question or two here in this thread, but I know you can't be my Photoshop 3D tutor. Hope it will be self-explanatory from here on out, more or less. (a few Google and YouTube searches are always part of the process)

Can't thank you enough, brother!

davescm
Community Expert
Community Expert
March 20, 2017

No problem

Enjoy - and ask away ! The 3D layouts changed a bit between CS5 and CS6 . Unfortunately, not all the documentation has kept up.

Just one other thing - when you come to render your animation use Render Video in the timeline.

If your output is to be a video format , e.g. an mp4 using H.264 codec then just select the options in the render video dialogue box (remember to set the 3D quality option).

If your output is to be a GIF - render first to a Photoshop Image Sequence (from the Render Video dialogue). Then import those frame images as layers to a new document and create a frame animation in that document. Finally use Save to Web (Legacy) to export your gif. If you try and go straight to gif from your 3D document you get an unrendered preview version.

Dave