bartonlew
Legend
October 31, 2019
Answered

What's a good alternative for Camera Raw Filter for subtle exposure modifications?

  • October 31, 2019
  • 3 replies
  • 3884 views

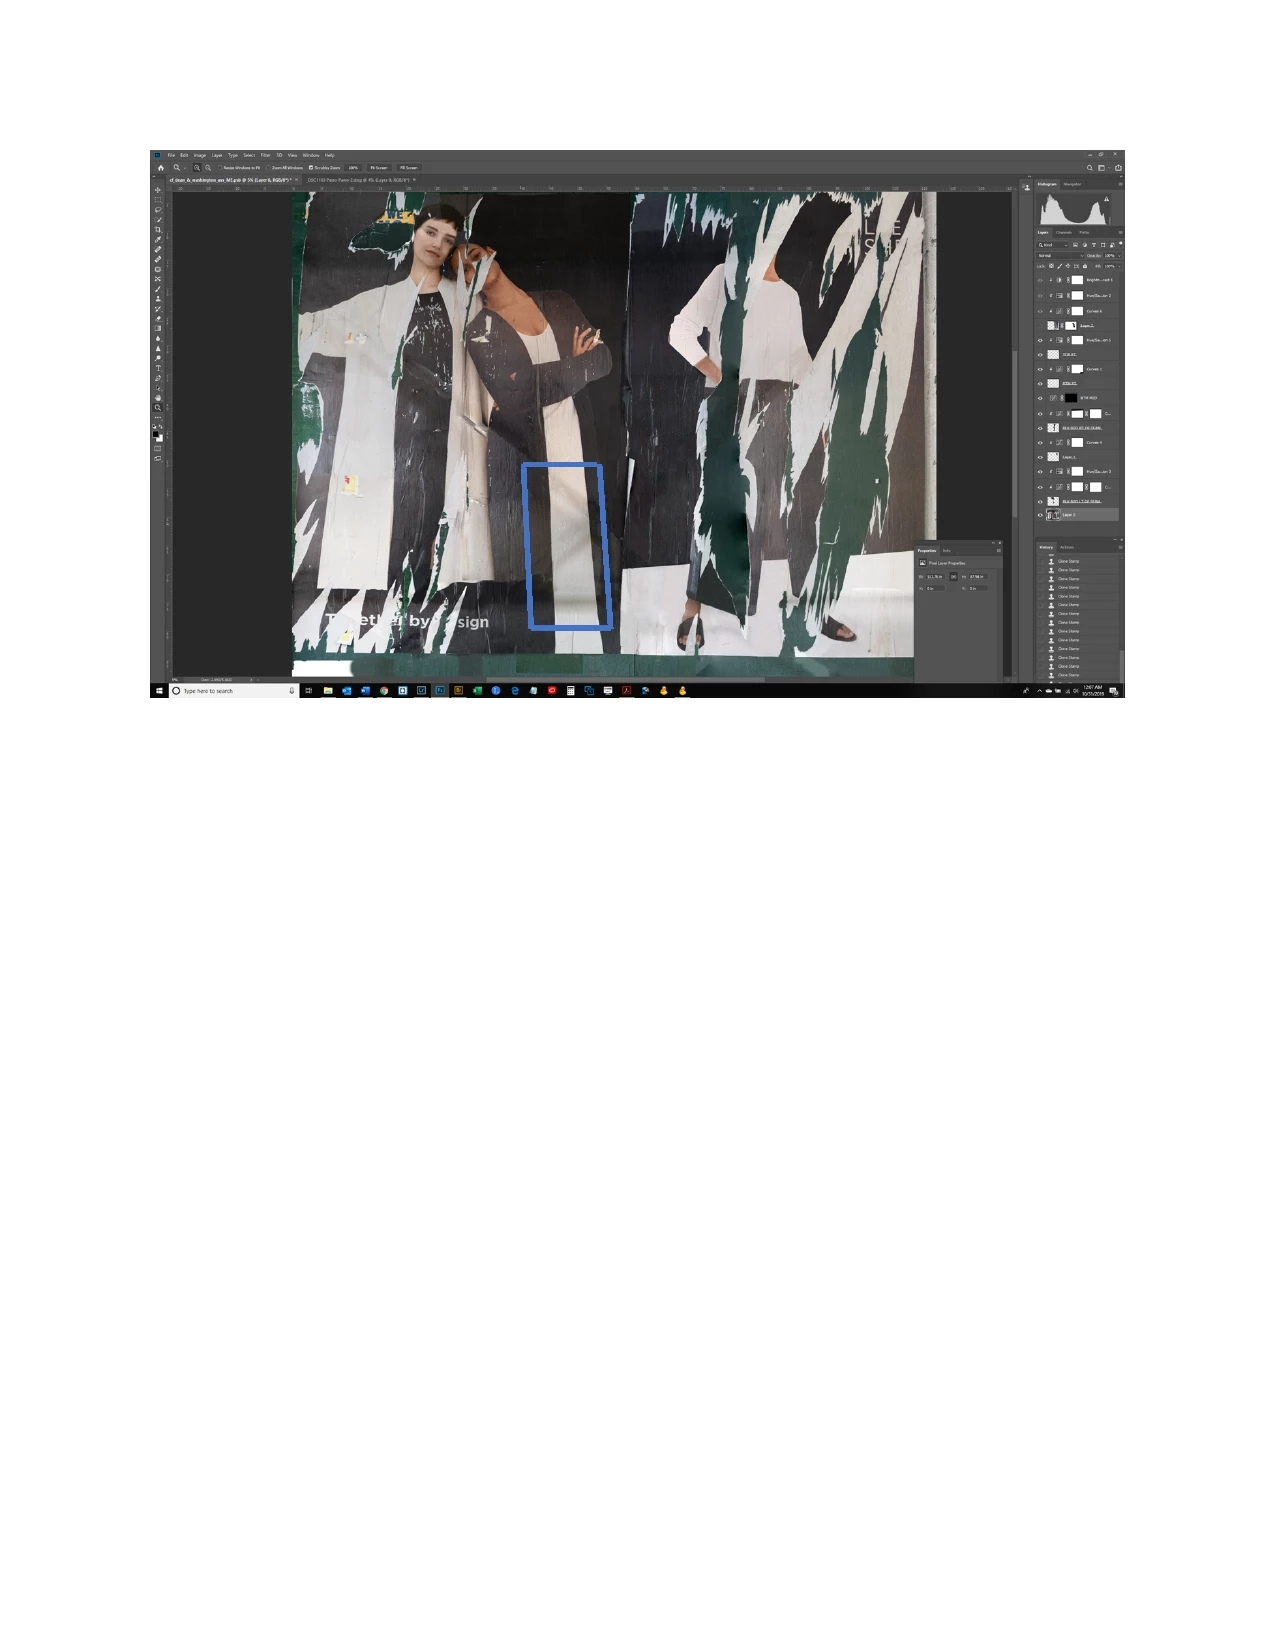
I want to make subtle exposure modulations in the white dress in the center of this image where there are shadows inside the blue box.  I would normally use the paintbrush in Adobe Camera Raw but this image is too big.  I tried making a selection of the dress and making that a Smart Object and adding Camera Raw Filter but it must be referencing the entire file as it says it's still too big.  For most things where I can't use Camera Raw Filter I have figured out alternatives using adjustment masks but I can't do that here.  I want to lighten the shadows so they blend in with the rest of the dress.  I tried creating a selection of the dress; adding a Curves adjustment layer; lightening the selection; selecting the paintbrush and painting over the parts of the dress I don't want to be lightened (the non-shadows part) but this didn't work well, I couldn't get fine enough control over the shadows.  Can anyone suggest a way to achieve this objective?  Thank you.

This topic has been closed for replies.
Correct answer Chuck Uebele

Other techniques that you can use include using color range. With color range, you can select the areas that you want to edit, then create a mask with that selection. As for color shifts, I use color range for that also. I will zoom into the pixel level and select pixels that are way off in color" overly magenta or blue, etc. Then, I will either use a curves adjustment layer to tone down those colors, or use hue on hue saturation, to subtly shift the color to one more inline with the image. In this way, I don't shift other pixels to far the other way. It doesn't take much correction to make a nice subtle correction.

3 replies

Chuck Uebele
Community Expert
Chuck UebeleCommunity ExpertCorrect answer
Community Expert
November 1, 2019

Other techniques that you can use include using color range. With color range, you can select the areas that you want to edit, then create a mask with that selection. As for color shifts, I use color range for that also. I will zoom into the pixel level and select pixels that are way off in color" overly magenta or blue, etc. Then, I will either use a curves adjustment layer to tone down those colors, or use hue on hue saturation, to subtly shift the color to one more inline with the image. In this way, I don't shift other pixels to far the other way. It doesn't take much correction to make a nice subtle correction.

bartonlew
bartonlewAuthor
Legend
November 1, 2019

Wow - Color Range!  Just watched a video from tutvid about it on youtube.  Great to know about this previosuly uinknown (to me) tool!  Thank you!

Chuck Uebele
Community Expert
Community Expert
October 31, 2019

I would stick with curves, but I would also add a luminosity mask to limit the corrections to just the slight shadow areas of the dress. The uploaded image is a bit hard to tell really, as this new forum messes up images.

bartonlew
bartonlewAuthor
Legend
November 1, 2019

Thanks Chuck.  I watched a video by Aaron Nace on Curves and am using the technique he showed:  1. create the curves layer; 2. make the adjustment; 3. fill the mask with black to hide the adjustment; 4. paint with white where you want the adjustment to show up.  I am having to add successive layers to create value shifts from the shadow area to the non shadow area as it is gradual; but I am getting better at it.  I think it justs takes practice.  It's the layer alternative to adding new pins in Camera Raw Filter where you can paint with varying values.

Stephen Marsh
Community Expert
Community Expert
October 31, 2019

I'd start with Image > Adjustments > Shadow/Highlights... Then possibly, dodge/burn, curves etc.

bartonlew
bartonlewAuthor
Legend
November 1, 2019

Thanks.  I know people who really like the Image > Adjustments > Shadow/Highlights option - but I kind of want to use something that is reversible.  I had forgotten about dodge and burn - will look into those again.

Stephen Marsh
Community Expert
Community Expert
November 1, 2019

You just need to copy the layer or area in question, mask it, then use Shadow/Highlights. I find that it provides a good start point before curves, however, unlike a raw camera image, it will not perform "magic" if the highlights are blown out.