I tried changing the opacity for the fill but the opacity slider also affects the outline. I tried clicking on the selected color box but the check mark does not go away. I tried right clicking but there is no affect.
The quickest way to do that is to 1) Use your Comment toolset to create an object that will contain proofing comments, and not add any comments so you only get the shape you want to draw.
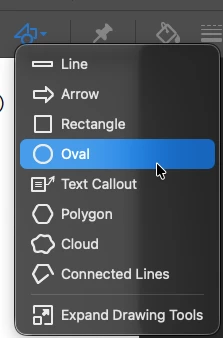
After that, 2) Go to the Object button and choose what shape you want it to be. For your circle, you would select the Oval tool, then hold down the Shift key as you draw an oval that will be a perfect circle. But that’s Step 4 and I’m getting ahead of myself. We’ll address that shortly.
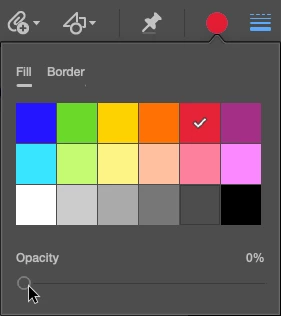
Then 3) Select the Color button above the document window (in the example above, the red dot to the left of the screen capture. When the drop-down menu shows below, select the color you want your border to be. After that, click on the Stroke button (the various lines illustrated in blue in the screen capture above) and choose how thick you would like the border/stroke to be. As you’ve discovered, you get a bunch of options to choose both the Fill and Border options, as well as how thick you would like the border to be. None of them work right … yet.
Now that you’ve selected the options you want, your cursor will turn to a set of crosshairs. The next step is to 4) Move your cursor to the upper-left of the area you’d like to encircle. As I said above, hold down the Shift key, then hold down your left mouse button and drag down and to the right, to enclose the area you want to circle. Again, as you’ve already discovered, none of that works right. You get a solid filled circle using the color you’d like your border stroke to be.
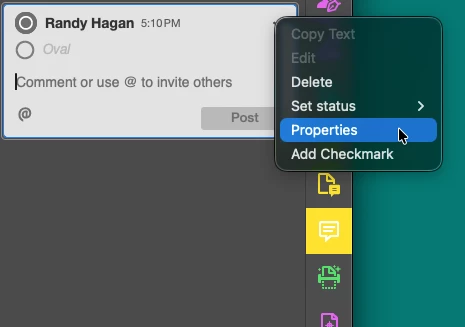
Here’s the part that you’re missing … not that it’s your fault. Adobe’s documentation of this is poor to non-existent. 5) In the panel to the right, where Acrobat wants you to type out your comment, click on the three dots to the upper-right and select the Properties menu command in the flyaway menu that pops up after clicking the three dots.
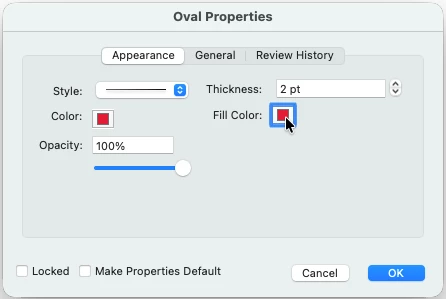
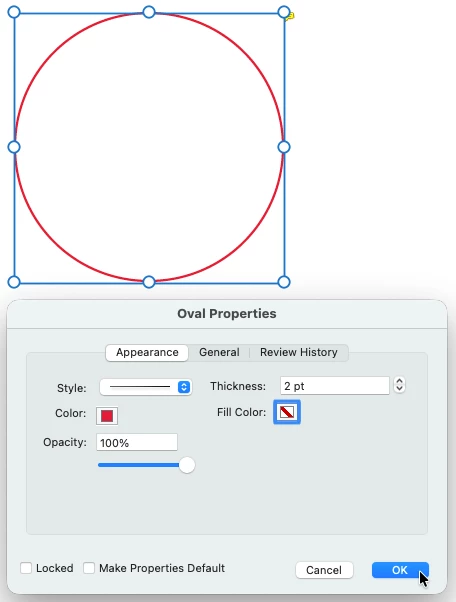
This opens the Oval Properties dialog box, where you can set your circle fill and stroke to where you really want it to be. Your circle still won’t look right, but since we set what we wanted, it will show you the stroke you want around the shape and the color you want that stroke to be. 5) Click on the swatch button to the right of the Fill Color: option, as shown above, to banish the solid area inside your circle to electronic nirvåna.
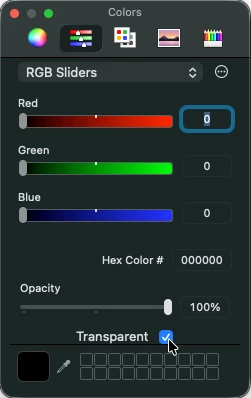
This opens a second, Colors dialog box. 6) Select the Transparent check box to hollow out your circular shape as shown above, then click the red button to the upper-left of the Colors dialog box to choose that option and close it.
When you return to your Oval Properties dialog box, you’ll see the Fill Color: swatch is now a white box with a diagonal red line through it — the common digital definition for a transparent fill color in a graphic. You’ll also notice that your solid circle has finally turned hollow. 7) Click the OK button in the dialog box and you’re done with it.
Forgive yourself for not realizing this is how creating a hollow shape really works. Acrobat has a non-standard interface for getting you the results you really want. That’s a high-falutin’ way of saying that it doesn’t make a lick of sense. This isn’t your fault; it’s Acrobat’s.
Can I ask a favor of you? Could you please mark my response to your question as the “Best Answer” to your post. This alerts forum moderators to push this up in the archives and offer it as a possible solution to other folks who find themselves in the same or very similar situations.
I’m very glad this worked out for you. Like I offered in the answer, this is a very non-intuitive interface. I didn’t know the answer because I’m somehow Rhodes Scholar bright. I learned it by getting caught in the same situation you were. Promoting that response will help other people who find themselves at the bottom of this learning curve.
The quickest way to do that is to 1) Use your Comment toolset to create an object that will contain proofing comments, and not add any comments so you only get the shape you want to draw.
After that, 2) Go to the Object button and choose what shape you want it to be. For your circle, you would select the Oval tool, then hold down the Shift key as you draw an oval that will be a perfect circle. But that’s Step 4 and I’m getting ahead of myself. We’ll address that shortly.
Then 3) Select the Color button above the document window (in the example above, the red dot to the left of the screen capture. When the drop-down menu shows below, select the color you want your border to be. After that, click on the Stroke button (the various lines illustrated in blue in the screen capture above) and choose how thick you would like the border/stroke to be. As you’ve discovered, you get a bunch of options to choose both the Fill and Border options, as well as how thick you would like the border to be. None of them work right … yet.
Now that you’ve selected the options you want, your cursor will turn to a set of crosshairs. The next step is to 4) Move your cursor to the upper-left of the area you’d like to encircle. As I said above, hold down the Shift key, then hold down your left mouse button and drag down and to the right, to enclose the area you want to circle. Again, as you’ve already discovered, none of that works right. You get a solid filled circle using the color you’d like your border stroke to be.
Here’s the part that you’re missing … not that it’s your fault. Adobe’s documentation of this is poor to non-existent. 5) In the panel to the right, where Acrobat wants you to type out your comment, click on the three dots to the upper-right and select the Properties menu command in the flyaway menu that pops up after clicking the three dots.
This opens the Oval Properties dialog box, where you can set your circle fill and stroke to where you really want it to be. Your circle still won’t look right, but since we set what we wanted, it will show you the stroke you want around the shape and the color you want that stroke to be. 5) Click on the swatch button to the right of the Fill Color: option, as shown above, to banish the solid area inside your circle to electronic nirvåna.
This opens a second, Colors dialog box. 6) Select the Transparent check box to hollow out your circular shape as shown above, then click the red button to the upper-left of the Colors dialog box to choose that option and close it.
When you return to your Oval Properties dialog box, you’ll see the Fill Color: swatch is now a white box with a diagonal red line through it — the common digital definition for a transparent fill color in a graphic. You’ll also notice that your solid circle has finally turned hollow. 7) Click the OK button in the dialog box and you’re done with it.
Forgive yourself for not realizing this is how creating a hollow shape really works. Acrobat has a non-standard interface for getting you the results you really want. That’s a high-falutin’ way of saying that it doesn’t make a lick of sense. This isn’t your fault; it’s Acrobat’s.






 AdChoices