


December 19, 2025
Question

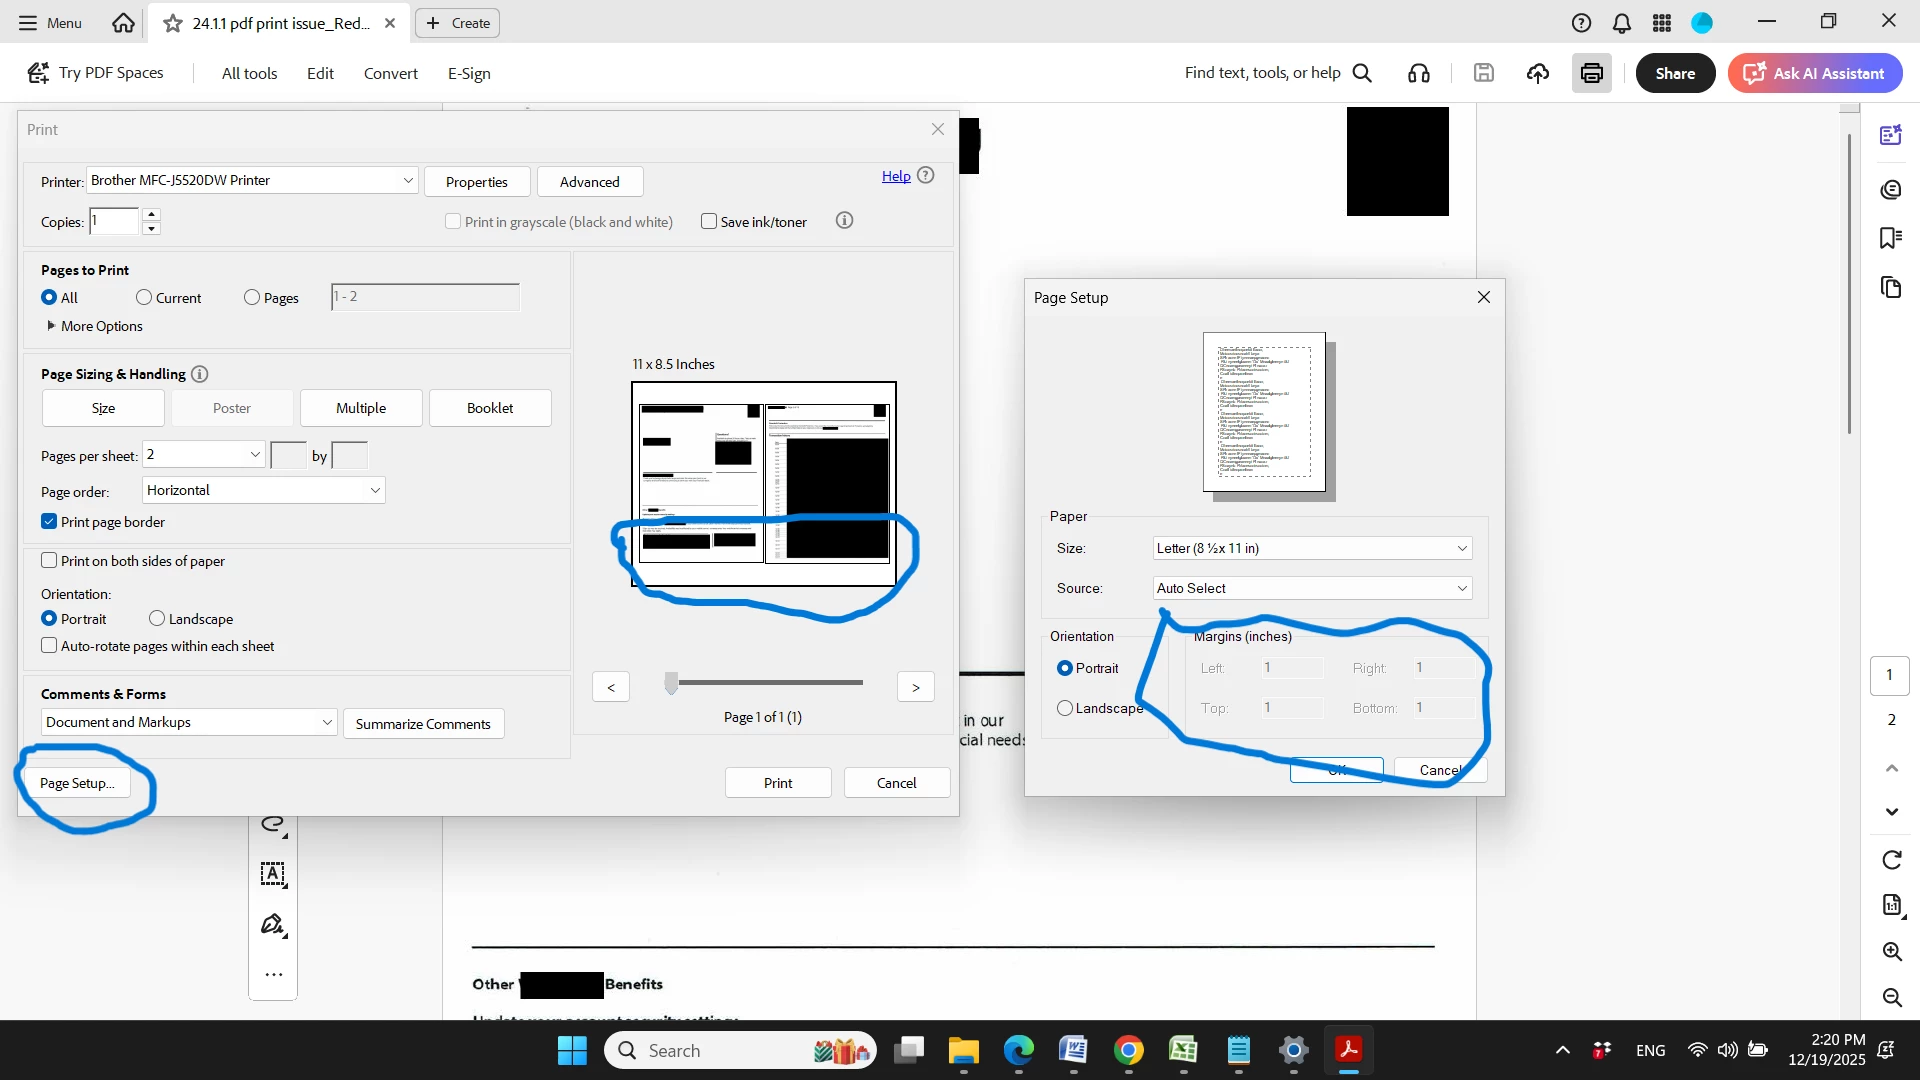
why pdf print page setup margins are grayed out forcing 1 inch all around

  • December 19, 2025
  • 1 reply
  • 399 views

why and how to fix it (by fix means not grayed out and can be changed. no work around works!!)

why pdf print page setup margins are grayed out, forcing 1 inch all around no matter what I do. See attached screenshot. As you can see the pdf page margin itself has been reduced in print view (above the border) but the 1 inch margin is being forced by print in print view (under the border)
1 reply

December 19, 2025

to be more exact, it forces 1 inch on the bottom and the top (If you are looking at print view) or left and right (of the paper since print view flips). No amount of changing inside pdf works since the print page inserts it. Believe me, I have tried.  I got a reply back from Adobe, for 

Case ADB-43083819-J1R3 CRM:04465000006768. Copy/paste below, but 1) those that I underlined are not available in my Adobe Pro version and more importantly, 2) the suggestion seemed to be another workaround (which I have done some) that does not solve the original problem since the grayed out 1 inch margin will overwrite and force it back in.


Copy/paste Suggestion from support


Windows

Create custom page sizes

Open the document and select Print this file from the global bar. 

In the Print dialog box, select Page Setup.

In the dialog box that opens, select the Page Size dropdown menu and then select Manage Custom Sizes.

Select + and enter the following information:

  • Name for the custom size
  • Width and height
  • Margin sizes

Select OK to save the custom size.

Use custom page sizes

Open the document and select Print this file from the global bar. 

In the Print dialog box, select Page Setup.

In the dialog box that opens, select the Page Size dropdown menu and then select the custom size under Custom papers.

Select OK.

Select Print.

December 19, 2025

Sorry, one more point, the printer manufacturer is "Brother." and they are saying Print menu is vendor responsibility (Like Microsoft, Adobe), but some of Adobe support are saying it is the printer !!?? very unfortunate as there seem to be many other complaints about the same issue, but no concrete documentation solution that closes the issue 

AnandSri
Legend
December 25, 2025

Hello @ramin_rd


I hope you're doing well. We apologize for the delayed response and the trouble.


Those grayed‑out 1″ margins come from the printer/OS page setup (printable area reported by the driver), not from Acrobat. Acrobat can’t override a device’s unprintable area. Acrobat uses the printable area reported by your printer driver. If the device reserves approximately ¼–1″ hardware margins, the Page Setup fields may appear fixed/disabled, and the preview will shrink content to fit when “Fit” is chosen.
 
Suggestions: 
Print at “Actual Size” (no scaling) and rely on the driver’s printable area. In Acrobat’s Print dialog, choose Page Sizing & Handling > Actual Size (not “Fit”), and verify the preview. If the printer supports borderless printing, enable it in the printer’s own Properties/Preferences and update the printer driver/PPD. This is a driver capability, not an Acrobat margin setting.
 
If you must visually remove margins on paper, adjust the PDF’s page boxes before printing. Use Organize pages > Set page boxes (Pro) to adjust the CropBox/TrimBox/BleedBox, or to Remove White Margins, then print. This doesn’t change the hardware margin, but it removes white borders from the document so the preview matches intent.
 
On macOS, manage custom page sizes from the Page Setup menu. If your printer/PPD supports it, set a Custom Paper Size (and margins) via macOS Page Setup; choose it in Acrobat’s Print > Page Setup. This depends on the driver/PPD and may be unavailable for some devices
 
Please ensure you have the latest version of Acrobat installed on the machine: 25.001.20997. Planned update: December 9, 2025. Check for any pending updates by navigating to Menu > Help> Check for Updates. Install the updates, restart the app and the machine, and try again.
 
Thanks,
Anand Sri.