

Digitizing Your Slides by Photography
This blog is divided into two parts. Part 1 is acquiring and digitizing your slides. Part 2 talks about processing the images in Lightroom to enhance the images in a fast and efficient manner and to provide keywords so that you can find the image(s) you want in an efficient manner.
I started using slides as my primary photography format around 1977. My Minolta 201 and my three lenses went to many countries and all around the United States. I photographed our family trips, my kids growing up, and my wife's and my many adventures. All told I have about 10,000 slides (really). But its been many years since I've seen these slides. They were in slide boxes and placed in the closet and the trouble of setting up the projector and screen, pulling out the slides that I wanted, mounting them into the projector to view, etc., etc. was too much work. Simply, it was as if I had never taken the photos in the first place.
I should point out that of all of the photographic mediums available, slides provide the least dynamic range. I didn't realize that when I started taking slides and I know that my photographic knowledge at the time was sufficiently limited such that if someone had told me that bit of information I wouldn't have known the significance. But that was then, this is now, and I still want to see what I photographed so many years ago.
I do own a very nice scanner and it can scan up to a dozen slides one-at-a-time sequentially but this still can take a lot of time. If you want the BEST quality images you need to do all of the adjustments with the scanning software at the time of the scan rather than later in Photoshop. If you also squeeze the largest resolution of the image (which adds to the scan time), it can take about 5 minutes per scan. With some 10,000 slides, I'd be dead before I finished.
So how good are the images when photographed?
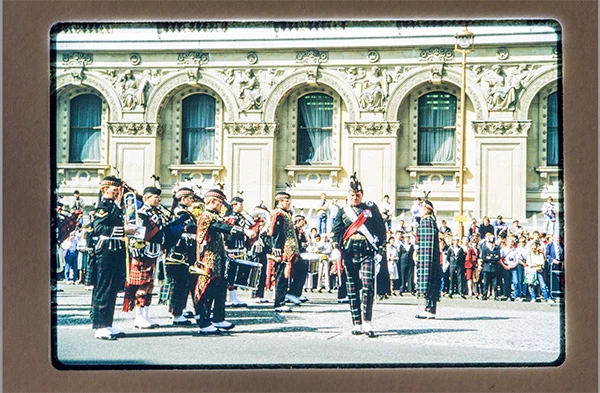
Below are two examples of the same image. On the left is the photo version of the slide on the right is the scanned version. Besides the obvious differences such as color variations, the real limitation of the photographed version can be seen is in the facial closeup below the following image.
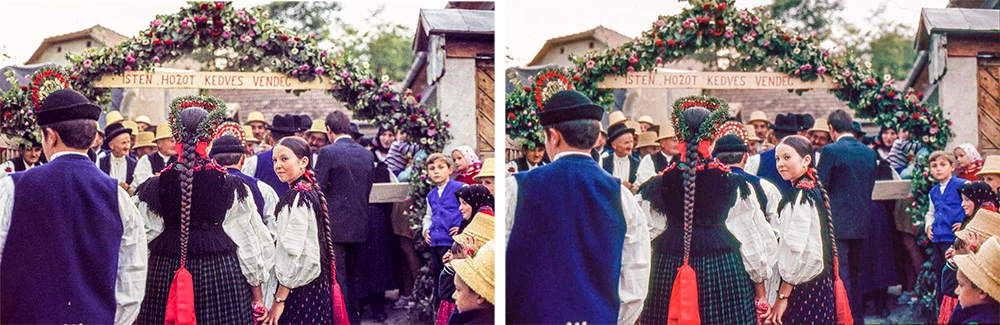
Here is a close up of the young woman facing us, again the photographed image is on the left. The biggest limitation of photographing your slides is that there is no way that Lightroom or Photoshop can properly deal with image grain. Digital noise, yes but not grain. However, scanning software can deal with this. For the record, I used Silverfast 8 (by Lasersoft Imaging) software on this slide and its quality is self-evident.

If your original images are mostly grain-free, you will find that the photographed images are remarkably good, but even with some grain, they are not bad as the above image testifies.
Why digitize your images
There are many reasons, probably the most important is that you've probably not seen your images in many many years. It's time to see them but there's as many reasons as there are slides.
As I pondered my options on how to do this, I had read about people photographing their slides with a macro lens but never saw a specific approach. After much research, a lot of experimentation (and solving problems as they came up), I developed an approach that lets me photograph about 30 slides in 5 minutes. In addition, with the power of Lightroom, I can process the slides from between a 20 seconds per slide (including adding keywords) up to 2 minutes per slide depending on how much time the slide deserves.
My goal here is speed: my primary objective is that I want to see my slides. If there are slides that I want the best quality for their digital format, I can always do a proper scan at a later time.
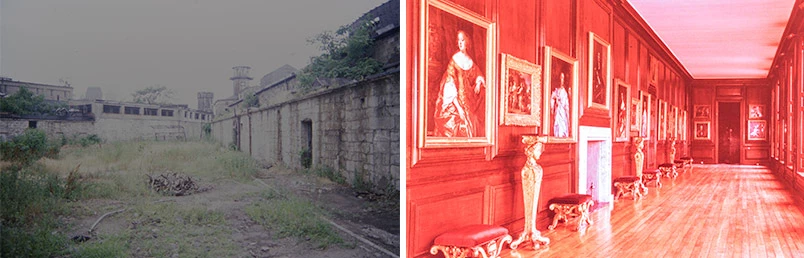
Interestingly enough, there is another benefit to digitizing your images: slides lose their quality over time. There's no doubt that the degree of degradation and the speed of this degradation depends upon the type of film used, how the slides were stored and cared for, and how old they are (to list a few of the potential reasons). Sometimes it's the luck of the draw if a group of slides has degraded over time, sometimes a whole group of slides will be pretty good yet within will be several bad ones. In addition, some film types were worse than others and were known for degradation In addition, every purchased set of slides I ever bought degraded badly. [You know, you go to some vacation spot and at the gift shop they sell a packet of slides, professionally made, and you figure, "Hey, I can't take slides inside and these professionally made slides of (say) Hampton Court will be better than what I can do." Well, after time has taken its toll, not so much.]
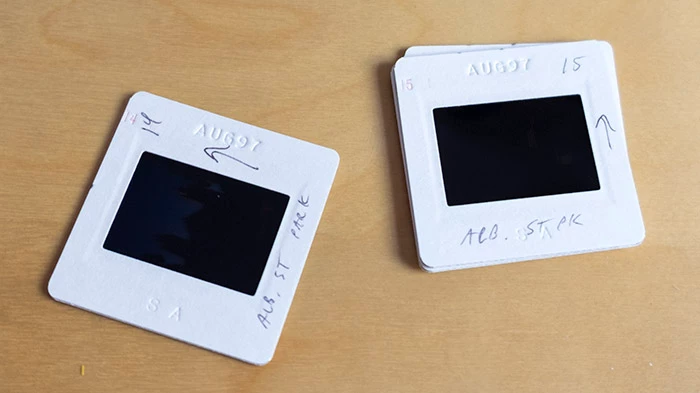
Below on the left is an image of a slide I took at Penn State Penitentiary and on the right a purchased slide from Hampton Court (Great Brittan). In both cases, these slides that looked fine at the time are now effectively gone.
So, in short, what this blog is all about is capturing your slides so that you have them digitized and locked in. You can always select slides that appeal to you and rescan them later to the highest quality. You can photograph these slides, look at them, shrug your shoulders and delete them all. But at a minimum you've seen them. Plus, you can now do a much better job of Keep & Toss on the images and/or the slides.
One of the side pleasures I've found as I look at these slides is how much my photography has improved and I also see where I did things correctly—even if it was inadvertent at the time!
The following is what worked for me, you obviously can vary the following as your needs and judgment feel is best. But I've photographed over 5000 slides at this point and I've already made most of the mistakes that one can do so I'm talking experience.
Preparing your slides
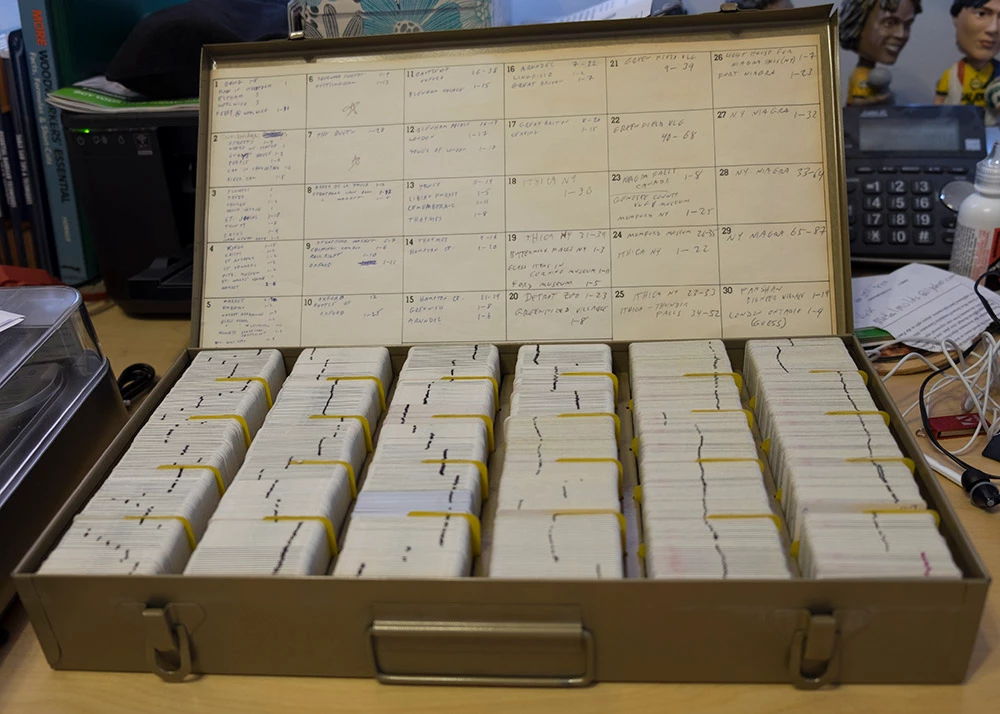
I'd like to say that my life is as organized as my slides and the way that I've kept them, but alas, no. For some reason I've always kept my slides well organized so that I could find things when I wanted/needed them. I'm too cheap to have purchased all of the carousels that I would have needed so from the very beginning I've stored my slides in steel Logan boxes that can hold up to 900 about slides. These boxes have 30 tabbed bins which, as you'll read, become a benefit as well. These boxes include a sheet of paper to identify what's in each bin. As I went through my slides I'd place some kind of identifying name, numbered them, and added an arrow to show what end was up. All of this identification helped immensely when it came to adding keywords. I would also take a marking pen and draw lines down slides with similar content to help see where one group started and stopped. Who knew how handy this would be years and years later.
If you haven't done all of this prep-work, I suggest sitting down during a sports game or some other mild distraction and do as much of this as you feel necessary before you begin. It will help in later steps.
Here's the equipment I used:
Some of the items in this list are not critical, others are. Again, this is what I used and perhaps you will find other items that fit your budget and/or lifestyle better.
- A DSLR camera. Pretty much any kind can work here. Sorry, no phone camera or a point-and-shoot can do this.
- A Macro lens, about 100mm is a good size for this type of work. The benefit here is that if you've been needing an excuse to get one, here's your excuse. I have to admit that I'm having a ball with my lens, I use it all the time in my regular photography.
- A light source: What I wanted was some light source that wouldn't create a color-cast. That is, if the light source had a tungsten filament, all of the images would have a yellowish cast that would have to be dealt with. What I ended up with is "The LED Light Box" by Porta-trace. [Model #1012-1 LED] This was not cheap but it provided full even lighting with no color cast.
- A Tripod. You need to affix your camera down so that it will not move, jiggle, or slide around. As one friend told me "don't buy a $20 tripod for your $1000 camera."
- Painter's Blue Tape: you need to tape your light box down onto the table and you need to tape your tripod to the table that the light box is on. What's critical to this process is that every thing is ridged so that each time you place a slide down, it's registered in one place. This will become more evident and critical as you go into Part 2, Lightroom.
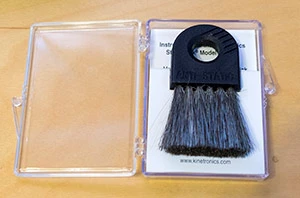
- Dust Broom: a dust broom for slides to get the dust off. No matter how you've had them stored, the slides have dust on them and you want to get the dust off.
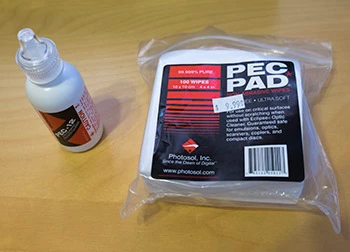
- Slide Cleaner: If there are heavy fingerprints or other subsistences on your slides, you need something heavy duty to clean this off AND not damage the slide. At my favorite camera store I was recommended to use PEC-12 and PEC PADs for cleaning. They do a good job but you must use this in fresh air.
- A long USB cable. If you chose to tether your camera to your computer, you will need a USB cable long enough to do that. My USB-3 cable is 8.5 feet long. Note: if your camera or computer does not have USB 3, depending on the storage size of your camera's images, it might not be worth tethering your camera. In addition, some cameras have built in wifi and there are 3rd party wifi options available as well.
- Remote control shutter for your camera. This is not essential if your camera is tethered to your computer as Lightroom's tether controls have a shutter on your computer to press your camera's shutter. (I tie a loop on the remote shutter's cord that I let hang from one of my tripod's head's arm to make it easier to reach and grab.)
Lastly, you need to make a slide-register to place the slides on the light box. (I initially used the cardboard from a USPS Priority Mail box). If there's one negative about the light box mentioned above is that you can see some wires underneath part of the surface of the translucent cover to the light. For most purposes this is completely irrelevant but for our purpose it's not good. Locate a region where the light is not interrupted (there's lots so this is not really an issue). Now cut a rectangular hole about 1.25 x 1.5 at this location. This hole is larger than the image part of the slide but smaller than the slide itself.
Finally you need to place two extra pieces of this cardboard, offset to the rectangular hole so that the slide image can be seen through this hole. These two pieces of cardboard need to be 90°, dead on. This whole cardboard creation needs to be tapped directly onto the light box The reason for the large cardboard base is to cover the light from the light box as you only want the light projected from behind the slide.

One problem I had at the beginning was occasional dust in that hole. So I took the trouble of making the whole thing again out of sheet plastic with blue tape covering over the clear plastic. This did not solve the problem: it turns out that most of the dust came from the slide's cardboard.
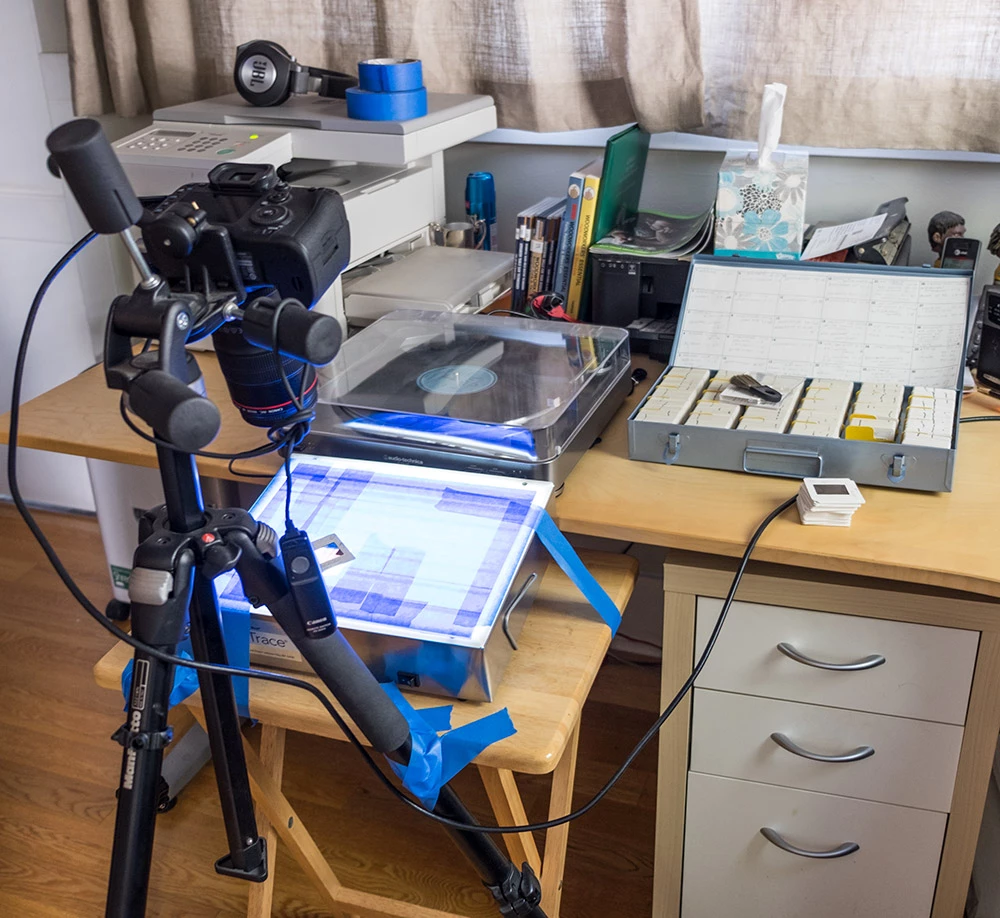
Now, as stated, everything needs to be place together so that once set up, NOTHING moves. Below is an image of how I did my set up. Note that I used a coffee table to do this: this was for convenience as my desk is, well, busy. Also note that the tripod is firmly attached to the table, the light box is firmly attached to the table, and the slide-holder is firmly attached to the light box All of this is done with blue tape. The bad thing about blue tape is that it tears easy so you do have to be careful. The good thing about blue tape is that it doesn't leave a residue. [Note: the photo below makes the blue tape appear very translucent. It is not, that's just an aberration of the photograph.
Prepping the slides for photography
I like to do the photography in small groups. That is, I found that each bin in the slide box is a good block to work with. I pull out this block of slides and place them on my desk. I should note that when I place the slides into each bin, they are numbered from back to front. This was originally done so I could remove them from the box and place them in my slide projector which displayed them in order back to font. This also turned out to be a fortuitous event because what I do is to lift the top slide (which is the last one of the group), dust the slide, and place it down on the desk. I then take the next slide, dust it, and place it on top of the previous slide. Thus, once complete, the slides are now in order top to bottom. In addition, if you have any slides in the portrait position, you must rotate them so they are in same orientation as the landscape slides. This must be done because the hole in the slide mount is set for landscape viewing. When I get to processing the slides in Lightroom in Part 2, you will see that this works out VERY well. [Note: do not think that it's wise to make the hole big enough to capture both landscape and portrait because that will end up taking more time when it comes to cropping the cardboard away from the image in Part 2.]
If you are tethering, plug one end of a USB cable into your camera, the other end into either a Powered USB port or the computer. Once the camera is turned on, you can go to Lightroom, File Menu, select "Tethered Capture," and select "Start Tethered Capture..." (A window will pop up that I will discuss in Part 2.)
One note on tethering: even if the images are directly going to your computer, the images are also being placed on your camera's storage card. As such, you may need to check and make sure you've room to continue taking photos. If you do not tether, you can save your images on your camera and Import the images later. The one big advantage of tethering is that you can quickly see if you have an issue and deal with the problem. Such issue's might include something simple such as forgetting to photograph the number of the box bin or something critical such as something in your setup slipped and you're only photographing half of the slide. If the images are only collected to your camera's card, you may miss something critical and need to redo some number of your photos.
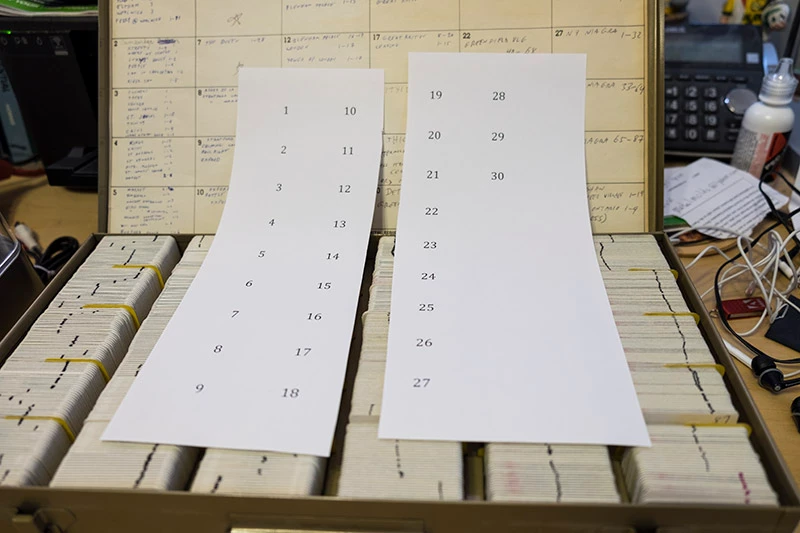
Now part of this whole process is that you will have all of your slides photographed so you can easily see them but the other part of this is that you can easily FIND them. Probably one of the biggest mistakes I made early on is to not make each bin in the slide box easily findable. Once I realized how valuable this is, I created a simple solution, embarrassingly simple: I prepared a sheet of paper with the numbers 1 – 30 printed on the sheet. I cut it in two to make it easier to maneuver on the light box and before each bin was photographed, I took a picture of that number. Then when looking over the images in Lightroom, it was VERY easy to find where the slide was in the box and since the box number is part of the keywords, I know which box.
The Photography
Finally, after procuring all of the equipment, prepping all of the slides, dusting and/or cleaning the slides, ordering and aligning the slides you can start photographing the slides.
Aim your camera at the slides and that your light box is tipped a bit so that the camera is not pointing absolutely straight down. I found that sometimes the orientation within the camera would flip from portrait to landscape and back when the lens was straight down. With the camera pointing "mostly" down, this never happened again. By eye, it's not difficult to set your camera to be in as good a perpendicular alignment as needed. If necessary, grab something perpendicular (such as a piece of paper) to hold against the light box and the lens to compare and adjust as needed. Dead on accuracy is nice, but not really critical. Nonetheless, once I had this set up correctly, whenever I broke the system down until the next time I needed it, I did not adjust the tripod head's angle—I just left that alone.
Set your f-stop at the sweet spot for your lens and set your camera on aperture priority. For my light box, I found that I got better images if I set the camera to shoot one full f-stop faster than default. I also set my ISO as low as could be, in my case that was 100 ISO. You will probably need to experiment with this to determine what works best for your setup.
As one who does a LOT of HDR photography, I tried a variety of ways to get the nuances and bring out the best of the dark and light regions of the slides. Disappointingly, all I got for my effort was to take more time and get no better an image. The best thing you can do to get the best quality of an image is to take raw images of your slides, do not take JPEGs of your slides. If a good quality image is not your goal, than by all means, go take JPEGs. But if you want to bring out the most of your images, take raw images.
Surprisingly, I got the best results by letting my camera do the focusing. The one problem with this is that you also need to use a fairly small region in the image to set the focusing point. If it's too wide your camera might focus on the cardboard of the slide, not the image. One of the problems with this approach is if the region where the camera is trying to focus has nothing to focus on (e.g., the sky or water), you can't focus. Just be aware of the problem and be prepared to change the focusing location in the image as needed.
Set the image so that you photograph will include some of the cardboard of the slide, do NOT try to perfectly get just the image. If the image is a bit tilted, again, not a big problem, this can easily be fixed in Lightroom.
So, once you got everything set, hold the stack of images in your hand, place the first slide in the register spot, take the picture, remove the slide and place on the table, take the next slide, etc. etc. etc. After each bin was photographed, I would dust the slide slot in the light box, put away that block of slides, pull out the next group, and photograph the next bin number. Then repeat.
Let me add that if you've kept the slides in their package box, you might also chose to do them one-box-at-a-time.
As far as how many bins or boxes you should do before starting the processing, again that's up to you.
I also suggest that you do one whole trip and then process those slides. This will make adding keywords a lot easier. As far as how many images I do before I called it time to take a break, that would vary anywhere from half a box to a whole box. In other words, do what works for you.
One strong suggestion for however you do this: I found that perching on a stool was great for my legs and back.
Now onto Part 2 where I talk about processing hundreds of images at a time in Lightroom.
