

- Home
- Animate
- Discussions
- Re: Rotate object around point without changing or...
- Re: Rotate object around point without changing or...

Copy link to clipboard
Copied
I'm currently creating a 2D animated SVG illustration in adobe animate (using SnapSVGanimator plugin).
I would like to rotate one object around a point without changing the object orientation.
Basically I wand to set the pivot point and rotate the object around a pivot point without rotating the object itself.
Only info I can find on this is relating to Adobe After Effects...
What is the best way to achieve this in Adobe Animate.
Thanks in Advance!


 1 Correct answer

Hi mate,
The green // at the keys are just indicating a comment. If you type two slashes you get a comment instead of a label.
Just to start with, here is a version of the file with updated comments and names of symbols.
endless_orbiting_loop_with_compensation.fla - Google Drive
There were a couple of confusing ones in there - I apologise for this. Just the day before I had done a similar file for another user, so based yours on it, but then re-timed and forgot to change the notes.
Now on to the symb
... 7
Replies
7
7
Replies
7
Copy link to clipboard
Copied
Hi mate,
Here you go: endless_orbiting_loop_with_compensation.fla - Google Drive

Things are nested multiple levels deep for full control over timing.
You'll find your way around the file. Much easier to show than to explain in a way that you'd understand.
Hope this helps!
NT
Member of the Flanimate Power Tools team - extensions for character animation
Copy link to clipboard
Copied
Thanks mate - That's really helpful although I probably should have
mentioned I'm pretty new to AA (basically just getting my head around
simple timeline animations with basic tweens and don't think I fully have
my head around layers, symbols instances etc yet).
I've been in the doc and had a look around the various layers and symbols.
I'd be grateful if you could just maybe very briefly describe the concept
of how this is working. Could a simple version of this be done without all
the nested layers?
(Also what is the 2 green line symbol at the beginning of the timeline? - I
haven't seen that before).
Cheers!
On Fri, Jun 28, 2019 at 6:17 PM n. tilcheff <forums_noreply@adobe.com>
Copy link to clipboard
Copied
Hi mate,
The green // at the keys are just indicating a comment. If you type two slashes you get a comment instead of a label.
Just to start with, here is a version of the file with updated comments and names of symbols.
endless_orbiting_loop_with_compensation.fla - Google Drive
There were a couple of confusing ones in there - I apologise for this. Just the day before I had done a similar file for another user, so based yours on it, but then re-timed and forgot to change the notes.
Now on to the symbol stuff...
It takes some time and effort to get your head around symbols and nesting, but there is really no way around it. The sooner you tackle it, the better and it will save you a lot of pain further down the road.
Symbols and nesting are at the heart of Flanimate.
For anything that is not controlled by code, you use Graphic Symbols, regardless of what you may see mentioned in all kinds of tutorials. There is a lot of incompetent advice out there. If you don't have a particular reason that you can name you don't use Movieclips.
Graphic Symbols can be set to 'Loop', stopped to display one frame, or 'Play Once'. These options cover lots and lots of situations.
You can use Graphic symbols as containers for static images that occupy frames and you can show one of these and switch between them.
You can use Graphic symbols as containers for looping actions such as walk cycles or your orbiting action.
You can also use them to display non-looping actions.
The principle in what I put together for you is this:
We have a square which is converted to a graphic symbol, which is stopped.
This symbol has two keys - one on frame 1 and one on frame 101. There is a classic tween between these two keys. In the tween properties in Property Inspector I have set rotation to CW (1) which means that there will be exactly one full rotation over the span of 101 frames.
The cycle however is not smooth if you play it back at this level because of the repeat position - 101 is the same as 1 and we have a little hold there.
This animation is wrapped into another container. Its timeline is only 100 frames set to 'play once', i.e. we do not show the repeat frame. This is our cycle. We can copy/paste this 100-frame span multiple times but this is not practical.
Therefore we have another wrapper which is set to loop and displays the cycle going from 100 to 1 and so on.
This is our outmost wrapper which will loop smoothly forever no matter how much we extend the timeline. We can move, tween, scale and so on, i.e. treat our system as a single entity which will never break.
I don't know whether you are interested in character animation or just motion graphics, but here is a list of some of articles I've written which may be useful. Some are quite old so you will have to allow flash to play on the site to see the examples.
Character rigging for Flash animation | electric dog :: flanimate power tools
Understanding symbol registration in Flash and Animate | electric dog :: flanimate power tools
http://flash-powertools.com/workflow/
Good luck!
NT
ps. I'm not sure how the SVG plugin will handle this though. You may need to convert everything to keys before exporting via the plugin when you have your animation finalised.
pps. What the ACP has suggested is very simple to do and a path to disaster as you will need at least 3 keys along the circular path and having a smooth orbit with 3 keys is.... a-a-a... let's say not a wise thing to have.
Member of the Flanimate Power Tools team - extensions for character animation

Copy link to clipboard
Copied
Smashing - thanks for taking the time to provide such clear detail here - It's greatly appreciated.
I'm going to spend some time with this and the file to get my head around it all properly.
(I am interested in character animation too so will be sure to take a look at those articles)
Copy link to clipboard
Copied
Good luck, mate!
It's a steep hill to climb, but results can be very rewarding and you will have a lot of fun after the initial frustrations 
Member of the Flanimate Power Tools team - extensions for character animation

Copy link to clipboard
Copied
It's important to note that the solid black dots on the timeline are called keyframes, not "keys". That's what the interface, the documentation, and the programming APIs call them. Learning to call them keys will just lead to long-term pain and suffering any time you try to Google anything on the subject.

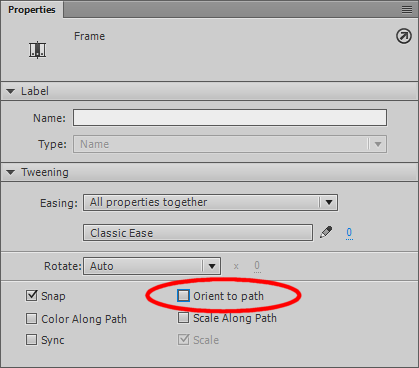
Copy link to clipboard
Copied
In the Properties panel, under the Path options there are options for including rotation or for orienting the rotation around the path, make sure this is deselected if you don't want auto-rotation to occur.

Get ready! An upgraded Adobe Community experience is coming in January.
Learn more
 AdChoices