

- Home
- Bridge
- Discussions
- Bridge Part 3: Finding Your Images in Adobe Bridge
- Bridge Part 3: Finding Your Images in Adobe Bridge
Bridge Part 3: Finding Your Images in Adobe Bridge

Copy link to clipboard
Copied
Part 3 in a 3-part Series on how to use Adobe Bridge
[Note: this was written some time back and is out of date on a number of issues. Nonetheless, there are some points that may still help others. If there is interest, I may update this to the current Bridge. Thank you.]
Whether you are looking at the contents of a single folder or the contents of multiple-folders-within-folders. The ability to find a specific image or a category of images in an easy fashion can only save you time. While it may seem that the work involved to make it easier and faster to find images may seem like wasted time, it really isn't. When you are looking for "THAT" one image, the time spent in preparation will be moot. The question is: do you want to spend time preparing to find any image (at any time) or do you want to spend all your time finding any one image?
There are three different ways to find your images in Bridge:
- Utilizing the original Metadata
- Ratings and Labels (that you ascribe to specific images)
- Keywording (that you ascribe to specific images).
Each of these has different levels of interaction, from least to most comprehensive. In other words, the more you want to get out of finding your images, the more you have to put into the investment.
The Basics: Taking Advantage of the Metadata
Every time you take a photo, the camera is very likely to collect data on that image such as the aperture, the date, whether the camera was being held portrait or landscape, the ISO, the focal length, etc. All of these attributes become data as part of the image and this data can be seen and selected from Bridge's Filter menu. The Filter menu allows you to filter the images seen in the Content Panel. When used properly, utilizing the metadata helps to eliminate the wheat from the chaff so that there are fewer images to have to dig through to find the image you are looking for. For example, if you knew that you were looking for an image taken in portrait mode and you are looking in a folder containing 500 images but only 50 were taken in Portrait mode, than 450 images do not have to be dealt with.
[Note that different cameras can only collect the Metadata that they are designed to collect. For example, if the camera does not have GPS capabilities, than it cannot collect the GPS Metadata.]
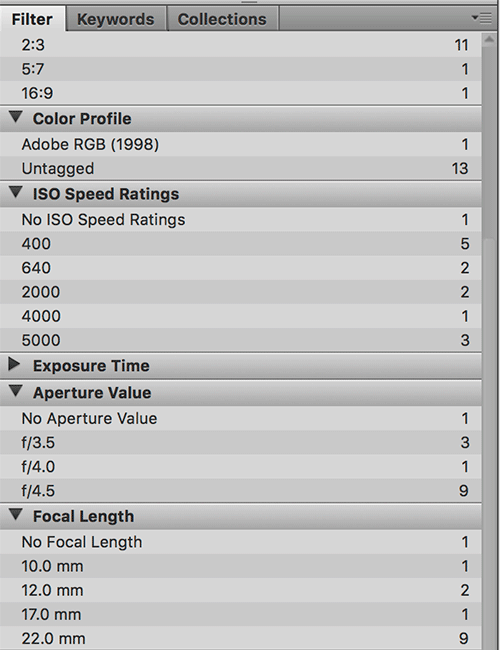
When you click on any of the displayed Metadata, images with that Metadata will be displayed in the Contents Panel. If you click on two (or more) Metadata options that can be concurrent such as images that were taken with f/3.5 AND f/4.0, than all images that have those settings will be displayed. But if you click on images with f/3.5 AND Portrait and no images in that folder have both of these attributes concurrently, than no image will show up in the Contents Panel.
The place where this often becomes an issue is if you do not cancel (re-click) out of a previous selection. For example, let's say you clicked on the Portrait images and then clicked on images that have Labels and suddenly there are no images in the Content Panel. Again, because this is a cumulative feature, not an additive feature. Thus, clicking on both will NOT display all Portrait AND Label images. Bridge will only show images that have BOTH, Portrait AND Label attributes. If no images have both, no images will be shown. So, if you are not seeing what you think you should be seeing, examine the Filter menu and see if you have something checked that you no longer need to have checked.
There are several other things to be aware of as you look at this Panel. First of all, if you are looking for an attribute that is not in existence with any of the images in the folder you are looking within, that attribute tag will not show up. So, for example, if I add a Rating and a Label to some images, THEN, those attributes will show up in the Filter Panel where they were not showing up at all prior to my adding those items. If you look at the image below, there are no single, double, or five start ratings in any of the images in this folder so therefore those rating options do not show up in the Ratings category. (There are some exceptions to this such as "Keywords" as that is baked into this Panel.)

Ratings and Labels
Now for simple interaction for finding images you want to work with.
Let's say you have a folder with 500 or so images. You need to whittle that down to a more reasonable amount to figure out which images you want to spend time enhancing. If you are like me, you may occasionally take multiple shots of the same thing just to make sure that you have a several options of the image to review. This is one of the values of Bridge where you can easily see in the Preview Panel a respectable sized view of your images as you play Keep & Toss. (See the 1st article I wrote on how to customize Bridge's interface so that the Preview Panel is much larger than how Bridge initially presents the Preview Panel. You can read that article here.)
At any time you can provide a rating to your images from one star to 5 stars (Command/Control-1 through -5). These can be used later as they are easy to search for when you want to see all of the images with ratings that are (say) 4 or better. You can also have Labels for images that add a color-bar to the image. This makes it very easy to have Red Labels images that are 4 stars or greater shown to one person while the Green Label images that are 4 stars or better shown to a different person.
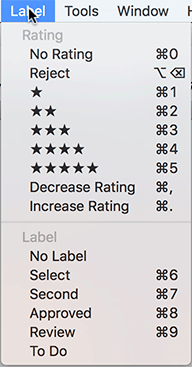
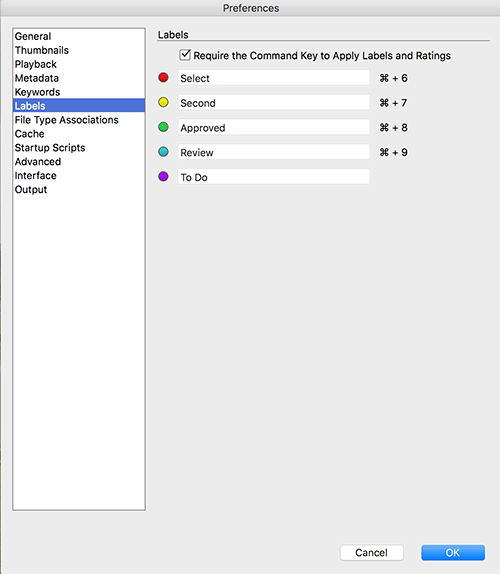
[Note: If you do not wish to press the Control or Command key with the number key when setting Ratings or Labels, that can be set in Bridge's Preferences. Also note that you can change the wording for the various Labels that shows up in the Menus in the same Preference tab to something that works better for your workflow.]
I find that the ratings and labels are excellent mechanism to organize my images as I work. I take a LOT of HDR images and when I do HDR or especially HDR - Panorama images, processing and finding my results used to be confusing. That is until I started using BOTH ratings and Labels. First I'd assign each triplet of images a 2-star rating. Something easy to assign and not rated high enough to confuse with images that (by themselves) I've rated with a higher rating. Then I'd take each of these marked proto-HDR images and process them into HDR images. Then as each image completed processing within ACR, I'd assign the resultant HDR-image, and proto-panorama image, with a Label.
So below you see the Content Panel after processing eight sets of image for an HDR - Panorama. That means that I had 24 images to combine into 8 HDR images and then I have to find these 8 images, select them, and then process them. It can be done without the rating and labeling but it's a whole lot faster and easier to do this using this approach.
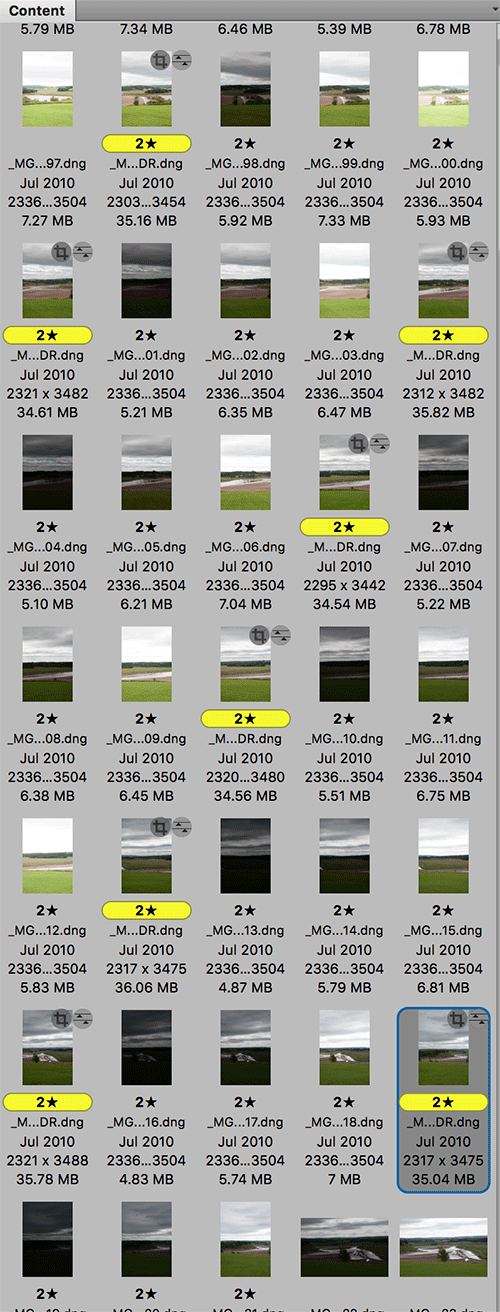
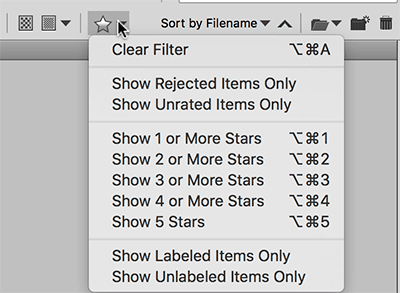
Then, to view only the images I want to see I go to the Filter Panel and filter out everything but the images I want to see by clicking on "2 stars" and "Label - Seconds."

Admittedly, in this case I'd only need to click on the "Second" Label to get the eight proto-panorama images. However if I had multiple many-image panorama proto-images I might have given the other one(s) a different Label to help make each group easily identifiable and unique. Nonetheless, from a folder with 241 images, instantly I am looking only at the eight I need to do the panorama. [Note, in the images above and below, the reason why you are seeing "2*" in stead of "**" is that I decreased the size of the thumbnails to make it easier to get a screenshot that fit in this blog 2* is Bridge's way to truncate the Rating. If the thumbnails were larger, you'd see "**."]

Once I've created the panorama, the panorama will automatically be given a 2-star rating and the Second Label. At that point I'd give it either 3-star because it's nice, a 4-star because it's impressive, or a 5-star because all I want to do is to stare at the image. Anything without a Rating is going to be ignored (and tossing non-rated images is also possible).
Meanwhile, if I've assigned my "impressive" images a 4 rating, than by clicking on the 4 (or greater) rating in the Filter Panel, all I will be seeing are images that I gave a 4 or 5 star rating. If I decide that a particular image is no longer a contender, I can give it (say) a 3 star rating and it will be removed from the Content Panel view and it is now out of view (but has not been removed from the folder).
When you add the ability to select an image via all of the other parameters available to the user in the Filter Panel, it's very easy to narrow down the potential number of images you may be looking for.
Lastly, if you look in the Path Bar region on the right hand side, you can see the dropdown menu to select ranges of Ratings. So besides the Filter Panel, this is also a very quick mechanism to find images with which you've done some selection.
[Note: if an image has any Ratings and/or Label and is subsequently saved into a different format (e.g., you've saved a DNG image into a JPEG image), the new image will inherent the attributes that it had prior to the saving. So once a 4-star, always a 4-star -- until you change that to something else.]
Keywords
If you want the greatest control to find specific images, you need to use Keywords. The biggest problem with Keywords is that they require "some" to "extensively" more work to create depending on how specific you want your Keywords. Simply, Keywords require more work than simply applying Ratings or Labels and as such, some people may rather dig through 1000 images rather than spending a few minutes applying Keywords to the images during the initial processing. Actually, the initial processing time is the best time to apply Keywords: when you are first examining the images and the background content and details are still fresh in your mind.
When you first open Bridge there will be some default Keywords listed in the Keyword Panel but I found them mostly irrelevant and soon deleted most of them and created my own. Creating Keywords that satisfy your needs is probably one of the biggest challenges about this whole process depending on how When you first open Bridge there will be some default Keywords listed in the Keyword Panel but I found them mostly irrelevant and soon deleted most of them and created my own.
Creating Keywords that satisfy your needs is probably one of the biggest challenges about this whole process depending on how compulsive you are and how specific you wish to be. For example, if you wish to rely solely on the main location, say Nova Scotia, than the process is very very fast. If you want to add cities, it can take a bit longer, and if you then start to add the name of tourist sites, geographic features, construction details, etc., it just adds to the time. As a woodworker, I also take photos of woodworking tools and early furniture as well as architectural construction details. As you might gather, my Keywording can get a bit detailed. If you are into gardens and plants, you might want to have keywords for specific trees and specific plants. And there is always family members and friends. you are and how specific you wish to be. For example, if you wish to rely solely on the main location, say Nova Scotia, than the process is very very fast. If you want to add cities, it can take a bit longer, and if you then start to add the name of tourist sites, geographic features, construction details, etc., it just adds to the time. As a woodworker, I also take photos of woodworking tools and early furniture as well as architectural construction details. As you might gather, my Keywording can get a bit detailed. If you are into gardens and plants, you might want to have keywords for specific trees and specific plants. And there is always family members and friends.
So you can see that creating the Keywords is almost a never ending process. Well, it is a never ending process because there are always new friends and you will always be encountering new tools and new plants. However, the true value of Keywords is that they are actually added to the image file and are not placed in some cache within Bridge. As such, all you need to do is have the folder you wish to examine within ANY folder you are looking in. So, for example, I have my Vacations folder and within the Vacation folder is my Nova Scotia Folder and inside that are the various folders I visited during my trip. If I have my Vacations folder open and I do a Command-f in Bridge and search for a specific Keyword, in milliseconds I will have the images with those Keywords front and center in the Content Panel.
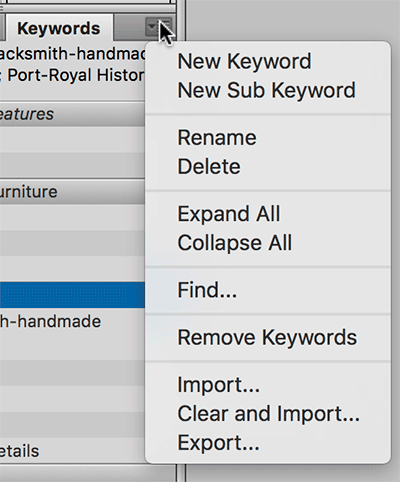
To create Keywords, open or display the Keyword Panel. As stated, there are a few pre-made Keywords set within that Panel, but it's probable that most of these are not relevant to you and these can be ignored or deleted as you so see fit. Adding new Keywords is easy and can be done either by clicking on the Flyout menu for the Keywords Panel
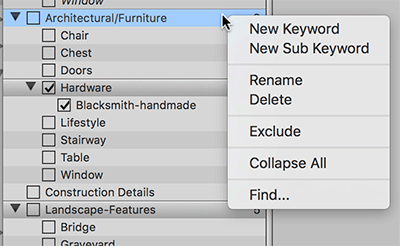
An alternative location to create new Keywords (with fewer options) is found by right-clicking on the Keywords within the Panel itself.
Applying Keywords
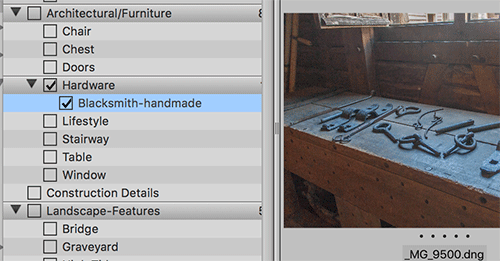
Notice the difference between Keywords and Sub Keywords. Sub Keywords are indented from the Keyword they were created from. [You may see this relationship also referred to as a Parent - Child relationship.] This provides a certain amount of extra control: If I were to simply click on "Blacksmith-handmade," only that Keyword would be checked. If I also wanted "Hardware" selected, I'd have to click on each option separately. However, if I press the Shift key at the same time I click on any subcategory, any parent Keyword(s) is also selected. So if I click on "Blacksmith-handmade" with the Shift key pressed, Hardware AND Architectural/Furniture are automatically and concurrently selected.
The Keywords you create become part of Bridge and will show up in any folders you subsequently open. This is both good if you are adding Keywords to new folders of similar nature but could be in the way for folder containing images of a completely different nature (e.g., a wedding). Nonetheless, this problem is worth the overall benefits of Keywords.
Keywording your images is obviously a time-filling operation. The good news is that the more you do this, the more of the likely Keywords will have already been created and once created it's only a matter of checking them off. By the way, if you mis-spell or decide on a different word for any category, renaming does not remove any previous selections made with that Keyword. Any previous selections will simply take the new fixed or altered name.
Finding images with Keywords
So once you've done all this Keywording, now what? Well, if you look at the 2nd or 3rd screenshot above, you will see an option for "Find…" and if you go to the Edit menu, halfway down you'll find "Find," and if you press the Command/Control-f keys you will get the same Find window.
The advantage of using this approach to Finding your keywords is that you can also look for a variety of other parameters and/or constraints at the same time. In addition, this approach allows you to dig into any of the children folders. I'll explain this in a moment.
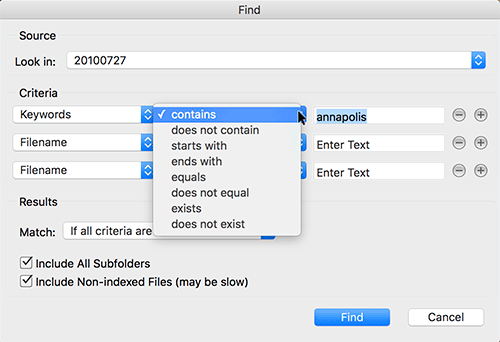
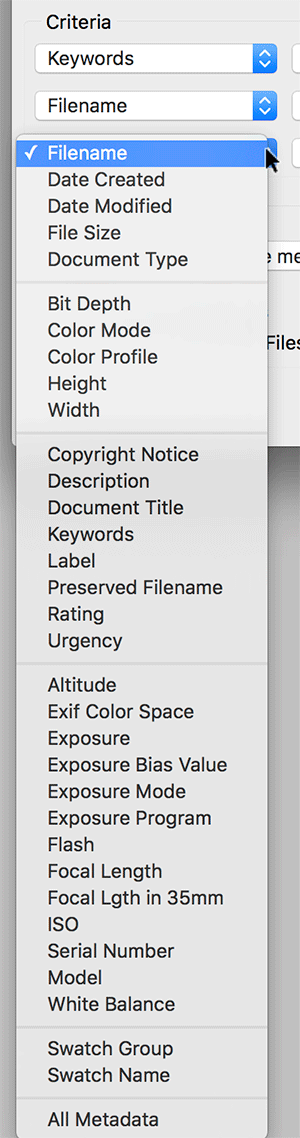
It would be easier if this window displayed the same view of the Keywords Panel as we see in the Keywords Panel. Rather, it allows us to search for Keywords and any other option we chose to select from the Metadata Panel.
While the interface for Finding your Keywords with this window is not the best, the results are spectacular. First off, remember that you do not have to be directly "in" the folder to find what you are looking for, only higher in the folder tree. So, let's say you want to find all your photos of Aunt Maude and you have opened your "Family Photos" folder. Within that folder you have vacation folders (and contained with that are the many vacation trips you've done) and also contained within Family Photos is the Holiday folder and all of the Holiday folders that you've photographed, etc. There might also be folders of family gatherings and many other folders that could potentially contain Aunt Maude as well.
However, if you just want to find Aunt Maude's images only from the Holidays folder, look in the Holidays folder and only images will show up from that folder. Any folders contained within the Holiday folder such as "Holloween-2012," Thanksgiving-2011," "Holloween-1999," etc. will be displayed. The display of these images will be milliseconds.
Please note that if you are looking in the Holidays folder, no images from the Vacation Folder will be found as those are parallel folders nestled in the Parent folder.
By the way, if you are curious as to where the found images were located, You have several options: as you select each image, looking at the Path Bar the Bird's Trail of where the image resides in the folders can be seen. However, a Right-click on any image will give you the option to "Display in Finder," and you have immediate access to the images from that approach as well.
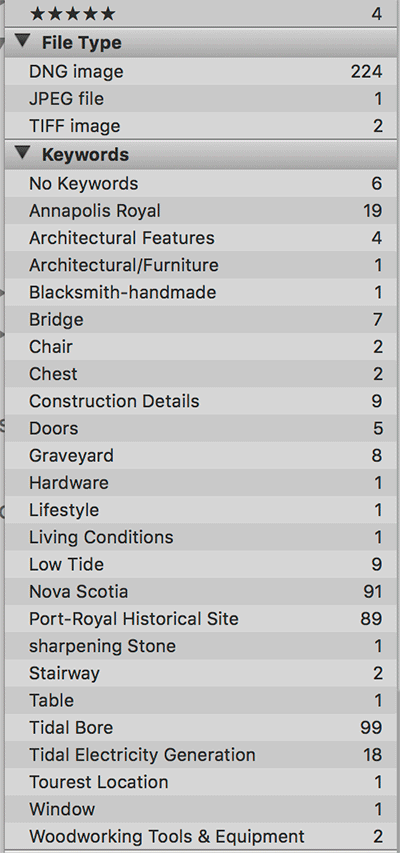
There is an alternate approach to finding your images that uses the Filter Panel. The Filter Panel can also display Keywords and will in fact display any and all Keywords contained within the images on display. Unfortunately these are displayed in alphabetical order and not in the hierarchal order that they were created in.
To find a specific image, all you have to do is to click on any of the Keywords in the list and POP, those images will show up in the Content Panel. Shift-clicking will select multiple Keywords even if the Keywords are not continuous on the list.
The biggest negative for this approach is that it will ONLY work within a single folder. That is, when you use the previous approach, using the "Find…" command, any image with a Keyword attached will be found no matter how deep that file is contained within the folder you started from. This approach, while easier (because you do not need to remember how to spell your Keyword or what words were used in a Keyword, you only need to look) will not look for items contained within folders within folders.
Bridge and Lightroom
After doing all this Keywording, Labeling, Rating, and adjustments you've done, one question you may have is can all of the work you've done creating Keywords import into Lightroom if you chose to move this folder of images into your LR catalog?
The answer is mostly yes. The Ratings you set for the images will all be there but the Labels will not. Neither the color or even the fact that they had a label of any kind will transfer. The Keywords will also transfer but depending on how many Keywords you have in your Lightroom collection may make it a tad of a challenge to find them. But they should transfer. Additionally, any image enhancements you've done in ACR or Photoshop will also transfer. However, they will come over as a completed work in progress and none of the "History" steps of any enhancements you've done in Adobe Camera Raw or Photoshop will be listed. Any subsequent corrections you do after Importing the images into Lightroom will be included in the History. Since Lightroom was not involved in any of the initial operations, it has no way of knowing what was done.
A Recap on Finding Your Images
There's no getting around the fact that as we take more and more images, finding the images we want to share can be a tortuous ordeal. From the features within Bridge, that ordeal can be focused by using the Metadata already built into each image. Unfortunately, Metadata does not automatically display how we felt about any image and that requires us to interact with Bridge to add either Ratings and/or Label. Lastly, if we want to easily find just those images of "trains" we've seen on all of our vacations, "steam engines" we've seen on all of our vacations, or "steam engines that are still functioning" on all of our vacations, we need to add keywords to quickly find those images. Otherwise our guests will need to be very patient as we say "I know it's here somewhere, give me a second..."


Have something to add?

 AdChoices