Copy link to clipboard
Copied
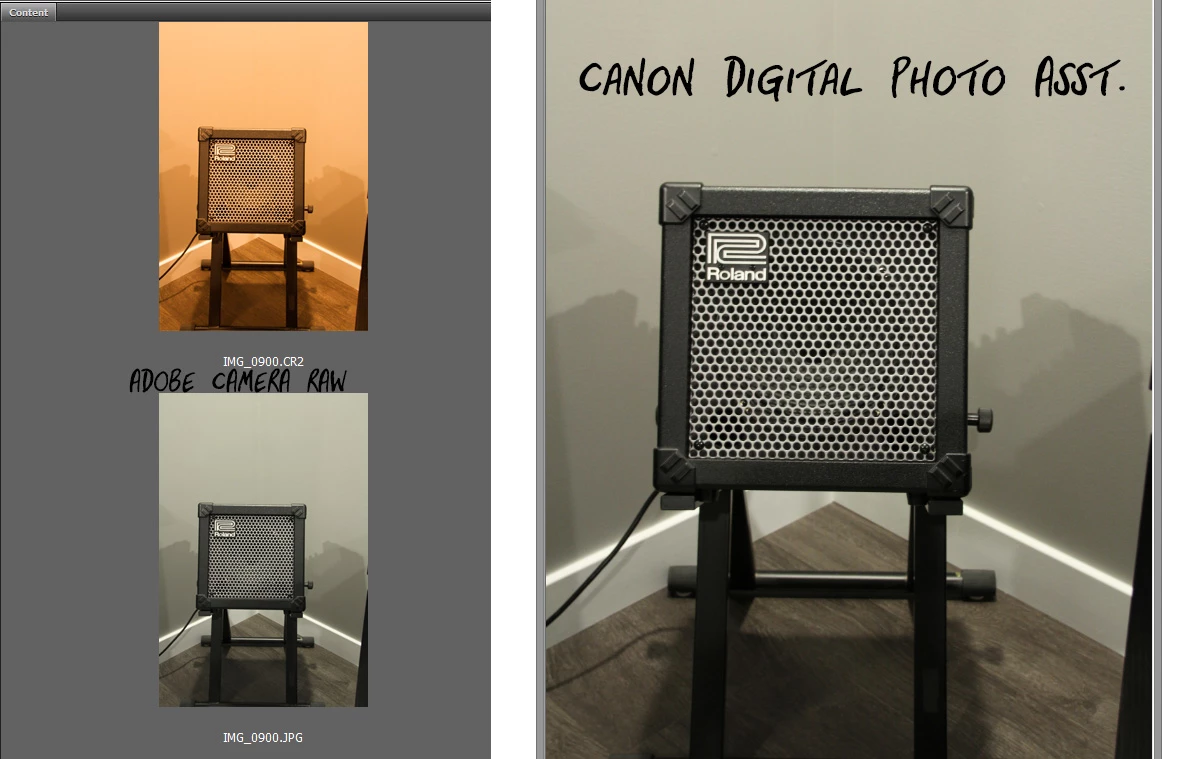
All the sudden all my .CR2 files from my Canon 7D have a yellow or red tint. This happens in Camera RAW or Lightroom.
If I open those same .CR2 files in Canon's Digital Photo Assistant they look fine.
How can I get the Adobe apps to not display them with the tint?
Thanks.
1 Correct answer
"Maybe" your default settings were changed somehow. Open a newly imported image and change the white balance to "As Shot" and then save new camera defaults. Do this for both Camera Raw and Lightroom. That should solve the problem. Any images that you have already imported can be corrected by clicking the reset button.
Copy link to clipboard
Copied
Also noticing when I open the .CR2 that the White Balance is listed as Custom. If I switch to As Shot it looks better like the Canon Digital Photo Assistant view.
Why would the .CR2 even open to a Custom WB?
Seems like a bug.
Copy link to clipboard
Copied
"Maybe" your default settings were changed somehow. Open a newly imported image and change the white balance to "As Shot" and then save new camera defaults. Do this for both Camera Raw and Lightroom. That should solve the problem. Any images that you have already imported can be corrected by clicking the reset button.
Copy link to clipboard
Copied
Jim,
Wow, that might have fixed it for Bridge/Camera RAW. AMAZING!
In Camera Raw in the Basic tab I changed the WB to As Shot then in the hamburger menu (flyout) top right I chose Save New Camera RAW Defaults. Then I noticed I could click the Default link above Exposure in the Basic Tab and in the flyout menu click Reset Camera Raw Defaults. Now when I purge the thumbnail cache for any recent picture THERE IS NO COLOR CAST!!!
Would you help me figure out how to change the default for Lightroom? Do I just go to Develop and then under Settings (top left) go to Reset all Settings?
Thanks again!
Copy link to clipboard
Copied
I don't know how much you may have modified your default settings in Lightroom from how they were originally. I have made several changes in my setup. I would suggest that you import a new image and simply change the white balance to "As Shot". Then go to the Develop menu and choose, "Set Default Settings" if that image represents the way you want new images to look. Then if there is a bunch of images that you want to reset, highlight all of them and turn on auto-sync and click on the reset button. That is how I would do it. But I'm sure there are other ways to accomplish it as well. In fact, one of the options in the "set default settings" dialog is to restore the Adobe default settings. If you choose that option I think it will automatically restore the "As Shot" white balance setting. But it might also reset any other settings that you may have changed. You'll just have to experiment until you get the settings the way you want them.

