- Home
- Camera Raw
- Discussions
- Re: Default crop setting to be unlocked
- Re: Default crop setting to be unlocked
Default crop setting to be unlocked
Copy link to clipboard
Copied
I updated my Camera Raw today and notice that the crop tool is always set in the lock position. Since I'm always cropping in odd ratios, I have gotten used to having it unlocked as a default. I try setting it multiple times and after searching for what felt like an hour, I couldn't figure it out.
Is there a way to set the default to unlock setting in the crop tool?
Copy link to clipboard
Copied
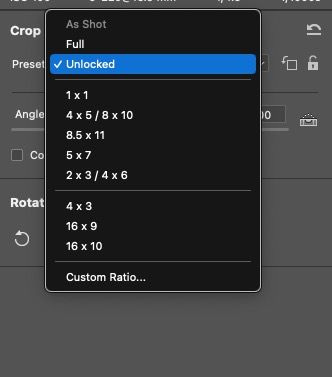
You want this?
Copy link to clipboard
Copied
Exactly, but have it as a default.
Right now, when I open a new document, it will stay in a locked ratio. I would like to revert back to when it was unlocked without having to go back to versions. I know I could easily unlock it by clicking the icon, but the workflow was faster without that extra step.
Copy link to clipboard
Copied
The default is "Full" and you can either select some preset (make your own) or move it so it becomes as shown, unlocked. But indeed, AFAIK, when you open a new raw, the default is Full from which you now do something with that you desire.
Of course, if you pick say 1:1, and apply that crop, select "Done", the next time you open that raw, its crop isn't "Full" but what you saved with the Done command.
Copy link to clipboard
Copied
I guess my frustration is that it's not behaving as described. It's constantly resetting to "Full" instead of the new ratio. I keep having to click the lock icon to unlocked or select a ratio when cropping. It's not the end of the world, if I am being honest, it's new a adjustment on my end.
Thank you for the assist
Copy link to clipboard
Copied
I figured it out! Holding "Shift" now locks the ratio while before this update it didn't. So whenever I opened a new document, it keep the "Full" ratio and locked it.
Copy link to clipboard
Copied
I don't see the shift key doing anything new or different, can you explain?
Here's a list of key commands and there's an area that addresses crop:
https://jkost.com/blog/2021/12/shortcuts-tips-and-tricks-for-adobe-camera-raw.html
• Tap the C key to select the Crop tool.
• When you first select the Crop tool, click and drag in the image area to set the crop or, use the handles to resize the crop. Drag within the crop marquee to reposition.
• Option -drag (Mac) | Alt -drag (Win) the crop handles to transform the crop from the center.
• Position the cursor outside of the crop marquee (the icon will change to the double headed arrow), and drag to rotate the angle of the crop.
• Select an aspect ratio from the list or, select Custom and enter values (ACR will save the last 5 custom aspect ratios entered).
– Tap X to flip the crop aspect ratio (landscape to portrait/portrait to landscape).
– Option + A (Mac) | Alt + A (Win) toggles the lock aspect ratio option
• Tap the A key to select the Straighten tool.
– Double click the Straighten tool to automatically straighten the image (this works best with images that have a strong horizontal line).
– With the Crop tool selected, hold the Command (Mac) | Control (Win) to temporarily activate the Straighten tool.
• Command + left/right arrow (Mac) | Control + left/right arrow (Win) move from one image to the next while cropping.
• Command + Option + drag (Mac) | Control + Alt + drag (Win) with the Crop tool to temporarily invoke the Zoom tool.
• Choose another tool, double-click within the crop marquee, or tap Return (Mac) | Enter (Win) to apply the crop.
• With the Crop tool selected, Command + Option + R (Mac) | Control + Alt + R (Win) will reset the crop.
• Tap Escape to reset the crop and dismiss the Crop tool.
• The Crop tool is solely responsible for defining the aspect ratio of the crop. Use the Save and Workflow options to determine image size.
– For example, in order to create an image that is 8 x 10 inches at 300 ppi, crop to a 4×5 crop aspect ratio. Then, when using the Save or Workflow options, check Image Sizing, select Short Size from the drop down menu and enter 8 inches and a resolution 300 ppi.
• Tap the V key to view the Crop overlay. Option + V (Mac) | Alt + V (Win) toggles through Overlay styles (or Control -click (Mac) | right -click within the crop marquee choose from the list of Overlay Styles).
• Command -click (Mac) | Right -click (Win) within the crop marquee to access many of the Crop options via the context sensitive menu.
• Tap the R key to rotate an image clockwise or use Command + “[“ (Mac) | Control + “[“ (Win)
Tap the L key to rotate counter clockwise or use Command + “]” (Mac) | Control + “]” (Win).
