 Adobe Community
How to blur part of an image

Copy link to clipboard
Copied
HI: I am new to Adobe Captivate and wondered if I can blur part of an image on a slide. I am capturing an image off a website that contains some confidential information and I want to blur-out only that part that contains that information. Is this possible? I am using Windows XP and Captivate 4.
Thank you


 14
Replies
14
14
Replies
14
Copy link to clipboard
Copied
Hi there
Unfortunately Captivate doesn't have a "Blur" feature. But here are some possible workarounds:
One way to do it is to edit the image using something like TechSmith SnagIt. Blur in SnagIt and import the image back into the project.
If you wanted to obliterate the area, that's easy too. Just insert a Highlight Box object and configure it to totally cover the area. And if the image is the background image, you can choose to Merge it into the background. That would accomplish the same thing as editing in Photoshop or another editor.
Cheers... Rick 
| Helpful and Handy Links Captivate Wish Form/Bug Reporting Form |

Copy link to clipboard
Copied
Hi Rick
Thank you for your quick reply. Just need some further instructions...I capture the webpage with Snagit, blur it, save it as a .png file...but then what option do I use to import it back into Captivate?

Copy link to clipboard
Copied
There's likely a process Rick can step you through, though I'd assume it's just "Insert > Image" then right-click that imported image and choose "Merge Into Background"...
...however, slightly different, whenever I need to edit an image already in Captivate, I:
1. Right click the slide background and select 'Copy Background'
2. Paste it as a new document into Photoshop (or, likely, pick your preferred image editor - SnagIt should work fine?)
3. Make the edits
4. Select All then Copy
5. Back to the Captivate slide, right-click and select 'Paste as Background'.
Works just fine in my experience.
Erik
Copy link to clipboard
Copied
Hi there
My process is similar to what Erik posted. Instead of right-click and copy image, I locate the image in the library. I then right-click and choose Edit With. Then choose SnagIt. Image opens in the SnagIt editor. (you do have to browse to locate the editor executable - at least the first time or until you change it to open with a different editor)
I edit in SnagIt and close SnagIt. The image is normally just updated back into Captivate. But I've heard others report the image in Captivate doesn't always update. So if that's the case, you would save the image somewhere and import it separately in Captivate.
Cheers... Rick
| Helpful and Handy Links Captivate Wish Form/Bug Reporting Form |
Copy link to clipboard
Copied
Hello Erik,
Since you are using CP4, why not using the roundtrip to Photoshop: right click on the background in the library, choose Edit with Photoshop (or Edit with is PS is not the default graphical editor) and background opens in PS. After editing just save/close and the background is updated. It works also with other editors, but my personal experience is only with PS.
Just my 2cents. I'm using this roundtrip so often... it saves me some clicks (RSI you know) ;-).
Lilybiri
Copy link to clipboard
Copied
Hi Lilibiri
Isn't there a step missing there? 
I thought that before things will work to update back you have to "flatten" the image in Photoshop?
Note that I'm a Photoshop ignoramous. I'm just parroting what I've heard others say. To me, Photoshop is like looking at the controls of the Milennium Falcon. I'm mostly bewildered by the endless array of panels and options and terrified to touch most of it for fear of invoking some obscure action that totally reformats my hard drive as well as any hard drive within a 200 foot radius, shaves my dog bald and permanently clogs all the drains in my house!
Cheers... Rick
| Helpful and Handy Links Captivate Wish Form/Bug Reporting Form |
Copy link to clipboard
Copied
Hi Rick,
Flattening is only needed (in CP4) when you are using more than one layer in PS. Of course you could add layers when editing the background, and in that case you'll have to flatten before closing PS. The background is a BMP-file, and you cannot have layered images in this file.
You were all right, I did not include this step in my explanation. Was just wondering why you should use copy/paste (twice) when you can have a nice roundtrip.
I started using Photoshop years ago (when Photostyler disappeared) and it was instant love. But after all these years I'm still learning something nearly every day. It is like when I started driving my new Prius: a manual of 365 pages...
Lieve
Copy link to clipboard
Copied
LOL - 365 pages! So if you read a page a day...
So how long did it take you to get past the intimidation factor? Or was it more like when you first saw it, it was a cute baby. Now it's a gorilla, but one you learned to cope with along the way?
Cheers... Rick
| Helpful and Handy Links Captivate Wish Form/Bug Reporting Form |
Copy link to clipboard
Copied
Hi Rick,
As female teacher with almost only male students I'm obliged to be good at "taming" things (hope this is understandable?). Photoshop and Captivate were both "cute babies" at first sight, but CP is "deceptively simple" (quoting someone?) and Photoshop was immediately saying to me "You'll need some time to like me". Plunging in and having to teach basic PS got me rather quickly started.
Both babies did grow up and starting to feel used to them with a different learning path (never taught CP), but both are so exciting, there is so much to discover. To be honest, I should mention my experience with developing analog photos (years ago) and I was glad to be rid of the odors of chemicals, using PS.
Try to give PS some time if possible. I think that we are both struggling with Flash (not so cute at first sight) and AS3 for the moment?
Have a nice day,
Lilybiri
Copy link to clipboard
Copied
You're both right, that's a better approach. I guess I'm a creature of habit. I've been editing backgrounds in CP the way I mention since version
1...and habits die hard. But, yes, it would be better to open the libraried item - now that there's a library! - send it to the editing tool, edit, then simply save.
Well clarified 😉
Erik
Copy link to clipboard
Copied
Thank you to everyone for their suggestions... I am a true novice at this and my head was spinning
a bit reading all your emails and instructions. I don't have Photoshop, but do have Snagit. I managed to follow the instructions and successfully blurred the slide. Thank you!
On a similar note, is there a way that I can spotlight certain portions of a page while greying out other portions as seen here: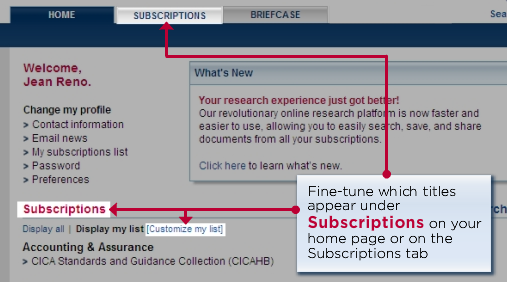
I am thinking that greying-out would require the same functionality as blurring?! What about the spotlight option...where the titles "Subscriptions" are highlighted in the example above?
Thanks again...
Copy link to clipboard
Copied
Hi there
If this is just for an image, the easiest way is likely to use SnagIt again for that. It's super simple to accomplish.
However, note that Captivate offers a functionality that will do that too. If you use a Highlight Box object, you have an ability to enable an option known as "Fill Outer Area". This will shade all but what the Highlight Box is surrounding.
My reason for suggesting SnagIt for this is because you seem to have multiple areas. While you could certainly place three different Highlight Boxes on the slide, each would "dim" the other highlighted areas and it wouldn't look too good.
Cheers... Rick
| Helpful and Handy Links Captivate Wish Form/Bug Reporting Form |
Copy link to clipboard
Copied
Hello Erik,
Glad that you didn't mind my interfering and posting the tip. I've learnt so much in this CP-forum and want to 'pay back'.
Lilybiri
Copy link to clipboard
Copied
Oh, no, not at all! That's what forums are all about and I'm certainly falible 😉
E

 AdChoices