

- Home
- Character Animator
- Discussions
- An Explanation of the Layer Mesh
- An Explanation of the Layer Mesh

Copy link to clipboard
Copied
I've read all that I can find in a search of Character Animator Help about the Layer Mesh and I really still don't get much of a sense about what its for and how I can best use it. The search linked to five different pages, but all of them seem to be written as if I already have a fundamental understanding of Ca's meshes and I am left with more questions than I started with.
A video tutorial or even a page dedicated to Mesh (that sounds funny) would be helpful.
Thanks,
Martin


 1 Correct answer

My understanding of the layer mesh is it shows how Character Animator understands the layer. If Ch needs to distort the mesh (to make an arm bend etc), then it needs to get the mesh correct. A contour mesh follows the outline of the object (which is generally what you want). Sometimes Ch struggles in "auto" mode and falls back to a rectangle. I think I read this happens more if the layer is not contiguous (has unconnected things in it). Rectangle distorts badly (does not look natural).
If you cli
... 5
Replies
5
5
Replies
5
Copy link to clipboard
Copied
My understanding of the layer mesh is it shows how Character Animator understands the layer. If Ch needs to distort the mesh (to make an arm bend etc), then it needs to get the mesh correct. A contour mesh follows the outline of the object (which is generally what you want). Sometimes Ch struggles in "auto" mode and falls back to a rectangle. I think I read this happens more if the layer is not contiguous (has unconnected things in it). Rectangle distorts badly (does not look natural).
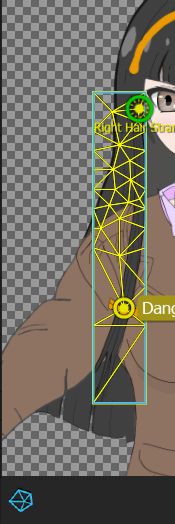
If you click the little mesh icon when rigging or when in a scene preview, you can see what the mesh structure is. For example, here is a good mesh for a strand of hair dangling at the front. See the little mesh icon at the bottom.

Here is a bad mesh (I manually set "Layer Mesh" / "Mesh Shape" to Rectangle for demonstration purposes).
When Ch bends the shape it can look more distorted if the mesh does not align nicely with the object.
Basically you don't need to touch meshes normally - just check to make sure Ch worked out the contour correctly. Oh, and the dangle handles etc need to be inside the mesh for them to work.
Copy link to clipboard
Copied
Wonderful explanation. Thank you.

Copy link to clipboard
Copied
What to do if the layer mesh detect the layers wrong (in this case overlapping) as the picture below? How can we adjust the mesh apart from provided setting on the panel? I tried to use all (contour, rectangle, auto) but it doesn't change much and still detect the right thigh as the left leg.
Copy link to clipboard
Copied
My guess seeing that yellow outline is some artwork is in the left leg that should not be there. E.g. a copy of the right thigh and front of body was accidentally copied in (or not deleted when you copied the artwork to cut it up or something). I would try hiding the other layers for example - if only the leg is visible, do you see more artwork than just the leg parts you expected?
I am also used to the profiles all being under a single root node by the way - a single "+Robot" under which profiles are. What you are doing might work too, just never done it that way (I don't do profiles myself very often).
Copy link to clipboard
Copied
Hey thanks for the response. The problem I figured was actually on the layering and masking in the illustrator file. All good now.

Find more inspiration, events, and resources on the new Adobe Community
Explore Now
 AdChoices