 Adobe Community
- Home
- Character Animator
- Discussions
- Re: Eye Rigging problem.....my first character and...
- Re: Eye Rigging problem.....my first character and...
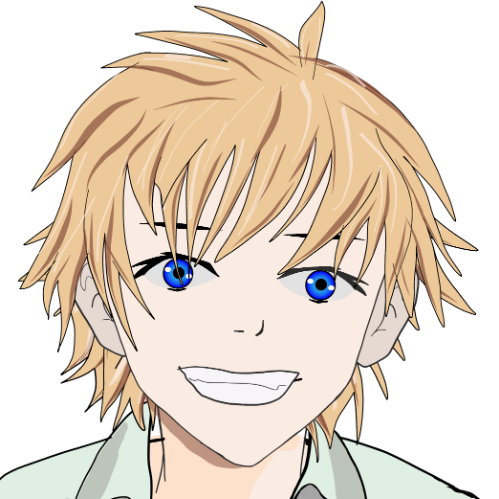
Eye Rigging problem.....my first character and i try all day long to fix it...

Copy link to clipboard
Copied


It seems like the eyes fix on top of the pupil, because the rest is moving(or try to move)
I can also load up the character, but i am a little bit desperate...
Thx for any help 🙂
Merry christmas


 10
Replies
10
10
Replies
10
Copy link to clipboard
Copied
A screenshot of the rigging hierarchy can be a big help. My guess is the pupil is not independent (or something is wrong in that area). I wrote up a blog of the most common errors I have seen a few years back; https://extra-ordinary.tv/2018/04/21/debugging-character-animator-eyess/ - might have a useful tip or two
Copy link to clipboard
Copied
Thx for answer so fast, when i am home i will check what you said and load up the rigging hierarchy 🙂
THX A LOT !!!
Copy link to clipboard
Copied

Is that enough or do you need more ?
Copy link to clipboard
Copied
It looks like your right pupil layer has a handle on it (see the number next to it?). These can cause problems like you are experiencing. Putting a tag on a handle is not the same (always) as putting a tag on the layer. The warping looks like the center of the pupil is getting stuck, near where the handle is. So my first suggestion is to remove the handle on the pupil layer.
If you turn on the yellow mesh icon at the bottom of the scene window it shows the mesh as it distorts. This can be useful during debugging. If you can see where in the mesh something is not moving (is stuck) that can narrow down where to find the problem. Eg i suspect it's the center of the pupil that is stuck, but watching the mesh as you move can confirm this.
''I am not used to the blink layer being nested, but that would not cause your problem.
I am not used to the eyebrows being inside the eye group - i would move it out as a sibling to the eye, but i don't think it's your problem either (but less sure of that).
Copy link to clipboard
Copied

Thx for so many help, but i dont get it work, so i fix the handle thing and remove them from the pupils, but now, nothing happened any more, she can blink, but the pupils does´t move at all
Copy link to clipboard
Copied
Are you able to share the puppet? use export puppet from the menu and upload to google drive or dropbox etc. Sometimes it's faster.
Copy link to clipboard
Copied
ok i will do that when i am home !!!
THX YOU SO MUCH !!!
Copy link to clipboard
Copied
Copy link to clipboard
Copied
You might like to go read https://community.adobe.com/t5/character-animator/keyboard-eyegaze-now-working/td-p/11713318 as well as it has similar issues (there are actually lots of threads on eyes).
First, it is important in rigging mode to go through all the layers of the eyes and make sure you have the right tags on the right layers. For example, your "left eye/eyeball" has "Left Pupil Range" and "Left Eye" tags on it. Remove both of those tags.
Your left and righ pupils have the "left pupil size" tag but not the "left pupil" tag. Put them both on the pupil. That tells CH that is the pupil, and the pupil size is to be taken from the pupil (which is normal, but you can do funky stuff sometimes).
Next, you need to set the pupil range - have far the pupil can move. Since your pupil is the same height as the eyeball, you cannot use the eyeball as the pupil range. What I recommend is to add another layer and call it "Right Pupil Range". I strongly recommend putting it just above "Right Pupil".

Then hide the layer (in Photoshop or CH) by turning off the eyeball. It will still have effect. I often set it semi-opaque so I can turn it on and still see the eye through the pupil range layer to size it correctly. This will define how far the pupil can move.
But, when you do this, the pupil will move over the skin! not a good look!

To fix this, there is a feature in the "Puppet" menu called "Create Clipping Mask". Select the Pupil layer and turn this on. You should see a little down arrow next to the pupil layer afterwards.

In your case you are not done however as the "eyeball" artwork actually includes the line around the eye and other bits. You can fiddle with the artwork to get it right if you want to.
Another approach not using the clipping mask is to arrange the artwork a little different. In the physical world, your skin is on top, then there is an opening in the skin that you can see the eye through. To mimic that, you would separate the eyeline, eyelids, etc but NOT the eye whites and move them above the pupil. Then the pupil layer comes next, then the eye whites layer. That way the pupil will be hidden by the skin and eyelids etc. You probably don't need the clipping mask if you do it this way, and you can use the eye whites layer as tthe pupil range (make it bigger than the opening). So you end up with
- face artwork with hole in it where the eye goes
- Left Eye
-- eye lid and eye line artwork
-- pupil artwork
-- eyewhite artwork, bigger than opening in face
Both ways work - just pick your preference. See that other thread for more info.
Copy link to clipboard
Copied
Sry for my absence !
Thx you so much, you help me a lot 🙂
Now i get it 🙂 !!!!

 AdChoices