- Home
- Character Animator
- Discussions
- Re: Puppet waist, during walk cycle, is doing some...
- Re: Puppet waist, during walk cycle, is doing some...
Copy link to clipboard
Copied
I was unable to get an answer to the question, I am reposting with edits to see if any suggestions will help finding the answer -
---
I have been working on creating some puppets with Illustrator and CA.
I recently watched this puppet walking video from Okay Samurai, and attempted to do this with some illustrator puppets I created.
I noticed the waist on my puppet was larger than needed after watching the run & sneak styles.
I opened the file in Illustrator, deleted some anchors on the waist shape, saved AI file, back to CA.
Now the waist looks like it is doing some odd behavior, but there are no behaviors added to the waist or body layer.
The anchors at the bottom center of the waist stay in the same position, while the rest of the waist moves with the body in motion to the walk styles.
Issue showcased in attached video file below.
Any suggestions, insights, recommendations are appreciated.
Thank you!
 1 Correct answer
Okay, here is how I got rid of thedistortion. I deleted every limb, layer, and handle one by one, pulling a few more hairs out each time. Ended up with just the waist and two markers on the leg. Did not help. Reimported puppet and started again.
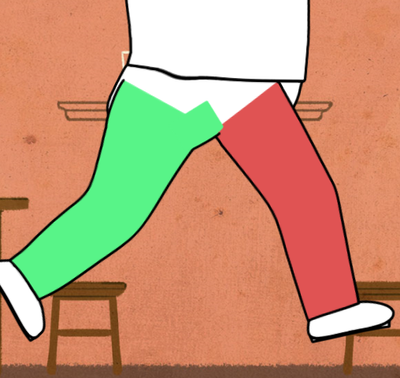
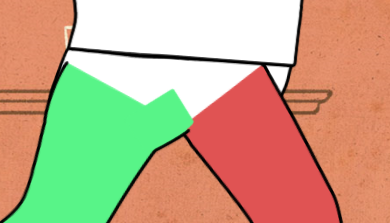
On the root THEWALKINGGUY layer, I moved the origin from down near his feet to his belly button. Then repeated for the origin handles for the child layers FRONTAL, RIGHT QUARTER, LEFT QUARTER. Problem solved! The weird glitch over the pants for the leg
...Copy link to clipboard
Copied
I had a look at the video and the puppet, but I am not sure I am understanding what the problem is exactly.
Do you mean you want the waist line to stay flat and not bend? (If so, you can try a stick.)
Are you talking about the bum sticking out in strange ways when it walks? The original artwork when I had the arms shows the bum is sticking out before you start. Its just hidden behind the arms.
Or do you mean bits of the body stick out in strange ways during the walk cycle? That can be impacted by where you put the origin handle for the leg (where it pivots).
With independent layers, it can be hard to get it right. I filled the two legs with colors just to make it easier to see how things were moving. It can take skill to get the origin points "just right" I am afraid, and sometimes you need to adjust the artwork and live with the "best you can".
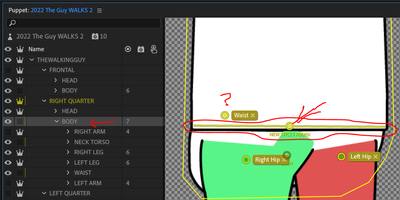
If you are talking about the waiste not being straight, I improved that by adding a stick on the right profile body layer along the artwork line. Its now straighter. You have the waiste marker over to the left (not in the middle). I am not saying that is wrong, but it might be affecting where the bend in the artwork occurs.
Here is where I put the stick.
But I am not sure what the problem you are trying to fix is exactly sorry - hopefully some of the above might help.
Copy link to clipboard
Copied
Wow, this is a great explanation for questions that I had while building and didn't ask. Thank you so much!
I'm attaching a video with the issue, showing both quarter Run motions without legs. Theres an anchor that doesnt move with the waist on both quarters like it is Fixed while in motion. There isn't a handle on the anchor in CA. Unsure about why or how it happens. Not noticable with most walk styles with legs except Run & Sneak, where it looked off.
I appreciate the feedback. Thank you!
Copy link to clipboard
Copied
Okay, here is how I got rid of thedistortion. I deleted every limb, layer, and handle one by one, pulling a few more hairs out each time. Ended up with just the waist and two markers on the leg. Did not help. Reimported puppet and started again.
On the root THEWALKINGGUY layer, I moved the origin from down near his feet to his belly button. Then repeated for the origin handles for the child layers FRONTAL, RIGHT QUARTER, LEFT QUARTER. Problem solved! The weird glitch over the pants for the leg on the side stopped!
So why do you ask? No idea in the slightest!!! But general advice is to have the origin for the character near the belly button (and that seems to be important per profile as well). Very very strange!
Copy link to clipboard
Copied
Wow, thank you for your explanation.
In the video I watched, it suggests the origin handles of each child layer view is required to be on the toes for walking. There are no effects that look unnatural by moving the origin handles to the waist for walking puppets.
What is wierd about this is I created another character that worked with the process shared in the tutorial with a puppet having a similar body structure.
Thank you, you are awesome!
Copy link to clipboard
Copied
"What is wierd about this is I created another character that worked with the process shared in the tutorial with a puppet having a similar body structure." As I said, I don't have an explanation - its just what helped! Lol!
Copy link to clipboard
Copied
One last question about this puppet. I'm sorry this was not included with the original post.
The walking video shares information about how to keep the head to stay on the body while walking or running. Steps followed: Select Head layer ~> Move Head handle over neck/close to chin ~> Add Neck tag to Head handle ~> Delete Head handle.
The Head Layer is independent, Auto attached, and attached by Weld.
However, this is how the puppet head looks when he runs. Video attached.
Tried a couple of things such as adding a Neck handle to the Body layer, and adding the Neck handle to the Head layer. Neither have worked.
Copy link to clipboard
Copied
Have you checked the "Head Position Strength" property for the head? I think the default is 100% (I think the default should be more like 5% or even 0%). I think its in the Face behavior.
But I tend to put a Neck handle around the middle of the shoulders on the torso (so near the base of the neck). The origin for the Head if independent has to overlap the neck artwork to connect them. Its important to have some space between the Head tag and the Neck tags I find. I don't put the Neck tag on the Head.
Note: I don't use walk behavior that often myself, but when people have asked questions, I have generally found it best to leave the Head tag on the Head layer origin and Neck on the Body/Torso layer (not the head independent layer) with a decent gap between them. If they are too close you get weird warping sometimes. I am *guessing* the Neck tag on the head is the cause of the problem. Its trying to lift up the top of the body using the neck tag, but because its on the independent layer, it won't touch the parent body artwork - it just lifts the head off the body instead!
Copy link to clipboard
Copied
Thank you for that explanation.
I'm not sure if you do this voluntarily, are employed to engage, or are an AI bot ... but you have answered all of my questions & provided insight into previous iterations on how to build a puppet with CA.
If you are a human & employed to engage on the forums, please use these references as your campaign for a raise.
Again, thank you.
Copy link to clipboard
Copied
You are welcome. AI? Well, sometimes I think I am just a puppet controlled by ... oh, that's right, I told my thearapist I would not talk about that in public 😉 😉 😉
Happy to help - feel free to repay by helping someone else in the forums when they have a problem! 😉
Find more inspiration, events, and resources on the new Adobe Community
Explore Now


