• Global community
    • Language:
      • Deutsch
      • English
      • Español
      • Français
      • Português
  • 日本語コミュニティ
    Dedicated community for Japanese speakers
  • 한국 커뮤니티
    Dedicated community for Korean speakers
Exit
0

Fix for decal being cropped when wrapping around object?

Participant ,
Feb 14, 2021 Feb 14, 2021

Copy link to clipboard

Copied

Hello!

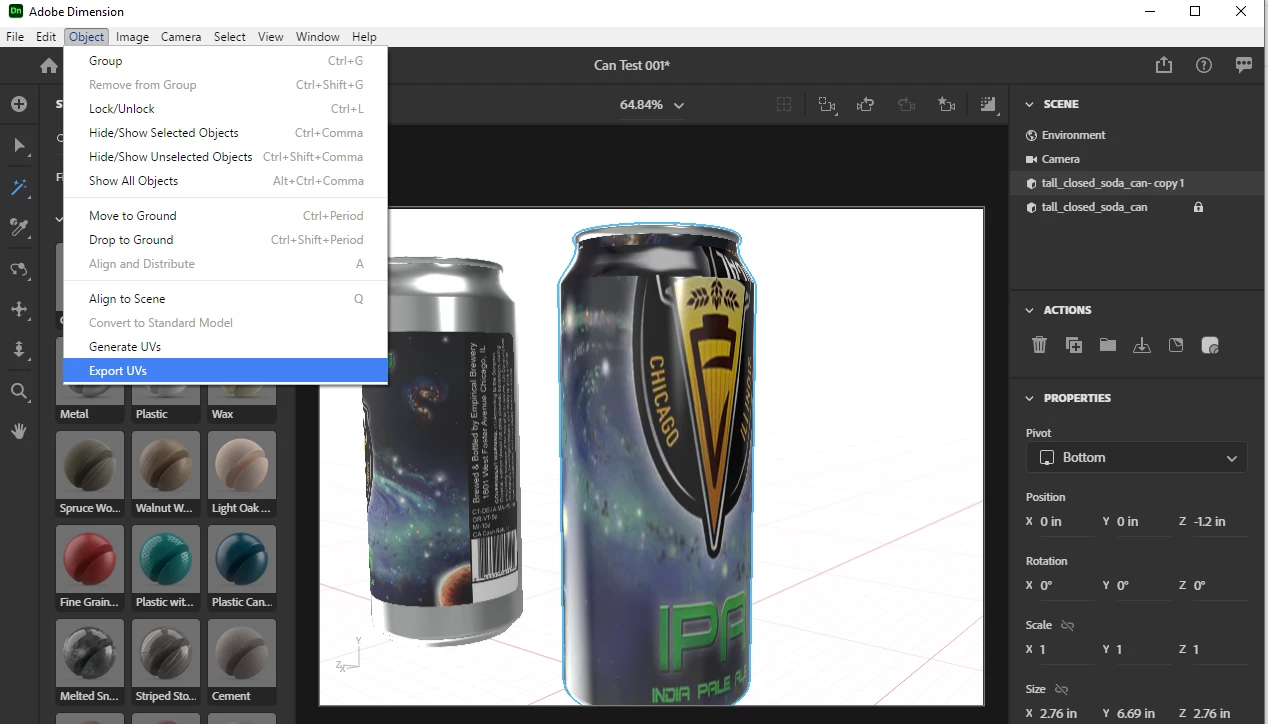
I am very new to Adobe Dimension and have not been able to understand why a decal that I am placing around Model (Tall closed soda can) which was downloaded from Adobe Stock, is not able to be wrapped completely around the object. Whenever the decal is about to wrap completely around the object, it gets cropped... or, rather, is not able to be completely wrapped without being cut off.


I've read some posts and saw some videos about this, and most suggested to try to  "Generate UVs"... but, that has not worked.


What am I doing incorrectly? I cannot imagine that I would not be able to wrap a decal completely around a licensed Adobe Stock object. Please let me know if you have any ideas. Thank you in advance!

TOPICS
How to , Mac , Problem or error

Views

932

Translate

Translate

Report

Report
Community guidelines
Be kind and respectful, give credit to the original source of content, and search for duplicates before posting. Learn more
community guidelines

correct answers 1 Correct answer

LEGEND , Feb 17, 2021 Feb 17, 2021

your files back ... this includes 2 samples of the logo and my working out


this is a problem can, the model needs repairs

the basic steps are:

  • use the magic wand to make a sub selection

Screenshot (310).png

give it a new material [colour makes it easy to see]

  • export the new UV map

Screenshot (309).png

adjust your image in Photoshop

  • apply image as fill and pick colours to taist

can-repair.gif


p.s, I'm trying a new system, do you find the vids help?

Votes

Translate

Translate
LEGEND ,
Feb 14, 2021 Feb 14, 2021

Copy link to clipboard

Copied

you missed the basics mate, a decal never wraps all the way around but a fill will

Votes

Translate

Translate

Report

Report
Community guidelines
Be kind and respectful, give credit to the original source of content, and search for duplicates before posting. Learn more
community guidelines
Participant ,
Feb 15, 2021 Feb 15, 2021

Copy link to clipboard

Copied

Thank you for the response, @Ussnorway. I do appreciate it! However, perhaps I explained it wrong:


  • I do not want the label to cover the entire surface of the object, like in the attached image... I simply want it to wrap around the entire can once (as a beer can does). Unless I am using Fill incorrectly, Fill does not do what I want.


Any ideas on how to remedy the fact I would like a decal to wrap around? Why does it crop when it gets near to the other side of the decal? Thank you in advance, should you have any ideas of how to overcome this.

Votes

Translate

Translate

Report

Report
Community guidelines
Be kind and respectful, give credit to the original source of content, and search for duplicates before posting. Learn more
community guidelines
LEGEND ,
Feb 15, 2021 Feb 15, 2021

Copy link to clipboard

Copied

Screen Shot 2021-02-15 at 10.15.16 AM.png

https://windowsforum.com/media/screencapture-gif.799/full

ScreenCapture.gif

looks like you are doing fill wrong yes... or your model needs work but Dimension can use the magic wand to fix that


p.s, as always share the file


Votes

Translate

Translate

Report

Report
Community guidelines
Be kind and respectful, give credit to the original source of content, and search for duplicates before posting. Learn more
community guidelines
Participant ,
Feb 16, 2021 Feb 16, 2021

Copy link to clipboard

Copied

Hi there @Ussnorway,

Here is an example of what I am trying to accomplish (which isn't a total fill, it's just a label that extends around the can and almost touches)...

Votes

Translate

Translate

Report

Report
Community guidelines
Be kind and respectful, give credit to the original source of content, and search for duplicates before posting. Learn more
community guidelines
Participant ,
Feb 16, 2021 Feb 16, 2021

Copy link to clipboard

Copied

And thank you for the tip, @Ussnorway! Here is the file that I am using (with an object from Adobe Stock)...

Votes

Translate

Translate

Report

Report
Community guidelines
Be kind and respectful, give credit to the original source of content, and search for duplicates before posting. Learn more
community guidelines
LEGEND ,
Feb 16, 2021 Feb 16, 2021

Copy link to clipboard

Copied

I can't help you without the Dn file mate

to share a Dn file with Adobe you must first zip it [only zip not 7z or any other type] then pop it into your creative cloud sync folder and once its uploaded, go to the online ui and set the link... there are also private 3rd party options like dropbox if you find the phone it in effort from Adobe lacking


Screenshot (4409).pngScreenshot (4410).png

Votes

Translate

Translate

Report

Report
Community guidelines
Be kind and respectful, give credit to the original source of content, and search for duplicates before posting. Learn more
community guidelines
Participant ,
Feb 17, 2021 Feb 17, 2021

Copy link to clipboard

Copied

Thank you very much for your suggestion, @Ussnorway! I now have a link to the file, should you have time to see why I cannot wrap a non-fill decal around the Adobe Stock object, like so:


giphy.gif


And here is the link, with assistance from you above instructions:


https://shared-assets.adobe.com/link/8bf96b93-26ba-4a71-6480-49064ac1dc34


Votes

Translate

Translate

Report

Report
Community guidelines
Be kind and respectful, give credit to the original source of content, and search for duplicates before posting. Learn more
community guidelines
LEGEND ,
Feb 17, 2021 Feb 17, 2021

Copy link to clipboard

Copied

your files back ... this includes 2 samples of the logo and my working out


this is a problem can, the model needs repairs

the basic steps are:

  • use the magic wand to make a sub selection

Screenshot (310).png

give it a new material [colour makes it easy to see]

  • export the new UV map

Screenshot (309).png

adjust your image in Photoshop

  • apply image as fill and pick colours to taist

can-repair.gif


p.s, I'm trying a new system, do you find the vids help?

Votes

Translate

Translate

Report

Report
Community guidelines
Be kind and respectful, give credit to the original source of content, and search for duplicates before posting. Learn more
community guidelines
Participant ,
Feb 18, 2021 Feb 18, 2021

Copy link to clipboard

Copied

LATEST

Thank you very much, @Ussnorway ! I appreciate the time which you have put into helping me (and all of the other posters on this forum)! I think that the included videos are a great new system, so I would say that you should use them in all of your answers (time permitting, of course).


I'm going to give the above a try and see if I can duplicate your results with my other labels. Have a great day, and thank you once more!

Votes

Translate

Translate

Report

Report
Community guidelines
Be kind and respectful, give credit to the original source of content, and search for duplicates before posting. Learn more
community guidelines