- Home
- Download & Install
- Discussions
- How do I take settings (Brightness, Contrast, Satu...
- How do I take settings (Brightness, Contrast, Satu...
How do I take settings (Brightness, Contrast, Saturation) from one image and impose it to another?
Copy link to clipboard
Copied
I have two identical images, by that I mean they are of the same subject. However one is brighter, with more contrast and saturation. I want to take this image and impose it over the other image and have photoshop calculate all of the curve differences so I can make a LUT. How do I do this?
Copy link to clipboard
Copied
If the changes you mentioned were made using Adjustment Layers then, with both I,mages open, click and drag an Adjustment Layer from one image over the other image. A copy of the Adjustment Layer will be added to that image. Drag each one in the same sequence as it appears in the original image.
Copy link to clipboard
Copied
Bor sure what you mean exactly, please post screenshots of both images including all pertinent Panels (Layers, Channel, …).
If there are only two images why bother with a LUT?
Copy link to clipboard
Copied
I want to take image #2 and make it look identical to image #1. These are just .png PRINT SCREEN images. That way I can use the new values on image #2 and make a LUT with those values.


Copy link to clipboard
Copied
How did you achieve the appearance of image #1?
Adjustment Layers, destructive Adjustments, in RAW development, …?
Copy link to clipboard
Copied
These were just two examples. The real images come from a video game (skyrim). I take one image in skyrim with a neutral LUT and I make adjustments in the game with an injector program called Reshade and then I PRINT SCREEN the image.
Copy link to clipboard
Copied
I confess, I'm not sure what you want either. Maybe the Histogram panel will show you where the 2 images differ. An old article but it's still relevant.
http://www.dummies.com/software/adobe/photoshop/how-to-use-the-histogram-panel-in-photoshop-cs6/
Copy link to clipboard
Copied
I want to take image #2 and make it look identical to image #1. These are just .png PRINT SCREEN images. That way I can use the new values on image #2 and make a LUT with those values.

Copy link to clipboard
Copied
You'll need to analyze the two images and then make necessary adjustments. For example, read the tonal values in specific areas on both images. This should help you understand brightness and contrast, and then from there adjustment layers can be utilized for the results. Ask yourself questions such as brightness, contrast, and saturation. You'll see that there are adjustment layers specific to these areas.
Copy link to clipboard
Copied

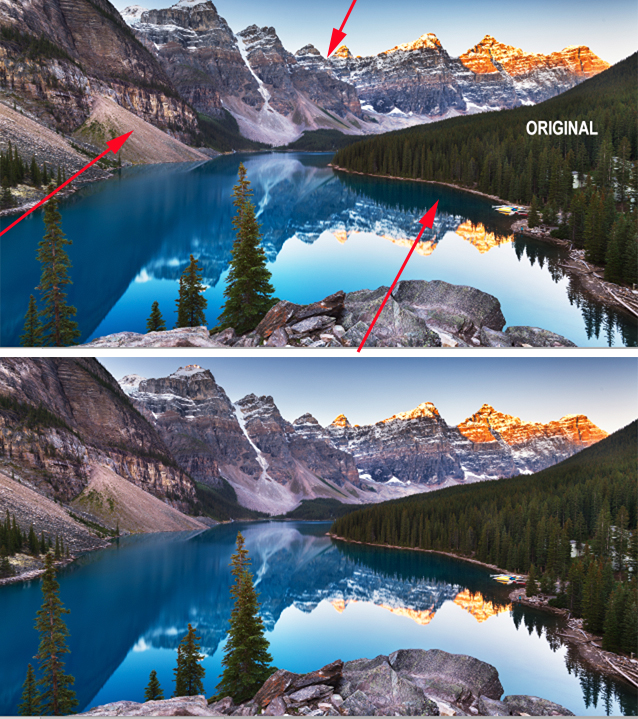
Original is the Background copy. Copy to be corrected is Layer 1
Highlight both layers and Edit > Auto Align Layers
On the Original use the Color Sampler tool to mark 3 aim points. Note on a scrap paper the values shown in the Info Panel.
Choose the Copy layer. The sampler positions are visible.
Image > Adjustments > Curves. Cmd+Shift with the Sampler tool on the 3 aim points. Their values now appear in the Info Panel and their positions on the separate curves are marked
Use the keyboard north/south arrow keys to move the curve point to the values marked on your scrap paper

These are the Curves that produced the Copy above. Additional aim points may provide greater accuracy.
Copy link to clipboard
Copied
Thank you, this is the most helpful post thus far. I will try it and see if I can mimic what you did.
Copy link to clipboard
Copied
I know how to open my background image, but how do I set the second image as Layer 1?
Copy link to clipboard
Copied
Judging from your question I assume you are new to Photoshop. In that case I suggest you first go to Preferences > Workspace > and uncheck "Open Documents as Tabs." Next, Open the image to be corrected. Now both images will appear in the Application Frame. Go to the Layers panel of the image to be corrected, and click and drag the layer over the other image. The layer and image will appear above the Background image. You can now close the image that you had dragged the layer from and you have one image open -- the Background image and, on a layer above it, the layer to be corrected.
Copy link to clipboard
Copied
Your Info Panel doesn't look like mine. All I see is a Histogram, not any curves.
***
Evok, I admire your desire to become adept at working with Photoshop but it is apparent that this project is too advanced for you at this time. I suggest that you look at some books and/or videos and learn the basics relating to Panels and Channels, Layers, Menu items and Tools. You must learn to walk before you can dance. The learning curve is steep but stick with it. Good luck.
Copy link to clipboard
Copied
Your Info Panel doesn't look like mine. All I see is a Histogram, not any curves.
Find more inspiration, events, and resources on the new Adobe Community
Explore Now


