Wrapping Text around a Picture
Copy link to clipboard
Copied
Sorry, I am new to this. I have Dreamweaver 8. How do I put a picture on the right of a frame and have the text "Wrap around" it on the left?
Copy link to clipboard
Copied
Not sure what your whole page is like but you can float your image to the right and text will automatically wrap on the left.
Just add as following:
<img style="float:right"...>
To learn more you may refer to followiing link also:
http://codex.wordpress.org/Wrapping_Text_Around_Images
Regards,
vinay
Copy link to clipboard
Copied
thank you very much this works grate just to try and help other out abit more add the link to ur pic and the size and ur url and where alt is put something that contains ur domain name its better in google for you
<img src="addthelinktourpichere" width="180" style="float:left" height="150" alt="Laptoprepaircourses" longdesc=" " />
Copy link to clipboard
Copied
You do this with CSS floats and margins like so:
http://alt-web.com/DEMOS/CSS2-Captions-on-floated-images.shtml
Please don't use Frames in the HTML sense. They're terrible to work with and frustrating for site visitors.
http://apptools.com/rants/framesevil.php
Nancy O.
Alt-Web Design & Publishing
Web | Graphics | Print | Media Specialists
www.alt-web.com/
www.twitter.com/altweb
www.alt-web.blogspot.com
Copy link to clipboard
Copied
Oh...I thought frame referred to create an image frame in general...(can't help but to think like a designer all the time ![]() )
)
Yes as Nancy said Frames are a strict NO NO...
Regards,
Vinay
Copy link to clipboard
Copied
Nancy, Again, sorry. I am new to this.
Do I have to do this with HTML code? Is there a tool I can click on in dreamweaver to make this happen?
Copy link to clipboard
Copied
Dreamweaver is a web authoring tool; not a drag & drop desktop publishing app. It does many time saving things for you to save you from hand coding but it's only as good as the skills you bring to the table. Working in code view is similar to checking under the hood of your car. You need to do it in order to keep everything running smoothly.
Start here:
HTML & CSS Tutorials - http://w3schools.com/
When you understand the basics, work your way through the following tutorials.
From Tables to CSS Web Design Part 1 -
http://www.adobe.com/devnet/dreamweaver/articles/table_to_css_pt1.html
From Tables to CSS Web Design Part 2 -
http://www.adobe.com/devnet/dreamweaver/articles/table_to_css_pt2.html
Nancy O.
Alt-Web Design & Publishing
Web | Graphics | Print | Media Specialists
www.alt-web.com/
www.twitter.com/altweb
www.alt-web.blogspot.com

Copy link to clipboard
Copied
Go up to Insert | Image, find your image and click OK. A dialog box will pop up asking your to put in your Alt Text, (A description of the image)do that as well.
Now switch to split view, click once on the image in design view, the code in code view will hightlight. Hit Control X to cut this code out, (thus deleting the image) and place your curser in the text close to where you want the image to be, hit control V to paste the image back in.
Your code will look like this
<img src="images/picturefilename.png" alt="The alt text you already added" />
NOw just like Vinay said, you will add style="float:right;" to the above code directly after the png", so it will look like this.
<img src="images/picturefilename.png" style="float:right;" alt="The alt text you already added" />
You may want to reposition (cut and paste same as above) once you see how it lays out.
Then pat yourself on the back, you just worked with HTML code.
Gary
Copy link to clipboard
Copied
Don't forget about float clearing. ![]()
CSS:
.clearing {/** to clear floats after they are not needed **/
clear:both;
height:1px;
width:100%;
}
HTML:
<br class="clearing" /> <!--apply to <br> <p> <hr> or <div> to clear floats -->
Nancy O.
Alt-Web Design & Publishing
Web | Graphics | Print | Media Specialists
www.alt-web.com/
www.twitter.com/altweb
www.alt-web.blogspot.com
Copy link to clipboard
Copied
Nancy O. wrote:
Don't forget about float clearing.
Hey Nancy,
but you don't have to clear an image every time though. I hardly ever use a clearing if I'm floating images left or right and never had a problem 🙂
Copy link to clipboard
Copied
Hey Nancy,
but you don't have to clear an image every time though.
I know, Nadia. Most times this is perfectly fine. But telling people about floats without showing them how to clear them is like handing someone a slice of bread and calling it a sandwich. Something's been left out.
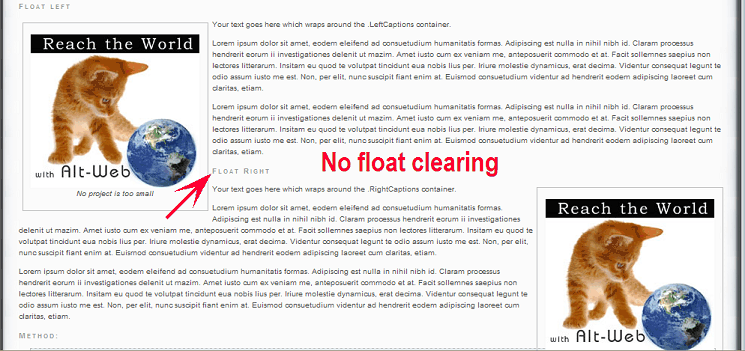
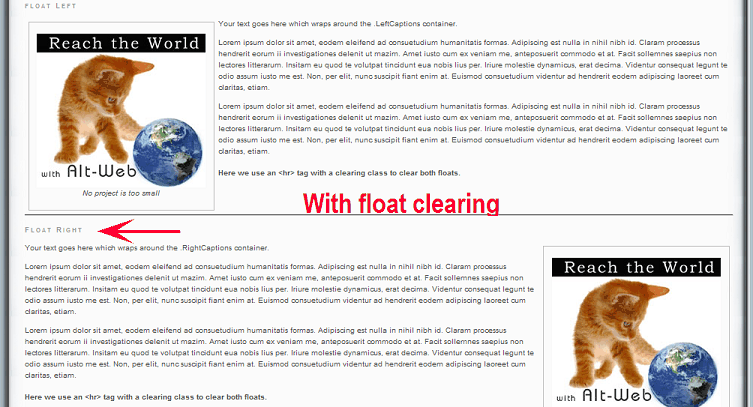
To illustrate what clearing does, look at the following screen shots.
#1 - No float clearing.
"Float right" text moves up and wraps around the "float left" image.

#2 - With Float Clearing
"Float right" text remains below "float left" image.

Nancy O.
Alt-Web Design & Publishing
Web | Graphics | Print | Media Specialists
www.alt-web.com/
www.twitter.com/altweb
www.alt-web.blogspot.com
Copy link to clipboard
Copied
Thanks for that Nancy,
I normally think of floating images so that text 'floats' around them no matter which way the images are floated on the page. I guess people would have a need to have the 'break' in text, before they float an image on the opposite side.
Copy link to clipboard
Copied
Or just to keep the relevant paragraph aligned with the relevant picture.
Copy link to clipboard
Copied
Kath-H wrote:
Or just to keep the relevant paragraph aligned with the relevant picture.
Yep, that's how I pretty much do it too. I doubt I've ever once had to use a clearing float when floating images 🙂
Copy link to clipboard
Copied
??? I do it all the time (doing it now) because the paragraph is shorter than I want the picture to appear.
Copy link to clipboard
Copied
Why teach to use an inline style, when it's better in the stylesheet or head of the document so it can be used as many times as needed? 🙂

Copy link to clipboard
Copied
I wanted to wrap text arond an FLV player. I floated the player left, and the text wrapped as hoped, except that I wanted it to wrap over the top too, with the player embedded in the text. But when I would move the player down, it left a blank zone over the top-- the text would not fall in over the top, leaving a nice big white area. Nothing semed to work-- tweaking posiitonong, margins, clearing floats, nothing. THen I remembered the advice here about inserting the image in the text close to where you want to position it. SO I went into Code View and put the cursor right in the middle of a paragraph, and pasted-in the FLV player. That worked!
So I thought I'd post this in case (1) it would help anyone else, or (2) what I did was completely wrong even tho it worked, and someone more knowledgeable than me can tell me how a real webmaster would do it! ![]() (DW CS6)
(DW CS6)
Copy link to clipboard
Copied
You need to be in code view for the following:
In the head of your document just before the closing </head> tag. copy and paste the following style rules:
<style type="text/css">
/* floats an image right, so text wraps around it */
.imgright {
float: right;
padding: 2px;
margin-left: 10px;
}
/* floats an image left, so text wraps around it */
.imgleft {
float: left;
padding: 2px;
margin-right: 10px;
}
</style>
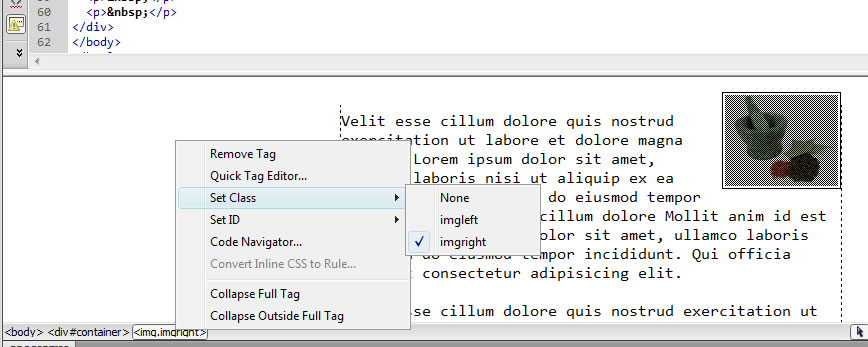
In Design View, select your image. Look at the tag selector above the Property Inspector and you'll see the <img> tag.
Right click on the tag and select "Class". You should see two classes. imgright and imgleft.
Select imgright. This floats the image to the right. If you want to have the image on the left, choose the .imgleft class.
The HTML will look like this when the class has been applied to the image.
<img src="79267-org.jpg" alt="" width="113" height="91" class="imgright" />
You can use this as many times as you like on a page because we are using a class rule not an ID (#) which can only be used once per page.

Example can be see here
Find more inspiration, events, and resources on the new Adobe Community
Explore Now