Exit
  • Global community
    • Language:
      • Deutsch
      • English
      • Español
      • Français
      • Português
  • 日本語コミュニティ
  • 한국 커뮤니티
0

add blank space around text

New Here ,
Jan 28, 2019 Jan 28, 2019

Hi all,

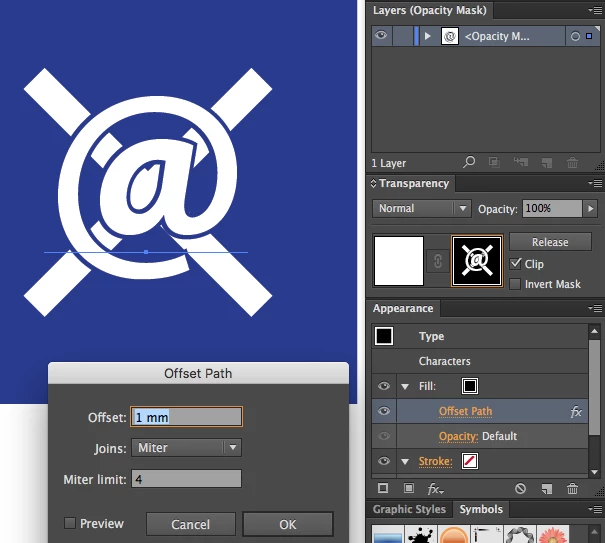
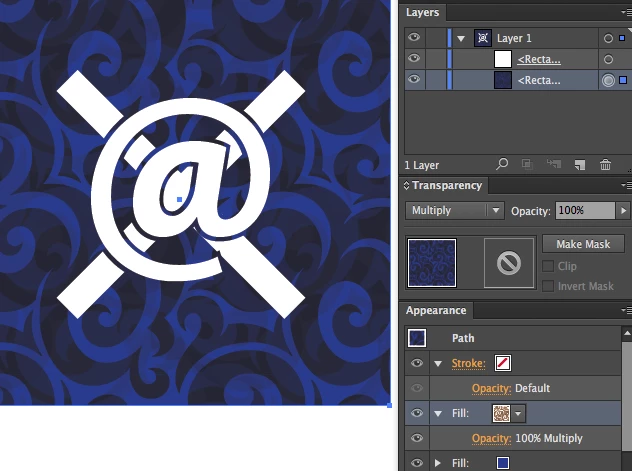
I'm using AI 2015 CC. I have a design with white text over some white lines in a kind of an "X" for a t-shirt design. I'd like the text to have a transparent outline around the letters, so they do not blend in with the lines that are supposed to appear as being behind the text.

How can I do that?

Thank you

6.8K
Translate
Report
Community guidelines
Be kind and respectful, give credit to the original source of content, and search for duplicates before posting. Learn more
community guidelines

correct answers 1 Correct answer

LEGEND , Jan 28, 2019 Jan 28, 2019

One way would be to set your artwork (white lines and text) as a "Opacity Mask" on a white rectangle. This would allow the text to remain fully editable on the mask. Add a Black Fill Attribute on top of the Character Attributes in the Attributes Panel and assign an "Effect>Path>Offset Path" to it to create the "transparency" to the rectangle.

Translate
Adobe
Community Expert ,
Jan 28, 2019 Jan 28, 2019

Can you show a screenshot?

Translate
Report
Community guidelines
Be kind and respectful, give credit to the original source of content, and search for duplicates before posting. Learn more
community guidelines
LEGEND ,
Jan 28, 2019 Jan 28, 2019

One way would be to set your artwork (white lines and text) as a "Opacity Mask" on a white rectangle. This would allow the text to remain fully editable on the mask. Add a Black Fill Attribute on top of the Character Attributes in the Attributes Panel and assign an "Effect>Path>Offset Path" to it to create the "transparency" to the rectangle.

Translate
Report
Community guidelines
Be kind and respectful, give credit to the original source of content, and search for duplicates before posting. Learn more
community guidelines
New Here ,
Jan 31, 2019 Jan 31, 2019

rcraighead, thank you, that is exactly what I am looking for. The top image looks very close to my drawing.

I've been working with someone, and they actually produced the effect, but, they changed some of letter's font sizes. I asked them to correct it and create it without changing the font sizes, but they have not replied to my request, so, I am trying my hand at it.

In one of the files she sent me, I found a white rectangle to the right of the drawing and dragged it onto that.

I've selected all and found the "Opacity Mask".

As for "Add a Black Fill Attribute on top of the Character Attributes in the Attributes Panel", I've found the Attributes Panel, so I think. I've clicked the upper right icon, and see: "Show Overlay Print Only" and "Hide Note".

Screenshot (100).png

Am I close?

Translate
Report
Community guidelines
Be kind and respectful, give credit to the original source of content, and search for duplicates before posting. Learn more
community guidelines
LEGEND ,
Jan 31, 2019 Jan 31, 2019

Sorry, I've confused you. You need the "Appearance" panel. I'll post a video shortly.

Here's the video. I forgot to show how to edit what's on the Opacity Mask. Two ways: Either by clicking the "Mask" thumbnail and editing (with all artwork visible) or by Option+Clicking to view ONLY the Opacity Mask artwork.

Translate
Report
Community guidelines
Be kind and respectful, give credit to the original source of content, and search for duplicates before posting. Learn more
community guidelines
New Here ,
Feb 07, 2019 Feb 07, 2019

Thank you. That looks very helpful. Sorry, I got caught up with some other projects. I plan to try this tomorrow, I'll post back if I run into any snags.

Translate
Report
Community guidelines
Be kind and respectful, give credit to the original source of content, and search for duplicates before posting. Learn more
community guidelines
New Here ,
Feb 08, 2019 Feb 08, 2019

ok, tried it, I am close: image. Since I plan to print on a t-shirt, I don't have any background.

Still trying to make it to look like yours looks at the 4:15 minute mark. I've grouped it all, yet, without a background, when I implement the mask, it disappears.

Here's a video of what I've done. What do I need to do to make and see that kind of effect, yet have no background?

Translate
Report
Community guidelines
Be kind and respectful, give credit to the original source of content, and search for duplicates before posting. Learn more
community guidelines
New Here ,
Feb 15, 2019 Feb 15, 2019

Hi all,

Any news or update on this?

Thanks

Translate
Report
Community guidelines
Be kind and respectful, give credit to the original source of content, and search for duplicates before posting. Learn more
community guidelines
Community Expert ,
Feb 15, 2019 Feb 15, 2019

pranaman  schrieb

Hi all,

Any news or update on this?

Thanks

Update on what?

You can speed up answers if you show images directly in the forum.

And also create your own thread, since this one is marked solved already.

Translate
Report
Community guidelines
Be kind and respectful, give credit to the original source of content, and search for duplicates before posting. Learn more
community guidelines
New Here ,
Feb 15, 2019 Feb 15, 2019

I've started this thread. I don't know how it marked as solved. I don't think I did it.

Here is the post relisted, with images.

I am close, got to here:

ai1.png

Since I plan to print on a t-shirt, I don't have a background.

Trying to make it to look like:

ai-right effect.png

I've grouped it all, yet, without a background, when I implement the mask, my entire drawing disappears:

What do I need to do to make and see that kind of effect, yet have no background?

Translate
Report
Community guidelines
Be kind and respectful, give credit to the original source of content, and search for duplicates before posting. Learn more
community guidelines
Community Expert ,
Feb 16, 2019 Feb 16, 2019

First question would be how will you print it? Screen printing, foil ...

What kind of file do you need? Which specifications for the file?

Depending on the printing process the method needs to be chosen.

Translate
Report
Community guidelines
Be kind and respectful, give credit to the original source of content, and search for duplicates before posting. Learn more
community guidelines
New Here ,
Feb 16, 2019 Feb 16, 2019

I will be using http://merch.amazon.com​, and they do it print on demand style. Perhaps others, like https://threadless.com/, which I'll look into another time.

For merch.amazon.com, it has to be 4500px x 5400px.

merch-amazon-merch-tshirt-upload.png

I used a png for another shirt: I also have this from them: T-shirt_template-Illustrator-Merch_by_AMZN - Google Drive

Translate
Report
Community guidelines
Be kind and respectful, give credit to the original source of content, and search for duplicates before posting. Learn more
community guidelines
Community Expert ,
Feb 16, 2019 Feb 16, 2019

Ok, so you won't need to actually cut the paths.

You need to apply the stroke differently.

The fill is applied to the text. But delete the stroke first.

Then in the appearance panel add a stroke to the text object (it needs to be selected with the select tool)

The stroke needs to be the width you want.

color doesn't matter.

Then in the appearance panel set the opacity of the stroke to 0%

Do that with all the texts

Then group everything with the crossed needles (?) in the back

Set the group to knockout group.

Set View > Preview on CPU.

Translate
Report
Community guidelines
Be kind and respectful, give credit to the original source of content, and search for duplicates before posting. Learn more
community guidelines
New Here ,
Feb 19, 2019 Feb 19, 2019
LATEST

Ooh, that was tricky, but I got it.

Couldn't delete the stroke, so I recreated each block of text.

Yes, needles in the back. Just using placeholder text for now.

I've copied it to the MBA template, and removed all other layers, however, now just need to remember how I export it and tweak it so it will upload right.

Thank you.

Translate
Report
Community guidelines
Be kind and respectful, give credit to the original source of content, and search for duplicates before posting. Learn more
community guidelines