
Creating a transparent frame around an icon overlay
First of all, I am a bloody Illustrator beginner, so please explain it for dummies, not experts! 🙂
Also, my version of Illustrator is in German, not english, so mind that I might use different wording than in the actual program.
I have to create and change software icons from already existing icons. These are all .svg files and have to be saved as svg again.
For many of those, I need to add overlays to the icon.
Example:
This is the icon:

This is the overlay:

Added together (without a frame):

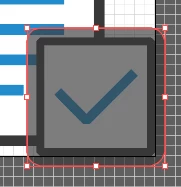
The overlay now needs to be sorrounded by a 1pt wide transparent frame, like this:

Now, I have finally found a way to make this work at all. The problem is that I have to do about 200 of these and it is currently incredibly tedious and takes up to 30minutes per icon.
This is my way to go:
1. I copy the overlay (here: checkbox)
2. I delete all details of the overlay and only keep the outer shape/ outline.
3. I turn the outline into an object (object > path > outline (/3rd option in list)) and delete the inner path (doubleclick on object, selecting it, delete) to make it a flat filled object.
4. I add a new outline of 1pt width to create my required frame. I repeat step 3 and end up with a flat object that is 1pt wider than the original overlay. (Transparent here for better visibility) Then I move the extended overlay exactly centered over the original overlay.
5. I turn every path that is part of the icon (here: document) into an object.
>Very tedious because I have to check every layer seperately. If I just select all layers of the icon and try to turn it into an object, it won't work as soon as there is one layer among them which isn't a path. This step is necessary because subtracting directly from a path causes problems and changes the shapes.
6. I copy the extended overlay numerous times and place them all on top of each other.
>Very tedious. Is there a way I can copy and paste into the exact same position by default?
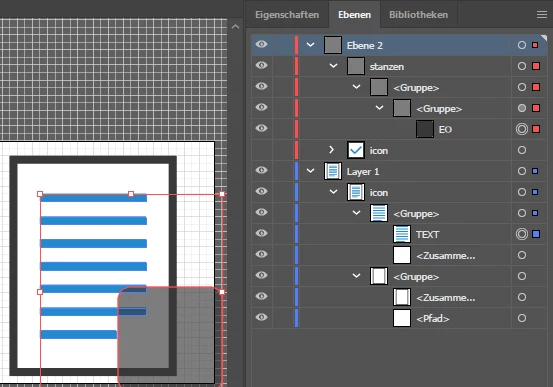
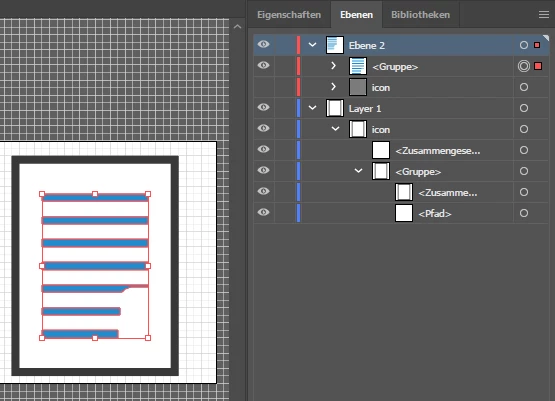
This step is necessary because as soon as I subtract the extended overlay from one layer, the layer of the extended overlay is replaced by the result of the cut out layer. (Note layers "EO" and "TEXT" in the picture, here I subtracted EO from TEXT, the image on the right is the result - EO and TEXT are gone and a new group has been created instead.) Can I avoid this (=keep the e. overlay intact and keep the cut out layer in its position)?
7. I select the extended overlay + one single layer of the icon. I subtract the extended overlay from that layer (Pathfinder > subtract icon in foreground  ) Rinse and repeat for every single layer of the icon.
>As soon as I select several layers of the icon, it won't work or it gives me some weird unwanted result. Now this icon only has 3 layers but imagine more complex stuff.
8. I drag the cut out icon layer back to where it originally was (in the layer list!) since it has moved into the position of the extended overlay which I subtracted from it (> explained in step 6).
>It can be really difficult to remember the right position for the layer since neither the name of the foreground layer nor thus of the background layer is kept.
9. Delete the extended overlay and make the overlay visible again. Done.

I really hope there is a simpler solution to this because the task in itself sounds very simple at first. Any tips or ideas on how to do this more efficiently? Isn't there a way to just create an outline around the overlay that makes everything behind it transparent?
Thank you in advance.
Tamara.