artdept22
Known Participant
April 10, 2020
Answered

Creating Tie Dye in Illustrator

  • April 10, 2020
  • 2 replies
  • 8020 views

I am trying to create a tie-dye design in Illustrator that has to be in vector format for me to be able to out put to my processor for photographic films. Are there any tips or tricks that anyone can suggest to help me create this type of pattern? 

I've tried using the Distrort & Effect functions to some degree and expanding it out, but it is not getting me to 100% of what I am looking for. 


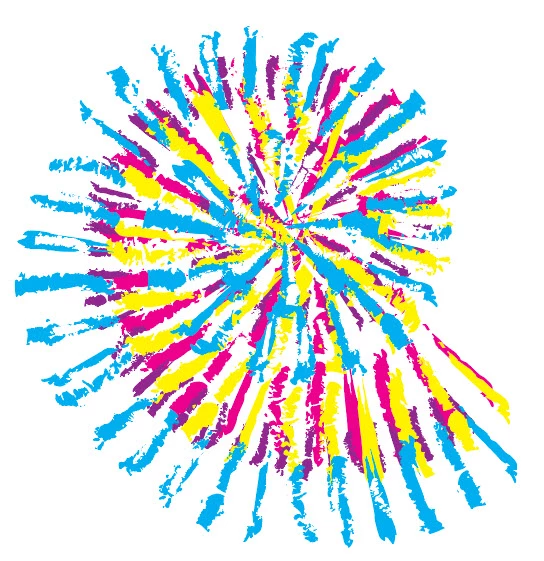
I am attaching ideas of the style or patterns that I am trying to create.


Thank you in advance!


This topic has been closed for replies.
Correct answer Myra Ferguson

Here's what I did to make the above image:

  1. Drew multiple lines (you can use the line tool or the pen tool)
  2. Went to the Brushes panel, to the panel menu in the upper right, to Open Brush Library > Artistic > Artistic_Paintbrushes
  3. Applied a variety of the splattery-looking brushes to the strokes
  4. Dragged the multiple paths to the Brushes panel to make a pattern brush with the corners set to Auto-Centered
  5. Drew a spiral with the Spiral Tool (nested with the Line Segment Tool)
  6. Clicked on the new brush to apply it to the stroke
  7. Used the Width Tool to make it not as wide at the center and wider at the outside
  8. Went to Object > Path > Outline Stroke to convert the brush to shapes
  9. Changed the Fill color (you could also change the color in the Brush panel with hue shift)
  10. Repeated steps 5-9 with various sizes of spirals, widths, and colors (I added a white one on the top for more texture)

2 replies

Document Geek
Community Expert
Community Expert
April 25, 2020

I wrote an article for InDesign that might be helpful. You can make the patterns in InDesign, export a jpeg, then place that jpeg into Illustrator and run image trace. 

https://documentgeek.blogspot.com/2016/02/how-to-make-tie-dye-patterns-in-indesign.html

Myra Ferguson
Community Expert
Myra FergusonCommunity ExpertCorrect answer
Community Expert
April 23, 2020

Here's what I did to make the above image:

  1. Drew multiple lines (you can use the line tool or the pen tool)
  2. Went to the Brushes panel, to the panel menu in the upper right, to Open Brush Library > Artistic > Artistic_Paintbrushes
  3. Applied a variety of the splattery-looking brushes to the strokes
  4. Dragged the multiple paths to the Brushes panel to make a pattern brush with the corners set to Auto-Centered
  5. Drew a spiral with the Spiral Tool (nested with the Line Segment Tool)
  6. Clicked on the new brush to apply it to the stroke
  7. Used the Width Tool to make it not as wide at the center and wider at the outside
  8. Went to Object > Path > Outline Stroke to convert the brush to shapes
  9. Changed the Fill color (you could also change the color in the Brush panel with hue shift)
  10. Repeated steps 5-9 with various sizes of spirals, widths, and colors (I added a white one on the top for more texture)