

Cutting a circle

Copy link to clipboard
Copied
Hi all,
I need to make shapes like this based on a value for graph purposes - usually I would just create a cutting shape based on trig (this shape representing around 60%) and subtract it from the path - I have about 30 graphs to do and I need to base it on a variable, and I want to use script - I'm sure there must be a better way, and I'm hoping you guys have the answer.
Thanks in advance
Dave


Explore related tutorials & articles
 31
Replies
31
31
Replies
31

Copy link to clipboard
Copied
one way to do it would be like this, it is semi-automatic, it requires a graphic style and a script.
- draw a couple of overlapping shapes
- group them
- click on Effects->Pathfinder->Minus Back menu
- make a new graphic style by dragging the group to the Graphic Styles palette
- rename your newly created graphic style to "minusBack"
- now run the script, I hardcoded all the values to make a 99% circle

- the shape has a live effect applied, select it and expand appearance to get the final shape.
the script will make 1 circle at a time, it needs more work to make more in one go, depending on how your data is arranged,
var r = 200; // this is the Radius of the Outer circle
var r2 = 125; // this is the Radius of the Inner circle
var percent = 99;
var idoc = app.activeDocument;
var igroup = idoc.groupItems.add();
var cutline = makeCuttingShape (percent, r, igroup);
var innerCircle = makeEllipse (r2, igroup);
var outerCircle = makeEllipse (r, igroup);
idoc.graphicStyles["minusBack"].applyTo (igroup);
function makeEllipse(r, container) {
var top = r;
var left = -r;
var width = r*2;
var height = r*2;
container.pathItems.ellipse (top, left, width, height, undefined, true);
}
function makeCuttingShape(percent, r, igroup) {
var teta = ((percent/100)*360);
var x1 = r*Math.cos(teta*Math.PI/180);
var y1 = r*Math.sin(teta*Math.PI/180);
var pp = [x1,y1];
var p0 = [r,0];
var pc = [0,0];
var q1 = [r,r];
var q2 = [-r,r];
var q3 = [-r,-r];
var q4 = [r,-r];
var cuttinLine = igroup.pathItems.add();
if(percent<=25)
cuttinLine.setEntirePath (Array(p0,pc,pp,q1,q2,q3,q4,p0));
else if (percent<=50)
cuttinLine.setEntirePath (Array(p0,pc,pp,q2,q3,q4,p0));
else if (percent<=75)
cuttinLine.setEntirePath (Array(p0,pc,pp,q3,q4,p0));
else
cuttinLine.setEntirePath (Array(p0,pc,pp,q4,p0));
cuttinLine.closed = true;
}

Copy link to clipboard
Copied
"Minus Back" needs an action in Illustrator!? Gosh. I have been programming something for InDesign for a while now, having all kinds of fun with (let me check) ... add and intersect, so far. Now working something that needs subtracting as well.
I *was* thinking about it but I guess there's not going to be an Illustrator version of this!

Copy link to clipboard
Copied
Jong, I think in AI about half the app is plug-ins… And script gets no access to this… It's over my level but I thought that plug-ins could be wrote to allow scripting access ( photoshop has some Im almost sure ) What you can do in ID compaired to this app makes it quite <path>etic  I should be a copy writer me thinks??? Scriptographer does have some of this… I've made lots of scripted use of 3d perspective grids though… Why on earth would you want to cut a simple shape an colour it up using a drawing app are you mad???
Copy link to clipboard
Copied
So InDesign is more powerful for scripting?
I'd be very interested to see the equivalent for InDesign.
D,
Copy link to clipboard
Copied
Dave, Yes this is much easier stuff to do in ID it has all the equivilent pathFinder methods… It is possible to get your paths from AI to ID via bridgetalk then manipulate and copy back but its a lot of work for something that should be in the AI toolbox anyhow… It may be possible to use AI's data driven graphics ( datasets ) for what you want but you would need to know XML for that…? An option for AI would be to add lots of path points around your circle at given distances then remove a bunch of them ( with a fat stroked path ) Thats going to involve bézier math and Im going to say goodluck at that point…
Jong, ID's path methods are good scripting fun and the one trick I had much fun with was text wrap ( off setting paths ) You can read the text wrap path point array out and apply it to other paths… I have a couple of scripts where I used this…
Copy link to clipboard
Copied
To be honest I would try the path of least resistance first and look if I could visually get away with a big fat stroked polygon…
#target illustrator
var doc = app.activeDocument;
doc.defaultFilled = false, doc.defaultStroked = true;
var g = doc.pathItems.polygon( doc.width/2, -doc.height/2, 100, 100, false );
g.strokeWidth = 100;
for ( var i = 0; i < 100; i++ ) {
g.pathPoints.pointType = PointType.SMOOTH; // If only this was like covert point in the GUI
// It would be easier to just do bézier math on the handles here
};
g.pathPoints[0].selected = PathPointSelection.ANCHORPOINT;
app.cut();
Pushing the number of path points up could help the look if you don't want to move left/right anchors…
Copy link to clipboard
Copied
Thanks, so now I have a couple of options!
Copy link to clipboard
Copied
Thats going to involve bézier math and Im going to say goodluck at that point…
Hi Mark, for circle approximations there's formula that doesn't seem "that" difficult to get the control points.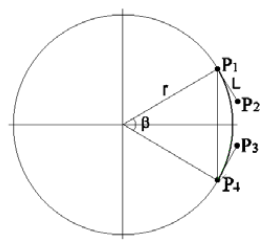
Let the coordinates of the arc start point P1, arc end
point P4 and arc center point C be (x1, y1), (x4, y4)
and (xc, yc), respectively. Then:
ax = x1 – xc
ay = y1 – yc
bx = x4 – xc
by = y4 – yc
q1 = ax*ax + ay*ay
q2 = q1 + ax*bx + ay*by
k2 = 3/4( 2*q1*q2 – q2) / (ax*by – ay*bx).
The resulting coordinates of the Bezier control points P2 and P3 are:
x2 = xc + x1 – k2*y1,
y2 =yc + y1 + k2*x1,
x3 = xc + x4 – k2*y4,
y3 =yc + y4 + k2*x4.
.
that being said, we could draw the cut donut from scratch without the need of path finders. We could start with a circle, and find out with that formula, only one set of control points.
Copy link to clipboard
Copied
Here is an InDesign version. .. Not that it's "simpler"  Draw a circle, select it, run the script and the circle gets clipped.
if (app.selection.length == 1)
{
val = prompt ("Start at,Size (in %): ", "15,25");
if (val != null && val.match(/^\d+,\d+$/))
{
start = Number(val.match(/^\d+/)) % 100;
perc = Number(val.match(/\d+$/)) % 100;
end = start+perc;
startangle = start*2*Math.PI/100;
endangle = end*2*Math.PI/100;
circleCenter = [ (app.selection[0].geometricBounds[3]+app.selection[0].geometricBounds[1])/2,
(app.selection[0].geometricBounds[2]+app.selection[0].geometricBounds[0])/2 ];
circleRadius = (app.selection[0].geometricBounds[3]-app.selection[0].geometricBounds[1])/2;
// warning: math! (though this is SIMPLE compared to what I've bin doing today)
segstart = [ circleCenter[0]+ 2*circleRadius*Math.sin(startangle), circleCenter[1]- 2*circleRadius*Math.cos(startangle) ];
segend = [ circleCenter[0]+ 2*circleRadius*Math.sin(endangle), circleCenter[1]- 2*circleRadius*Math.cos(endangle) ];
cutoff = app.activeDocument.graphicLines.add();
// create surrounding border
path = [ circleCenter, segstart ];
for (i=start; i<end; i += (perc/16))
path = path.concat ([[ circleCenter[0]+2*circleRadius*Math.sin(i*2*Math.PI/100),circleCenter[1]-2*circleRadius*Math.cos(i*2*Math.PI/100)]] );
path = path.concat ([segend]);
cutoff.paths[0].entirePath = path;
cutoff.paths[0].pathType = PathType.CLOSED_PATH;
cutoff.intersectPath(app.selection[0]);
}
}
(I wrote this without peeking at Mark's answer. .. His appears to be a bit shorter ..)
Copy link to clipboard
Copied
If you want to keep your original circle, change the last command line to:
cutoff.intersectPath(app.selection[0].duplicate());
The original circle stays selected, so you can run the script again.
Thinking: since this uses "prompt" to let you input the values, it could be rewritten to accept a range of numbers and then slice the underlying object up according to those values, having it do the calculations itself. Hmmm ...
Shall I leave that as an excercise to the Reader? After all, this is still an InDesign script ...)
Copy link to clipboard
Copied
Jong, shorter does not mean better… I used to be great at math while ( at school ) it's the do { nothing } with it since thats the root of my problems… Too larger gap between school & scripting to fix that now…
Copy link to clipboard
Copied
(g) You should see what lower grade websites I had to read today just to get my basic trigonometry right, coupled with some line-line intersection.
I couldn't resist: Here is a script that accepts any array of numbers -- they don't even have to add up to 100%. Funny thing: with a slight adjustment, you can now not only make pie diagrams, but also squares -- or whatever. Stars? Yup:

(Warning: THIS IS STILL AN INDESIGN SCRIPT!)
if (app.selection.length == 1)
{
val = prompt ("Values: ", "1,2,3");
if (val != null)
{
values = val.split(",");
total = 0;
for (i=0; i<values.length; i++)
{
values = Number(values);
total += values;
}
for (i=0; i<values.length; i++)
{
values = values*2*Math.PI/total;
}
circleCenter = [ (app.selection[0].geometricBounds[3]+app.selection[0].geometricBounds[1])/2,
(app.selection[0].geometricBounds[2]+app.selection[0].geometricBounds[0])/2 ];
circleRadius = Math.max ( (app.selection[0].geometricBounds[3]-app.selection[0].geometricBounds[1])/2,
(app.selection[0].geometricBounds[2]-app.selection[0].geometricBounds[0])/2);
startangle = 0;
for (i=0; i<values.length; i++)
{
endangle = startangle + values;
// warning: math! (though this is SIMPLE compared to what I've bin doing today)
segstart = [ circleCenter[0]+ 2*circleRadius*Math.sin(startangle), circleCenter[1]- 2*circleRadius*Math.cos(startangle) ];
segend = [ circleCenter[0]+ 2*circleRadius*Math.sin(endangle), circleCenter[1]- 2*circleRadius*Math.cos(endangle) ];
cutoff = app.activeDocument.graphicLines.add();
// create surrounding border
path = [ circleCenter, segstart ];
for (j=startangle; j<endangle; j += (values/16))
path = path.concat ([[ circleCenter[0]+2*circleRadius*Math.sin(j),circleCenter[1]-2*circleRadius*Math.cos(j)]] );
path = path.concat ([segend]);
cutoff.paths[0].entirePath = path;
cutoff.paths[0].pathType = PathType.CLOSED_PATH;
cutoff.intersectPath(app.selection[0].duplicate()).fillTint = (i+1)*100/values.length;
startangle = endangle;
}
}
}
Copy link to clipboard
Copied
that's pretty cool jong

Copy link to clipboard
Copied
[Jongware] wrote:
I couldn't resist: Here is a script that accepts any array of numbers -- they don't even have to add up to 100%. Funny thing: with a slight adjustment, you can now not only make pie diagrams, but also squares -- or whatever. Stars? Yup:
(Warning: THIS IS STILL AN INDESIGN SCRIPT!)
Hi [Jongware] and everyone.
Great thread. I happened to come across this thread/script (searching the forum for tint) and also then saw the accompanying thread in the indesign forum as well, great stuff [Jongware]! So I was hoping [Jongware] or someone would be willing to convert it to Illustrator JS Code? Also if possible to include the mentioned "slight adjustment" for working on whatever shaped shapes as mentioned. I really appreciate the consideration and assistance in converting this for illustrator. Thanks everyone for your time and consideration and especially [Jongware] for the nifty script!
Copy link to clipboard
Copied
W_J_T, it was "easy" to do for InDesign but not so for Illustrator. The rather crucial command "subtract" is not (easily) accessible from within Illustrator scripts.
I'm going to have to hand this one over to dedicated Illustrator scripters 🙂
Copy link to clipboard
Copied
Hi [Jongware],
Thanks for responding. Yeah I have seen mention through the forums about illustrators lacking vs inDesigns robust scripting control, thats too bad illustrator is not on par. Well, I guess worse case scenario, as long as the converted script makes the proper circular chart shape based upon the array numbers I can then position and use the pathfinder manually to combine the two shapes to get the desired end result.
Maybe someone can help with the conversion to illustrator of drawing the divided circle shape from the array, it looks like you have already tackled all the required math. So I guess it's just a matter of using illustrators drawing methods, using setEntirePath with the array of numbers I suppose like in CarlosCanto's example? Thanks for the assistance [Jongware] and anyone that is willing to help. Again this is a great thread with some really good nuggets in it. Thanks everyone for the assistance on this.

Copy link to clipboard
Copied
You could always just do it in ID and copy/paste the result back into Illustrator.
Copy link to clipboard
Copied
Learning bridgetalk is a walk in the park compaired to bezier math… I would cheat… he he…
Copy link to clipboard
Copied
Hi Larry and Muppet Mark,
Thanks so much guys for your input and feedback. Yes those are both viable options as well as using the pie graph tool itself in combination with other methods in the illustrator IDE.
I was however more interested in seeing how this "Divided Circle Shape from an Array of Numbers" creation approach could be accomplished in Illustrator via script like [Jongware]'s inDesign code.
Unless I am misunderstanding the code, it looks like the only things that need addressed is the following extracted bits from [Jongware]'s code:
cutoff = app.activeDocument.graphicLines.add();
path = [circleCenter, segstart];
path = path.concat([[circleCenter[0] + 2 * circleRadius * Math.sin(j), circleCenter[1] - 2 * circleRadius * Math.cos(j)]]);
path = path.concat([segend]);
cutoff.paths[0].entirePath = path;
cutoff.paths[0].pathType = PathType.CLOSED_PATH;
cutoff.intersectPath(sel[0].duplicate()).fillTint = (i + 1) * 100 / values.length;
I was thinking that with in those bits, it could be re-coded to use illustrators pathItems.ellipse along with pathItems..add() + setEntirePath , etc., is it not quite that simple and involves more to it than what I am imagining? Myself however, looking at the inDesgn code I cant make heads or tales of the the similarities or conversion needs between the two to get there. Any further help would be greatly welcomed. Thanks everyone.
Copy link to clipboard
Copied
Yes I know where you come from and its a big issue for me… I came from AppleScript where the syntax like every & whose filtering worked across all apps because it opperates above them… Then you get to ExtendScript and things are not so portable… idiosyncrasies or so I like to call it id is a much newer app and it pretty much has it's own set of methods unlike the other suite apps. Makes things a little to say the least difficult for a scripter of all suite apps… Using core JavaScript Math & geometry should transend all apps if you can remember it…?
Copy link to clipboard
Copied
W_J_T, the handling of paths is different enough to just re-write it from scratch. Fortunately, I found some code on the web! The math is really horrible Hans Muller's Flex Blog contained *almost* ready-to-use code, only minor tinkering was necessary to adjust it for Illy.
This script prompts you for a series of numbers, adds them all up, and then shows a circle pie divided into relatively-sized slices in the center of your viewport, with a fixed radius of 100 points, and colored at random.
I briefly considered adding a hole in the middle, but ... well, maybe later. Also, maybe left as "exercise for the reader"
var segmentSizes = prompt('Segment sizes','1 2 3');
if (segmentSizes != null)
{
segments = segmentSizes.replace(/,/g, ' ').replace(/ +/g, ' ').split(' ');
total = 0;
for (i=0; i<segments.length; i++)
{
segments = Number(segments);
total += segments;
}
for (i=0; i<segments.length; i++)
{
segments /= total;
segments *= 2*Math.PI;
}
segments.reverse();
radius = 100;
center = app.activeDocument.activeView.centerPoint;
angle = 0;
for (i=0; i<segments.length; i++)
{
curves = createArc (radius, angle, angle + segments);
npath = app.activeDocument.pathItems.add();
ptPoint = npath.pathPoints.add();
ptPoint.anchor = ptPoint.leftDirection = ptPoint.rightDirection = center;
for (c=0; c<curves.length; c++)
{
ptPoint = npath.pathPoints.add();
ptPoint.leftDirection = ptPoint.anchor = [center[0]+curves
.x1,center[1]+curves .y1]; ptPoint.rightDirection = [center[0]+curves
.x2,center[1]+curves .y2]; ptPoint = npath.pathPoints.add();
ptPoint.rightDirection = ptPoint.anchor = [center[0]+curves
.x4,center[1]+curves .y4]; ptPoint.leftDirection = [center[0]+curves
.x3,center[1]+curves .y3]; }
npath.closed = true;
color = new RGBColor();
color.red = 255*Math.random();
color.green = 255*Math.random();
color.blue = 255*Math.random();
npath.fillColor = color;
angle += segments;
}
}
// Following code adapted from http://hansmuller-flex.blogspot.nl/2011/04/approximating-circular-arc-with-cubic.html
// [JW] According to Hans, his code cannot draw a single segment larger than one circle quarter. So he cleverly split it up into
// two separate routines; one that splits a curve larger than a full quadrant into at-max-quadrant-sized ones, the other that does
// the calculations for a single arc (guaranteed not to exceed a quadrant).
// I add the returned curve points together into a single path, and there *will* be some duplicate points. However, the
// book-keeping bit is a bigger pain than just leaving it as it is
/**
* Return a array of objects that represent bezier curves which approximate the
* circular arc centered at the origin, from startAngle to endAngle (radians) with
* the specified radius.
*
* Each bezier curve is an object with four points, where x1,y1 and
* x4,y4 are the arc's end points and x2,y2 and x3,y3 are the cubic bezier's
* control points.
*/
function createArc(radius, startAngle, endAngle)
{
var EPSILON = 0.00001; // Roughly 1/1000th of a degree, see below
// normalize startAngle, endAngle to [-2PI, 2PI]
var twoPI = Math.PI * 2;
// Note: MOD does not work as I expected!
// startAngle = startAngle % twoPI;
// endAngle = endAngle % twoPI;
while (startAngle < -twoPI) startAngle += twoPI;
while (startAngle > twoPI) startAngle -= twoPI;
while (endAngle < -twoPI) endAngle += twoPI;
while (endAngle > twoPI) endAngle -= twoPI;
// Compute the sequence of arc curves, up to PI/2 at a time. Total arc angle
// is less than 2PI.
var curves = [];
var piOverTwo = Math.PI / 2.0;
var sgn = (startAngle < endAngle) ? 1 : -1;
var a1 = startAngle;
for (var totalAngle = Math.min(twoPI, Math.abs(endAngle - startAngle)); totalAngle > EPSILON; )
{
var a2 = a1 + sgn * Math.min(totalAngle, piOverTwo);
curves.push(createSmallArc(radius, a1, a2));
totalAngle -= Math.abs(a2 - a1);
a1 = a2;
}
return curves;
}
/**
* Cubic bezier approximation of a circular arc centered at the origin,
* from (radians) a1 to a2, where a2-a1 < pi/2. The arc's radius is r.
*
* Returns an object with four points, where x1,y1 and x4,y4 are the arc's end points
* and x2,y2 and x3,y3 are the cubic bezier's control points.
*
* This algorithm is based on the approach described in:
* A. Riškus, "Approximation of a Cubic Bezier Curve by Circular Arcs and Vice Versa,"
* Information Technology and Control, 35(4), 2006 pp. 371-378.
*/
function createSmallArc(r, a1, a2)
{
// Compute all four points for an arc that subtends the same total angle
// but is centered on the X-axis
var a = (a2 - a1) / 2.0; //
var x4 = r * Math.cos(a);
var y4 = r * Math.sin(a);
var x1 = x4;
var y1 = -y4;
// magic constant:
var k = 4*(Math.sqrt(2)-1)/3;
var f = k * Math.tan(a);
var x2 = x1 + f * y4;
var y2 = y1 + f * x4;
var x3 = x2;
var y3 = -y2;
// Find the arc points actual locations by computing x1,y1 and x4,y4
// and rotating the control points by a + a1
var ar = a + a1;
var cos_ar = Math.cos(ar);
var sin_ar = Math.sin(ar);
return {
x1: r * Math.cos(a1),
y1: r * Math.sin(a1),
x2: x2 * cos_ar - y2 * sin_ar,
y2: x2 * sin_ar + y2 * cos_ar,
x3: x3 * cos_ar - y3 * sin_ar,
y3: x3 * sin_ar + y3 * cos_ar,
x4: r * Math.cos(a2),
y4: r * Math.sin(a2)
};
}

Copy link to clipboard
Copied
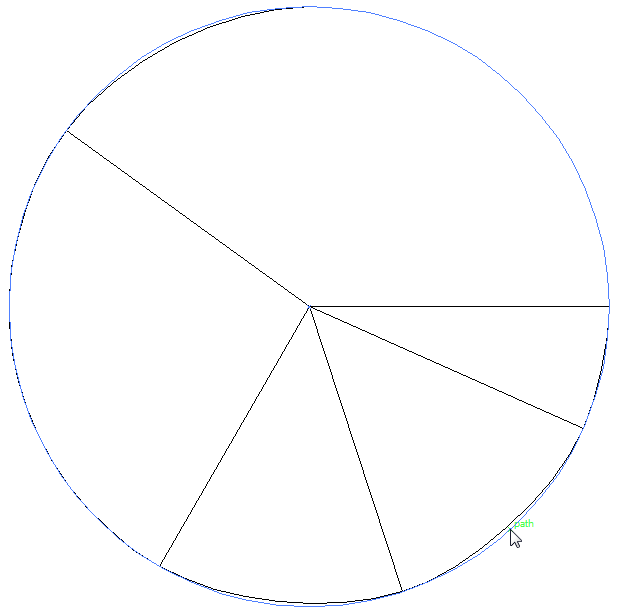
nice JW...though the circle is not that perfect ?
Copy link to clipboard
Copied
Ha ha, but you are comparing it against another "circle" from Illustrator!
There is no mathematically correct method to draw circles (or circle segments) exactly using Bezier curves, there always is going to be an error of some kind. In your example, the error in my code and Illy's approximation seem to add up, rather than cancel each other out, so it's highly visible.
I can live with this
A better way would have been to use my InDesign approach: take a native object (which, somewhere far in the future, just might include "real" circles) and use Pathfinder operations to cut it into pieces. This can be done manually, but as said above, Illy's scripting language isn't quite there yet. Maybe somewhere far in the future it will be.
Copy link to clipboard
Copied
A slightly improved version: http://ww.jongware.com/binaries/makemeapie.zip
Now you can add a hole in your Pie. Set its size to 0% to make a whole pie, or to 100% to get just the outermost lines -- no fills in that case.
-
- 1
- 2

 AdChoices