• Global community
    • Language:
      • Deutsch
      • English
      • Español
      • Français
      • Português
  • 日本語コミュニティ
    Dedicated community for Japanese speakers
  • 한국 커뮤니티
    Dedicated community for Korean speakers
Exit
0

Divide tool not working

New Here ,
Mar 13, 2017 Mar 13, 2017

Copy link to clipboard

Copied

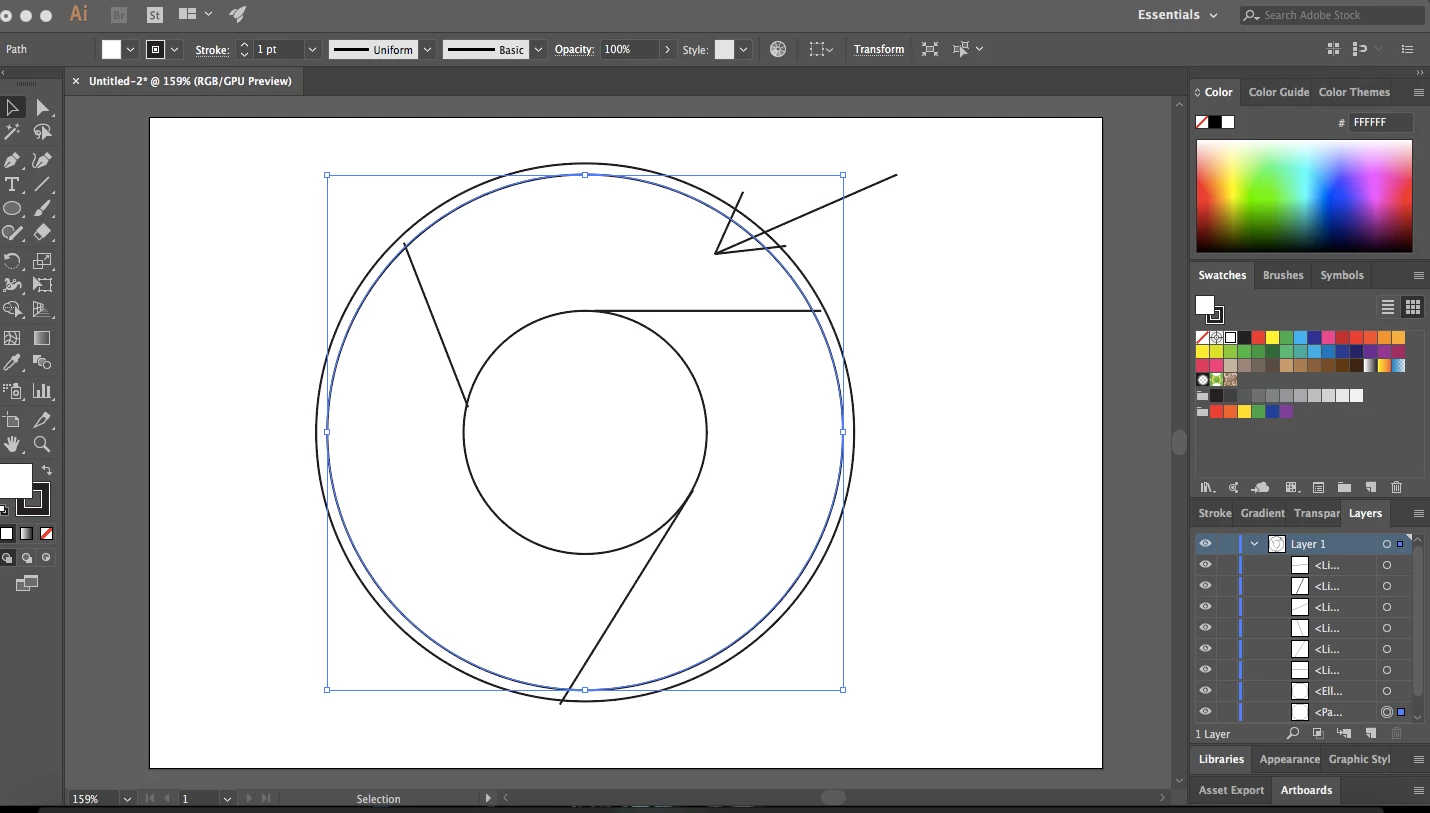
I am trying to make a google chrome logo for practice in illustrator CC Also necessary to mention that I'm a beginner. My divide tool is not working as I expected.  Every time I try to select that portion (marked with an arrow) either with the direct selection tool or otherwise the whole circle gets selected and I want to select that portion only to start to color it.

Any help would be appreciated!

Screen Shot 2017-03-13 at 7.55.40 PM.png

Views

4.4K

Translate

Translate

Report

Report
Community guidelines
Be kind and respectful, give credit to the original source of content, and search for duplicates before posting. Learn more
community guidelines
Adobe
Community Expert ,
Mar 13, 2017 Mar 13, 2017

Copy link to clipboard

Copied

Select all and use live paint.

Read the introductory pages of the documentation, so that you know how vector graphic works.

Votes

Translate

Translate

Report

Report
Community guidelines
Be kind and respectful, give credit to the original source of content, and search for duplicates before posting. Learn more
community guidelines
Community Expert ,
Mar 13, 2017 Mar 13, 2017

Copy link to clipboard

Copied

One thing I am seeing is that you have a Path selected, and the selection anchor points are on the circle, not a wedge. That's why the circle is getting the fill.

I also see that out of the three lines, one crosses both circles (the bottom one). Two cross one circle and go only halfway into the next.

Open your layers panel to see what you have, and post a screen shot if you want to.

Be sure you select all objects when you use Pathfinder > Divide.

Or, alternatively, use Live Paint. Select all objects first.

Votes

Translate

Translate

Report

Report
Community guidelines
Be kind and respectful, give credit to the original source of content, and search for duplicates before posting. Learn more
community guidelines
New Here ,
Mar 13, 2017 Mar 13, 2017

Copy link to clipboard

Copied

Hey! Thanks for your comment! Can you please explain the line "the selection anchor points are on the circle, not a wedge.". Also, I have rectified the three lines to connect the inner circle only. However, does it make any difference? Can you please step by step guide me as to how I can select that single inner box which I marked! That would be really helpful for me as I am fairly new to this!

Votes

Translate

Translate

Report

Report
Community guidelines
Be kind and respectful, give credit to the original source of content, and search for duplicates before posting. Learn more
community guidelines
Community Expert ,
Mar 13, 2017 Mar 13, 2017

Copy link to clipboard

Copied

Select all and use the live paint tool.

Please read about it in the documentation.

It's all there. All the step by step guides you need:

Live Paint | Adobe Illustrator CC tutorials

After expanding you will be able to select your "wedge"

Votes

Translate

Translate

Report

Report
Community guidelines
Be kind and respectful, give credit to the original source of content, and search for duplicates before posting. Learn more
community guidelines
Advisor ,
Mar 13, 2017 Mar 13, 2017

Copy link to clipboard

Copied

So just to way in on this...

Essentially the reason your method doesn't work is that (none of) your paths are joined... as lets say 4 or 5 shapes..

If we were to break the construction of the Chrome logo down into separate shapes and not use the Live Paint tool etc... then you have 5 elements to deal with (unless you decide you want transparency between Shapes 1-3 and 5 as below).

You have....

Shape 1: The Red shape

Shape 2: The Yellow

Shape 3: The Green

Shape 4: The White circle that joins all elements together and is hidden by...

Shape 5: The Blue circle dead centre.

So either you could first select bits [EDIT] (OR ALL) of the shape together and then divide to get the structure as above or use one of the methods suggested above such as Live Paint or the Shape Building Tool.

It would probably be easier as you have come this far to use the Live Paint tool but it depends what you intend to do with the Illustration long term...

If you were going to use this Logo millions of times in a wide variety of ways then you would probably be best creating each individual element as a "perma-shape" i.e. a base shape of paths (constructed as above) rather than the Shape Builder > as depending on the complexity of the logo you create etc can become distorted when flattened (Probably not with the Chrome Logo but worth knowing).

Also the Live Paint tool has its limitations with other programs interpreting the Logo when flattened (However this is becoming supported more and more). I.e. Your applying multiple colours to one shape without each section of that shape holding a true value

So the receiving software has to be smart enough as Illustrator and Create both the "Illustration" and the Live Paint as Layers and combine them. Rather than just saying

Circle Blue...

Shape 1: Red etc.

In other words your asking the computer to do the work you could have done to begin with... with the risk that it doesn't know how to do it as efficiently as you might.

Votes

Translate

Translate

Report

Report
Community guidelines
Be kind and respectful, give credit to the original source of content, and search for duplicates before posting. Learn more
community guidelines
Community Expert ,
Mar 13, 2017 Mar 13, 2017

Copy link to clipboard

Copied

ou create etc can become distorted when flattened (Probably not with the Chrome Logo but worth knowing).

I have never seen that happening. Maybe with the old "align to pixel grid" function, but then you would run into the same problem with pathfinders.

So the receiving software has to be smart enough as Illustrator and Create both the "Illustration" and the Live Paint as Layers and combine them. Rather than just saying

No. When exporting to any exchange format, like PDF or EPS, there won't be any traces of live paint in it.

And also in the PDF part of an AI file there is no trace of live paint in it. PDF doesn't understand it so it gets expanded automatically.

Votes

Translate

Translate

Report

Report
Community guidelines
Be kind and respectful, give credit to the original source of content, and search for duplicates before posting. Learn more
community guidelines
Advisor ,
Mar 13, 2017 Mar 13, 2017

Copy link to clipboard

Copied

Ahh ok so progress has been made on this! Cool!

A while back I remember people experiencing problems with Live Paint.

Thanks for letting me know Monika!

Votes

Translate

Translate

Report

Report
Community guidelines
Be kind and respectful, give credit to the original source of content, and search for duplicates before posting. Learn more
community guidelines
Advisor ,
Mar 13, 2017 Mar 13, 2017

Copy link to clipboard

Copied

However does this still mean you may experience the other problem with Live Paint if it expands bits you didn't want it to?

Votes

Translate

Translate

Report

Report
Community guidelines
Be kind and respectful, give credit to the original source of content, and search for duplicates before posting. Learn more
community guidelines
Community Expert ,
Mar 13, 2017 Mar 13, 2017

Copy link to clipboard

Copied

LATEST

https://forums.adobe.com/people/Eternal+Warrior  schrieb

However does this still mean you may experience the other problem with Live Paint if it expands bits you didn't want it to?

I don't understand this question.

Votes

Translate

Translate

Report

Report
Community guidelines
Be kind and respectful, give credit to the original source of content, and search for duplicates before posting. Learn more
community guidelines
Community Expert ,
Mar 13, 2017 Mar 13, 2017

Copy link to clipboard

Copied

I find the Shape Builder Tool to be much more intuitive than Pathfinder. You might try using it to divide your shape. Select all the parts with the Selection Tool (V). Then select the Shape Builder Tool (Shift + M). Hover over areas that you'd like to become distinct shapes (right now you have concentric circles with lines overlapping at various parts). Click to make a highlighted area a new shape. You can also drag across areas to add to the shape. If you want to remove part of a shape, you can Alt + drag (PC) or Option + drag (Mac) to subtract. Here's more info on the Shape Builder Tool How to create shapes using the Shape Builder tool in Illustrator

Votes

Translate

Translate

Report

Report
Community guidelines
Be kind and respectful, give credit to the original source of content, and search for duplicates before posting. Learn more
community guidelines