- Home
- Illustrator
- Discussions
- Re: Dropping out a shape from stroke art with AI C...
- Re: Dropping out a shape from stroke art with AI C...
Dropping out a shape from stroke art with AI CS6
Copy link to clipboard
Copied
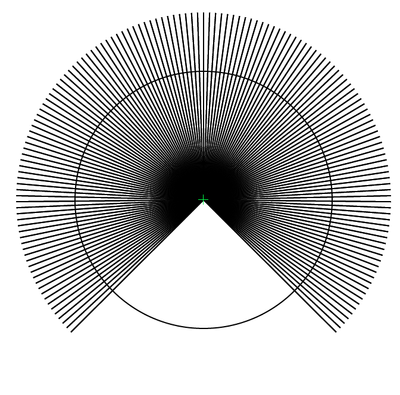
The stroke art consists of a a series of simple lines radiating out from the page center. It was created using the Stroke Tool to create a suitable line and then using the Rotate Tool and <Ctrl>D to replicate the line in 1.5 degree increments thrououghout a 270 degree sweep.
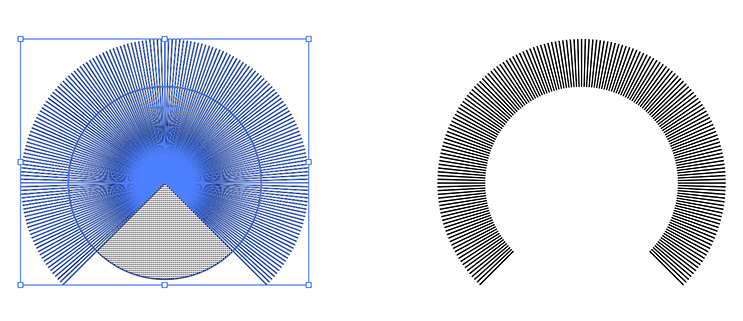
On selecting the stroke drawing with the circle on top (see attasched image) AI Pathfinder doesn't seem able to drop out (remove) the contents of the circle:
Minus Front tool returns "The filter produced no results. Please select two intersecting paths."
Trim tool returns "The filter produced no results. Please select one or more filled paths."
Crop tool eliminates everything but an outline of the circle pasted above the stroke drawing
Divide tool results in an outline of the strokes inside the circle that disappears if a selection is attempted.
I've tried these Pathfinder options with a filled circle or an empty circle. I toyed with the template and cut tools to no avail.
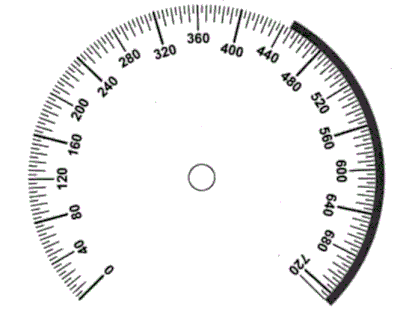
What I want to want to end up with is an arc of tics like what you would see on an analog dial gauge.
Do you see what I'm doing wrong?
[ attachment inserted as inline image by moderator ]
Explore related tutorials & articles
Copy link to clipboard
Copied
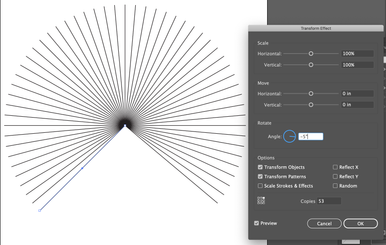
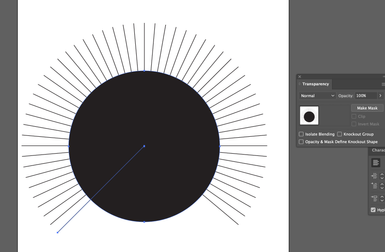
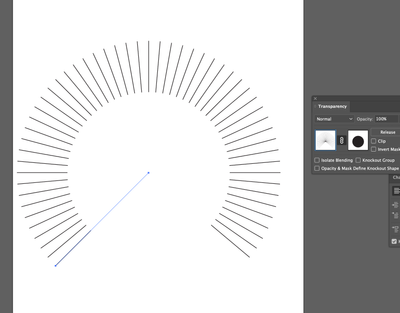
Your arc would be more easily made with the Transform Effect, but even the way you have done it, Transparency Mask will give you the effect you want. (make sure all of your marks are grouped)
Copy link to clipboard
Copied
Here's an example of what I'm trying to create:
I tried using the Rotate tool to position each ring of different length tics but it came out uneven. The idea of masking off different diameters to get rings of different length tics came from speculating that the uneven tics were because of rounding errors as Illustrator calculateded the start and end of each tic stroke.
Your suggestion seems like it would work. Unfortunately I got lost trying to figure out how to implement the "Transparancy Mask".
Here's a cookbook of the steps I took:
1) Opened an existing layer with the fan of lines. It is the only layer selected and displayed.
2) Used "Direct Selection Tool" to select the fan of lines.
3) Used "Edit/Copy" to copy the fan of lines.
4) Unselected and undisplayed the layer I'd just copied the fan of lines from.
5) Opened a new layer. it is the only layer selected and displayed.
6) Used "Edit/Paste in back" to paste the fan of lines into the "new layer".
7) Direct selected the fan of lines in the "new layer" and used "Object/Group" to group the fan of lines
8) Unselected and undisplayed the "new layer".
9) Selected another layer containing a centered circle (no fill, black stroke). It is the only layer selected and displayed.
10) Used "Direct Selection Tool" to select the centered circle.
11) Used "Edit/Copy" copy the centered circle using "Edit".
12) Unselected and undisplayed the layer I'd just copied the centered circle from.
13) Selected and displayed the "new layer" with my grouped fan of lines (created in step 5). It is the only layer selected and displayed.
14) Used "Edit/Paste in front" to add the centered circle copied in step 11.
I can select the circle with a right click and get a menu of options but none seem to involve a "Transparency mask". Any thoughts about where I got lost?
Copy link to clipboard
Copied
I can select the circle with a right click and get a menu of options but none seem to involve a "Transparency mask". Any thoughts about where I got lost?
In order to make the mask work, you must select both the group of lines and the masking circle. Then use the Transparency Pallet, which can be found under the Window menu.
Copy link to clipboard
Copied
Finally figured it out -- enough to get the job done:
1) Create starburst layer
2) Create outer circle layer (shift + elipse tool) and center the circle (select circle then apply horizontal center followed by vertical center)
3) Create inner circle layer (shift + elipse tool) and center the circle (select circle then apply horizontal center followed by vertical center)
4) Create empty work layer and select it. Perhaps this should be the topmost layer
5) Display unlocked outer circle layer. Display unlocked inner circle layer.
6) Select both circles and apply Object/Compound Path/Make
7) Select any color swatch from the right hand color panel
8) Display the starburst layer
9) With the Work layer selected, click on Object/Clipping Mask/Make
Now there's no telling what will actually happen on step 9. One time the result of the masking action actually went into the top most work layer. Typically, however, the masking action trashes some of the layers used as resourses, but somewhere in the layers will be the desired arc of tics.
At least I got the job done and can close this thread with thanks to all who shared ideas -- I couldn't have done it without you to assure me it was possible.
Copy link to clipboard
Copied
You can use the Shape Builder tool (Shift M) with the Alt key down to get rid of the inner parts.
Copy link to clipboard
Copied
Sounds like a simple solution!
Unfortunately my skills with Illustrator aren't up to it.
After copying the circle on top of the fan of lines and selecting everything, pressing <Shift><Alt>M didn't seem to do anything.
I seem to be having problems selecting the object to manipulate.
Using the "Selection Tool" to select the circle I can go to the "Appearance" tab on the right and change the fill and stroke to "white" color. It looks right -- just a ring of tics -- but the white center would obscure any background layers. The goal is to effectively delete the inside of the circle so layers below would be visible.
Can you see where I slid off the rails?
Copy link to clipboard
Copied
The shapebuilder tool in Shift + M.
And when youhave the tools and the objects are seleted, you press Alt for deleting.
Please read the documentation.
https://helpx.adobe.com/illustrator/using/creating-shapes-shape-builder-tool.html
Copy link to clipboard
Copied
I get the RTFM advice and I have indeed been guilty of failing to read resources in the past. However, the problem with "Create shapes using the Shape Builder tool" (https://helpx.adobe.com/illustrator/using/creating-shapes-shape-builder-tool.html) is that the instructions seem not to apply an unenclosed object like a star-burst of lines.
Specifically: Step 1 says "Create the shapes on which you want to apply the Shape Builder tool." What I'm trying to drop out is part of a series of lines (strokes) and not an enclosed shape.
Even the example shows a solid filled circle (an enclosed object) from which a rectangle (also an enclosed object) is dropped out.
Am I missing something here?
Copy link to clipboard
Copied
It's the part about erasing edges in the documentation.
Have you tried it?
https://www.dropbox.com/s/5sbq8y6r9etxthd/shapebuilder.mp4?dl=0
