

- Home
- Illustrator
- Discussions
- Expand appearance creates loads of new paths.
- Expand appearance creates loads of new paths.
Expand appearance creates loads of new paths.

Copy link to clipboard
Copied
Hello,
I'm trying to learn illustrator. I apologise if this has been asked before but I did a search and could not understand if the answers were right for my question.
I have been following this Jason Secrest tutorial. Beginner Adobe Illustrator CC Tutorial: Teddy Bear Beginner - YouTube
I used the pen tool and hit 'P' everytime I was finished with one line. I then I hit 'Shift +C' to curve my line. Then I hit 'P' again to start my next stroke. When I got to the part where you have to select all your brush strokes and expand appearance loads of new paths were created.
Here is the amount of points I had before expansion:

and here is the amount I had after I selected all and hit 'expand appearance'
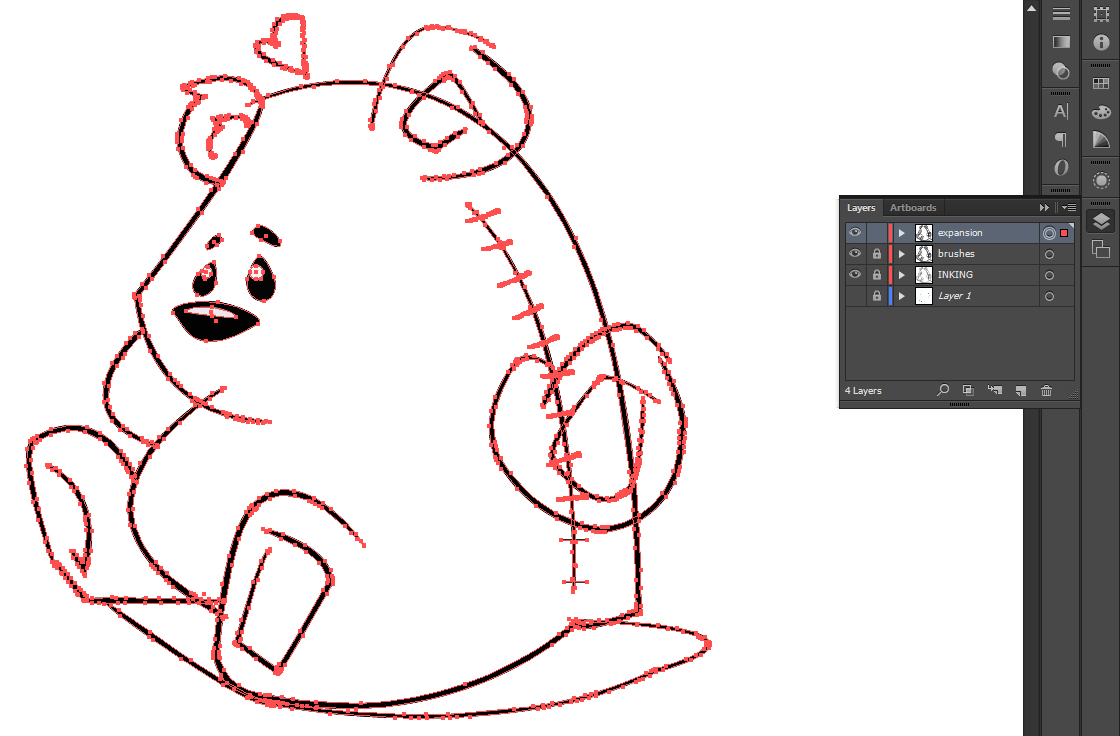
Can someone tell me if I've done something wrong? I asked in a comment on his video but I don't think he reads comments anymore.
Thanks in advance.


Explore related tutorials & articles
 35
Replies
35
35
Replies
35

Copy link to clipboard
Copied
missface wrote
I tried another of his tutorials and the exact same thing happened. I just don't know what I'm doing wrong. I followed it to the letter and after I expand appearance the eraser doesn't work. It takes a line away and then it pops back again.
I would not worry about the amount of points after expanding, that's just how his brushes are constructed.
You can show or hide these points depending on the selection tool you are using. In CC 2017 the Selection tool (black arrow) hides the points, the Direct Selection tool (white arrow) shows them.
I see he is duplicating the layer. Are you sure you have hidden the original one and only working at the duplicate?
And are you sure you have only selected the path you want to erase?
When you did it without expanding, you probably also see the brush stroke changing because you are shortening the path.

Copy link to clipboard
Copied
JETalmage schrieb
The actual artwork that you have been stretching along the paths you are drawing become fully exposed as ordinary paths. You see all those kazillion anchorPoints and think "Egads! What a mess."
The real mess was actually introduced in Illustrator CS6. In all older versions of Illustrator expanding the appearance of brush strokes as well as stroked paths with width profiles (and sometimes even some common strokes) resulted in much more economic creation of additional anchor points. The number of superfluous anchor points in expanded brush strokes in Illustrator CS6 and above is two- or threefold higher than in older Illustrator versions. Even the Simplify command may not always "repair" it convincingly.
Copy link to clipboard
Copied
https://forums.adobe.com/people/Kurt+Gold wrote
JETalmage schrieb
The actual artwork that you have been stretching along the paths you are drawing become fully exposed as ordinary paths. You see all those kazillion anchorPoints and think "Egads! What a mess."
The real mess was actually introduced in Illustrator CS6. In all older versions of Illustrator expanding the appearance of brush strokes as well as stroked paths with width profiles (and sometimes even some common strokes) resulted in much more economic creation of additional anchor points. The number of superfluous anchor points in expanded brush strokes in Illustrator CS6 and above is two- or threefold higher than in older Illustrator versions. Even the Simplify command may not always "repair" it convincingly.
Are you sure about that?
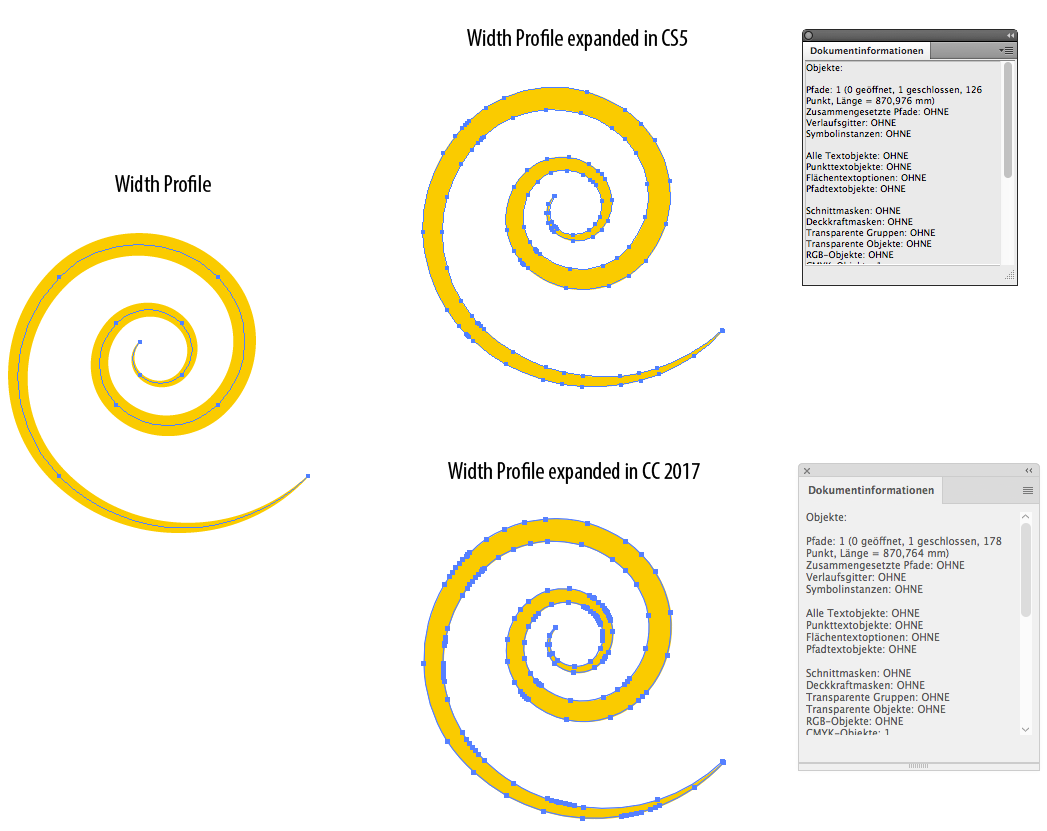
CS5 introduced Width profiles, and they create a lot of unnessecary points when expanded.
But I see no difference in the number of points when expanding brush strokes in CS4 or CC 2017.
Copy link to clipboard
Copied
Yes, I'm sure. It's rather hard to overlook the differences. See screenshots below.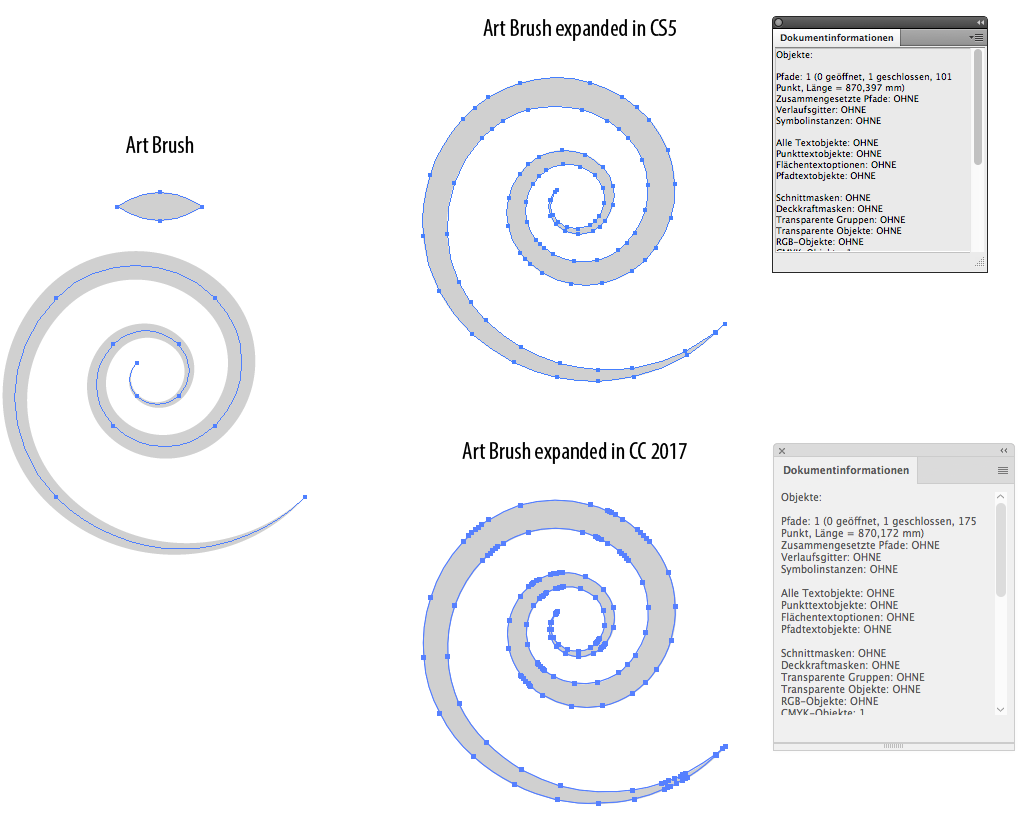
Copy link to clipboard
Copied
Strange, I can repeat your findings with the artbrush, but I did a test yesterday with various brushes and did not see any difference in the number of points.

Copy link to clipboard
Copied
Kurt, It is getting even stranger.
When I expand it the first time in CC 2017, I get the same amount of points as in CS4.
When I undo that and expand again, I get many more points.
But when I repeat that with my test document, I get less points after Undo and repeated Expand.

Copy link to clipboard
Copied
Did you perhaps create the art brush in CS4, saved the file in CS4 format, opened that file in CC 2017 and then immediately expanded the brush stroke?
If so, the behaviour would be kind of normal. That's because when you open the file and leave its content untouched, you still have the "good" CS4 brush definition including its underlying principles. Expanding the stroke will then result in the same number of points as in CS4. As soon as you do an Undo, the brush will be reapplied, but this time with the "bad" brush definition of CC 2017. You can check that by opening the CS4 file, select the brush stroke, remove the brush (such that it only has a basic appearance) and then reapply the brush. After that, expand its appearance and you will probably get the same increased number of anchor points.
The same applies to the opposite direction: Create the brush stroke in CC 2017, save the document to CS4 format and open it in CS4. If you now immediately expand the brush stroke, you will probably get the same number of anchor points as you would get in CC 2017. If you instead first reapply the brush, then you will get less anchor points, based on CS4 brush technology.
Copy link to clipboard
Copied
Yes, I can replicate the behaviour you are describing with your simple art brush .
But it does not explain why some brush strokes created in CS4 and expanded in CC 2017 first give the same number of points as in CS4, but after undo or reapplying the brush strokes, you get less points instead of more.
See this example file:
Copy link to clipboard
Copied
Detecting the behaviour of brushes is sometimes a bit tricky, but in your sample file something rather obvious (or unobvious?) happens:
Take a closer look at the left crowd of brushes (Art Brush: Chalk) in the second row and keep in mind its appearance. After you select all and expand the appearance the first time, then undo it, you can see that the appearance of the reapplied chalk brushes changes considerably and they actually get simplified. At the moment I cannot thoroughly explain why it happens, but apparently it has to do something with the actual Miter settings in the Strokes palette.
In other words: Open your sample file, select all, go to the Strokes palette, set the Miter limit to 1, expand the appearance and check the number of anchor points in the Document Info palette. Then undo and expand the appearance again. Check the number of anchor points. Do you still see a difference? I don’t.
This specific sample file seems to somehow disprove my statement, but in general I’m still claiming it’s a fact that Illustrator CS6 and all versions above produce many more anchor points when expanding brush strokes (especially art brushes) and strokes with width profiles. The only thing that should be corrected is that the number of points sometimes may even be four or five times higher than in Illustrator CS5 and below. That’s not just a cosmetic issue.
Copy link to clipboard
Copied
What would the reason be that the eraser works before expansion but not after even though I've selected what I wanted to erase? the line disappears but then pops up again?
its interesting that different people are getting different results when expanding his brushes. Maybe it's a version issue?
Copy link to clipboard
Copied
When expanding his brushes, I get many points (just like you).
That's because the brushes were made with many points.
What happens when the line disappears and pops up again, I can only replicate that when there is a visible copy on a layer below it.
It seems to erase (and it does) but when you release the eraser, the layer below becomes visible.
-
- 1
- 2

Find more inspiration, events, and resources on the new Adobe Community
Explore Now
 AdChoices