

- Home
- Illustrator
- Discussions
- Re: how can I convert all complex portions of whit...
- Re: how can I convert all complex portions of whit...

Copy link to clipboard
Copied
I need to place a file (that I built with shapes surrounded by dashed lines) as 1-color TRANSPARENT vector art into an ID doc on top of a Photoshop background file, so that I can see the file through it. I don't want to merge it into a PS file as one because I want to keep the clean vector art VECTOR. How can I knock out all of the white that sits on top of and currently blocks other shapes in the AI file, so it is black lines with transparent areas in between. I've tried using my Pathfinders but it affects the quality of the dashed line every time and where the breaks in the dashes land.


 1 Correct answer

Select your whole object, and use Object > Live Paint > Make
You can then change the fill on the resulting Live Paint object to None.

Explore related tutorials & articles
 17
Replies
17
17
Replies
17

Copy link to clipboard
Copied
Please show a screenshot.
Copy link to clipboard
Copied
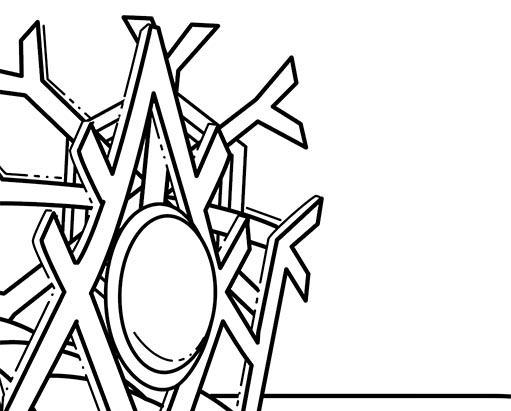
Ok..got the pics to post. First pic is what the pic looks like on a white background. Second is so that you can see I had to fill some of the shapes with white to cover the background elements and I placed a blue rectangle behind so that you can see it better. Third shows what those things look like when I move the first shape that's filled with white out of the way. I need this to look like the first image but make all of the white transparent, ultimately. Thanks!


Copy link to clipboard
Copied
I want to knock out the shapes behind the elliptical shape and then make all of the white things transparent.

Copy link to clipboard
Copied
As I said: knockout group.
Copy link to clipboard
Copied
I tried it and it just seems to turn everything white, including the strokes

Copy link to clipboard
Copied

This is rudimentary. but is this what you are trying to accomplish? If so, I just set the background "snowflake" lines and set the transparency to multiply. then made an elliptical shape, filled it with color and placed it behind the black lines.
Copy link to clipboard
Copied
The color will not be added in AI. The AI file needs to be black lines only (no fills) sitting on a photoshop image, combined in ID
Copy link to clipboard
Copied
OK, after placing your file in Indesign, then right click the image to get to a sub-menu.
- choose Effects..Transparency
- change basic blending mode to "Multiply".
Copy link to clipboard
Copied
when I do as you've suggested, the white goes transparent, but the black strokes from the object behind still show through. This is complicated!
Copy link to clipboard
Copied
Select your whole object, and use Object > Live Paint > Make
You can then change the fill on the resulting Live Paint object to None.
Copy link to clipboard
Copied
I was under the impression that live paint converted strokes to fills, rendering them pretty much impossible to edit, but not so. Did that used to be the case? This is a life saver. Thanks
Copy link to clipboard
Copied
jenniferz38549197 wrote
I was under the impression that live paint converted strokes to fills, rendering them pretty much impossible to edit, but not so. Did that used to be the case?
I know know if it ever did that - I don't use it often.
It's great for working with imported AutoCad drawings, and your situation looked like a perfect use for it as well.
Copy link to clipboard
Copied
thanks again!
Copy link to clipboard
Copied
Set all the white fills to opacity 0% in the appearance panel.
Then group everything and set the group to "Knockout group" in the appearance or the transparency panel.
You might need to View > Preview on CPU in order to see it in Illustrator

Copy link to clipboard
Copied
To add to Monika's suggestion, I would say if you have a lot of shapes with white fills, you can select just one then use Select > Same > Fill Color to select all the rest to change their opacity at once.
Copy link to clipboard
Copied
Can you expand your dashed line stroke to make it a shape, then use pathfinder to knockout?
Copy link to clipboard
Copied
it won't let me post pics. I have jpgs and it's saying the file type is forbidden?

Find more inspiration, events, and resources on the new Adobe Community
Explore Now
 AdChoices