Inspiring
January 12, 2021
Answered

How Can I Square off the End of a Point in Illustrator? I'm Making Leaves from a Brush that I Made.

  • January 12, 2021
  • 5 replies
  • 2323 views

Hi there!

I am attempting to do something different with brushes, by making some leaves that I made into a brush and using the brush to make multiple leaves, in different directions.


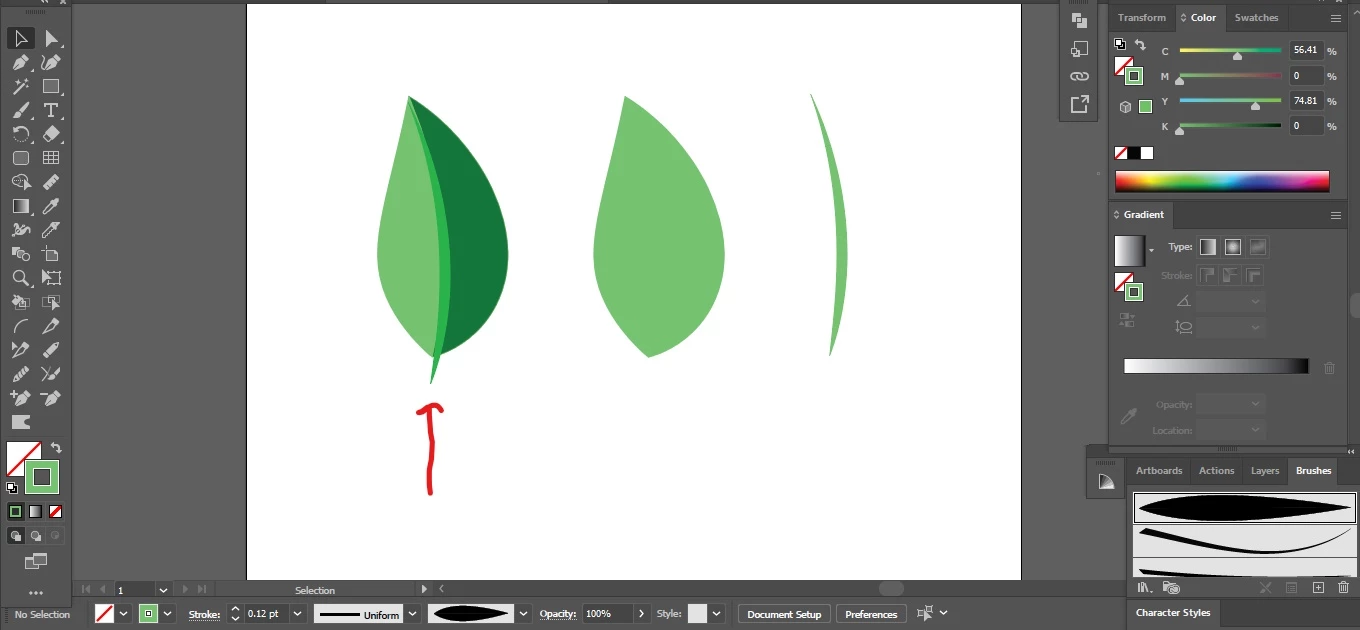
I created a leaf from one of the brushes (the one on the far right of the screenshot) and then I did Object à Expand Appearance. So the brush stroke is now an object with a fill. I clicked around on it, and I found out that I can in fact get two separate halves for this expanded leaf … which is great because I can make each half a different color if I want to, which is what I had done here (see the first one on the left of this screenshot).


Before expanding, I had created two copies of the brush stroke for that leaf (via copy/paste), and then I reduced the stroke size of one of them in order to create a stem for the expanded leaf (see the one on the far right). This I did because the expanded leaf was made from the same brush stroke and I had wanted the stem to follow the same path as the middle of the expanded leaf without having to manually draw out the stem, which I was doing before using this technique.


Since I had scaled down the stroke size a bit for my “stem”, I had to play around with it a bit by dragging it around with the selection tool in order to make it fit perfectly in the middle of the expanded leaf, which I had accomplished. But how do I get a square tip for the stem … is there an easy way to change from a point to a squared tip without having to manually manipulate the tip's anchor points with the direct selection tool? I guess I need to “expand the appearance” of the stroke for the stem first as well? I'd like to be able to just click the bottom of the tip then click something else to do this for me automatically and be able to widen it afterwards. I find it difficult to change the shape of a point manually with the direct selection tool. If this is not possible, please give me advice on how to easily do this.

Thanks in advance!

This topic has been closed for replies.
Correct answer tromboniator

Make the stem part of the brush. if the brush is symmetrical across the stem, the stem will always follow the path. If it is not symmetrical, add paths visible or not, to make the brush extend the same amount on both sides of the brush path. And if you want similar leaves of different colors, make a brush in shades of gray, and in the Brushes panel choose (and experiment with) one of the Colorization Methods.


Peter


5 replies

tromboniator
Community Expert
Community Expert
January 15, 2021

Delighted to hear it. Love your enthusiasm! I find brushes endlessly fascinating and useful. Enjoy.

Inspiring
January 15, 2021

Thank you! Yes, they are a lot of fun!

I am quite enthusiastic because I am using my designs for my Print on Demand company that I am starting up. I am an artist, but new to digital art, and it has only been lately that I decided to do this as my career. So I truly enjoy learning new things and better ways to create beautiful designs that I will be featuring on my merchandise. It is quite rewarding to get to a deeper understanding than I had before and be able to take my abilities to the next level in order to create wonderful artwork for my customers. 🙂

tromboniator
Community Expert
Community Expert
January 14, 2021

Just saw your update. Glad you found something that works. Keep playing and experimenting, there are probably many ways of getting to something you like.

Inspiring
January 15, 2021

I sure will! Thanks again for your input ... I have all the info that I need for now, and I will continue to experiment 🙂

tromboniator
Community Expert
tromboniatorCommunity ExpertCorrect answer
Community Expert
January 14, 2021

Make the stem part of the brush. if the brush is symmetrical across the stem, the stem will always follow the path. If it is not symmetrical, add paths visible or not, to make the brush extend the same amount on both sides of the brush path. And if you want similar leaves of different colors, make a brush in shades of gray, and in the Brushes panel choose (and experiment with) one of the Colorization Methods.


Peter


Inspiring
January 15, 2021

Great idea! Thanks for this 🙂

tromboniator
Community Expert
Community Expert
January 12, 2021

I think you would be better off drawing a new path for the stem and/or creating a brush for it. A fairly easy way is to create a stroked (no fill) path down the center of the leaf, and extending past it for the stem, with the Pen Tool. Then select the Width Tool and click and drag anywhere along the path, and in as many places as you like, to adjust the width of the stroke. You may also double-click anywhere on the path to open a dialog box in which you may enter values you might prefer fo the width of the whole stroke or for either or both sides of the path. In this example I've set the stroke width at the extreme right at 0.


Peter


Inspiring
January 13, 2021

Thanks. However, is there a way that I can just change a pointed tip at all? If not, then I will create things like that by hand as you had said. But since some of the leaves that I would be creating would be more "wavy" after I draw them using the brush that I have for them, I wanted to avoid manually drawing in the stem in order to make sure that the stem followed the inner path of the leaf perfectly.

Inspiring
January 12, 2021

This is what I want to achieve (via this example I am showing):