• Global community
    • Language:
      • Deutsch
      • English
      • Español
      • Français
      • Português
  • 日本語コミュニティ
    Dedicated community for Japanese speakers
  • 한국 커뮤니티
    Dedicated community for Korean speakers
Exit
0

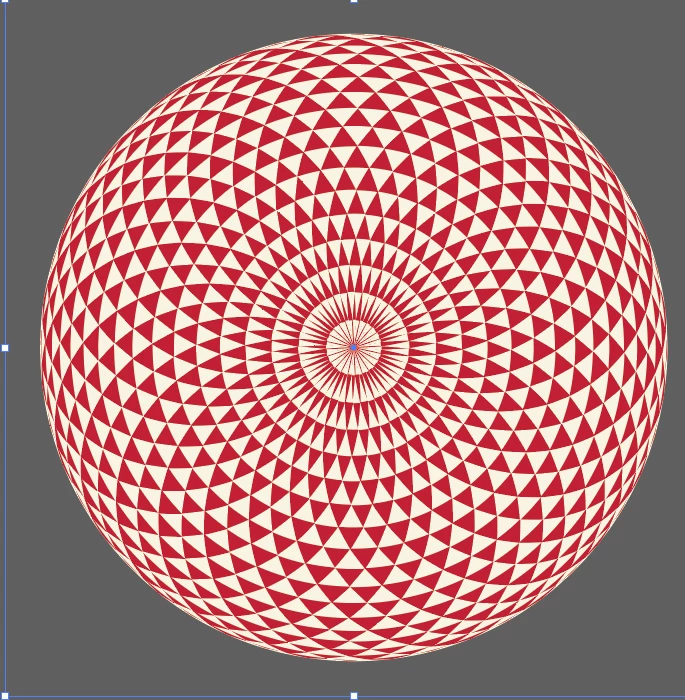
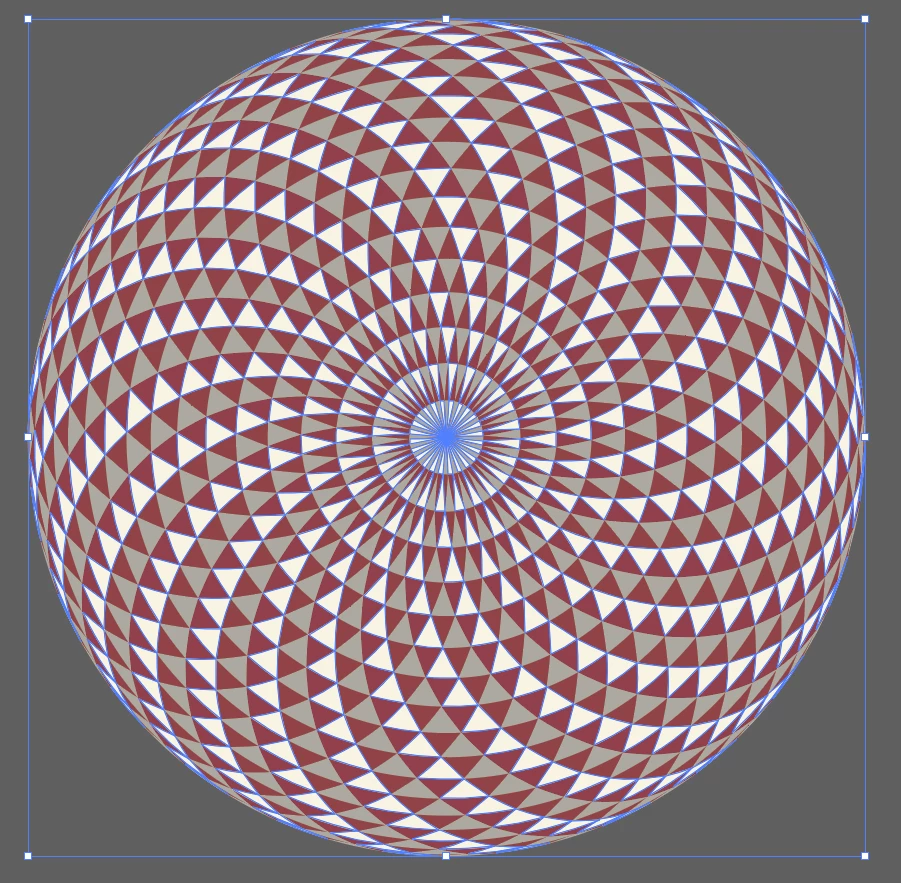
How did I make this?! Radiating triangle sphere shape

Community Beginner ,
May 03, 2024 May 03, 2024

Copy link to clipboard

Copied

Hello! I can't for the life of me figure out how I made this design a while ago. Can anyone help me work backwards?


I'm pretty sure I made it from radiating circles with just a stroke and no fill, using either transform or rotate/copy and Ctrl+D. 


I can't figure out how I got the lines to cross uniformly like this to make the triangle shapes but I believe once I got the lines set up, I joined them all and then it let me select different rows of them easily so I could fill with alternating colors.


Screenshot 2024-05-03 110854.png

Screenshot 2024-05-03 114517.png

TOPICS
Draw and design , How-to

Views

266

Translate

Translate

Report

Report
Community guidelines
Be kind and respectful, give credit to the original source of content, and search for duplicates before posting. Learn more
community guidelines
Adobe
Community Expert ,
May 03, 2024 May 03, 2024

Copy link to clipboard

Copied

You need a circle and a curve. Then duplicate/rotate around the center and then mirror and duplicate.

Then use Live paint to fill this:

Bildschirmfoto 2024-05-03 um 22.06.46.png

Votes

Translate

Translate

Report

Report
Community guidelines
Be kind and respectful, give credit to the original source of content, and search for duplicates before posting. Learn more
community guidelines
Community Beginner ,
May 04, 2024 May 04, 2024

Copy link to clipboard

Copied

Thanks! I have got to this point but I am missing how to make the lines that create the triangles aside from manually creating circles from the center.

Votes

Translate

Translate

Report

Report
Community guidelines
Be kind and respectful, give credit to the original source of content, and search for duplicates before posting. Learn more
community guidelines
Community Expert ,
May 04, 2024 May 04, 2024

Copy link to clipboard

Copied

You would use Live paint or shapebuilder afterwards, but using a brush would be much more efficient

Votes

Translate

Translate

Report

Report
Community guidelines
Be kind and respectful, give credit to the original source of content, and search for duplicates before posting. Learn more
community guidelines
Guide ,
May 03, 2024 May 03, 2024

Copy link to clipboard

Copied

The spirograph part can be created with a simple script. 
femkeblanco_1-1714775397124.png

Select a circle (the count can be changed in the first line):

var count = 25;
var doc = app.activeDocument;
var source = doc.selection[0];
var r = source.width / 2;
var first = doc.pathItems.ellipse(source.top - r / 2, source.left, r, r);
first.stroked = true;
first.filled = false;
for (var i = 0; i < count; i++) {
    var duple = first.duplicate();
    duple.rotate(360 / count * (i + 1), undefined, undefined, undefined, undefined, 
        Transformation.RIGHT);
}

I can't find a formula for the concentric circles. 

Votes

Translate

Translate

Report

Report
Community guidelines
Be kind and respectful, give credit to the original source of content, and search for duplicates before posting. Learn more
community guidelines
Community Expert ,
May 04, 2024 May 04, 2024

Copy link to clipboard

Copied

With some work, I got this.

Will describe later this evening (if I have more time) how I got this result.

Triangle ball.png

Votes

Translate

Translate

Report

Report
Community guidelines
Be kind and respectful, give credit to the original source of content, and search for duplicates before posting. Learn more
community guidelines
Community Expert ,
May 04, 2024 May 04, 2024

Copy link to clipboard

Copied

Looking at that - right. Pattern brush would be the easiest.

From this kind of element

Bildschirmfoto 2024-05-04 um 14.49.32.png

Votes

Translate

Translate

Report

Report
Community guidelines
Be kind and respectful, give credit to the original source of content, and search for duplicates before posting. Learn more
community guidelines
Community Beginner ,
May 04, 2024 May 04, 2024

Copy link to clipboard

Copied

This is a cool alternative! 

Votes

Translate

Translate

Report

Report
Community guidelines
Be kind and respectful, give credit to the original source of content, and search for duplicates before posting. Learn more
community guidelines
Community Beginner ,
May 04, 2024 May 04, 2024

Copy link to clipboard

Copied

amazing! yes I would love to know the steps you took


Votes

Translate

Translate

Report

Report
Community guidelines
Be kind and respectful, give credit to the original source of content, and search for duplicates before posting. Learn more
community guidelines
Community Expert ,
May 05, 2024 May 05, 2024

Copy link to clipboard

Copied

Sorry if it is a little long. I try to work as non destructive as possible, but the last part needs some manual edits to get the distorted triangle effect.

Half a circle (75 px)filled with a dark global color is rotated from the lower right corner with a Transform effect: 35 copies, angle -10°. To get clean filled objects, a Pathfinder effect Exclude was applied and moved to the bottom of the Appearance panel stack. This only works when the Stroke is hidden.

001.png

A second Transform Effect is applied, 1 copy is reflected along the X axis.

002.png

The result is grouped and a new fill with a light global color is added and dragged below the Contents item in the Appearance panel. The fill is converted to a circle with the Convert to Shape > Ellipse effect. An Absolute size is specified to match the size of the object. A final Pathfinder > Divide Effect is applied as the last item in the Appearance Panel.

003.png

I saved the project under a different name because the next steps are destructive.
Use Object > Expand Appearance and Object> Ungroup to get separate individually editable shapes.

004.png

Remove the objects to get a single dark colored and a single light colored column. I made them into 2 colored groups.

This is the boring part, you need to split every object in two and give it different colors. You can make it faster by recording 2 actions. This is where global colors are useful. Zoom in and Double click the dark colored group to get into Isolation mode.
Direct Select only the bottom part of a shape (drag over the 2 lower sides). Cut them. Paste in Front. Join. Fill

Repeat to create the other triangles.

005.gif

The 2 triangle groups are transformed separately. The vertical one is transformed from the bottom center. The rotated one is transformed from the bottom right. Both are transformed 10°.

006.gif


Votes

Translate

Translate

Report

Report
Community guidelines
Be kind and respectful, give credit to the original source of content, and search for duplicates before posting. Learn more
community guidelines
Community Expert ,
May 05, 2024 May 05, 2024

Copy link to clipboard

Copied

Nice approach, Ton.


If I had to do it with basic tools, I'd just multiple copy rotate a stroked circle around a centre point, create the concentric circles by multiple copy scaling one circle with the Scale tool (assisted by smart guides snapping at intersecting circles).


Then I'd convert the stroked objects to filled objects, select all and apply Pathfinder Exclude. Takes half a minute.


triangle_thing_001.png

Votes

Translate

Translate

Report

Report
Community guidelines
Be kind and respectful, give credit to the original source of content, and search for duplicates before posting. Learn more
community guidelines
Community Expert ,
May 06, 2024 May 06, 2024

Copy link to clipboard

Copied

That looks good and faster, Kurt. Can you show/share the intermediate steps? 

Votes

Translate

Translate

Report

Report
Community guidelines
Be kind and respectful, give credit to the original source of content, and search for duplicates before posting. Learn more
community guidelines
Community Expert ,
May 06, 2024 May 06, 2024

Copy link to clipboard

Copied

Sure, here are the steps.


circle_construction_001.png


  1. Green circle: Rotate by 10° around the red rotation centre. 35 copies.
  2. Orange circle: Copy scale with the Scale tool (smart guides turned on). The blue dots indicate the intersections to which the Scale tool will snap.
  3. Convert all circles to filled objects, select all and apply Pathfinder Exclude.
  4. Put a big circle behind and fill it with a nice colour.

Votes

Translate

Translate

Report

Report
Community guidelines
Be kind and respectful, give credit to the original source of content, and search for duplicates before posting. Learn more
community guidelines
Community Expert ,
May 06, 2024 May 06, 2024

Copy link to clipboard

Copied

LATEST

Thanks, Kurt.

Votes

Translate

Translate

Report

Report
Community guidelines
Be kind and respectful, give credit to the original source of content, and search for duplicates before posting. Learn more
community guidelines