

- Home
- Illustrator
- Discussions
- Re: How do I align objects around the top of a hea...
- Re: How do I align objects around the top of a hea...
How do I align objects around the top of a heart?

Copy link to clipboard
Copied
I am trying to learn illustrator and am using CS5. The goal was to create a heart and align small circles around the top portion of the heart with a bigger circle on the bottom of the heart.
So far I have created the heart and 10 small circles + 1 big circle. The big circle I could align on the bottom center of the heart using aligns to key object.
The 10 small circles I have put above the heart by hand, by the spacing in between them is not equally divided among all 10.
How do I align objects around the top of a heart?
[Here is the list of all Adobe forums... https://forums.adobe.com/welcome]
[Comments is to ask about the operation of the Forum, not a specific program]
[Moved from the Comments forum to the specific Program forum... Mod]


Explore related tutorials & articles
 10
Replies
10
10
Replies
10

Copy link to clipboard
Copied
You could use a font ( on a path ) for the circles. Duplicate the heart and use just the top portion of the artwork for the path ( by deleting all of the anchor points used for the bottom part ). If that does not work, create a new path that follows the top contours of your original heart. Use text on a path tool and type 10 circles sized to fit. You can adjust the tracking for your desired spacing. Use the center alignment to see if the circles fall in the center. After, outline the text and adjust if necessary.
Copy link to clipboard
Copied
My first thought is using the blend tool to make the 10 circles. Copy the heart path and use just the top portion to replace the spine on the blend.

Copy link to clipboard
Copied
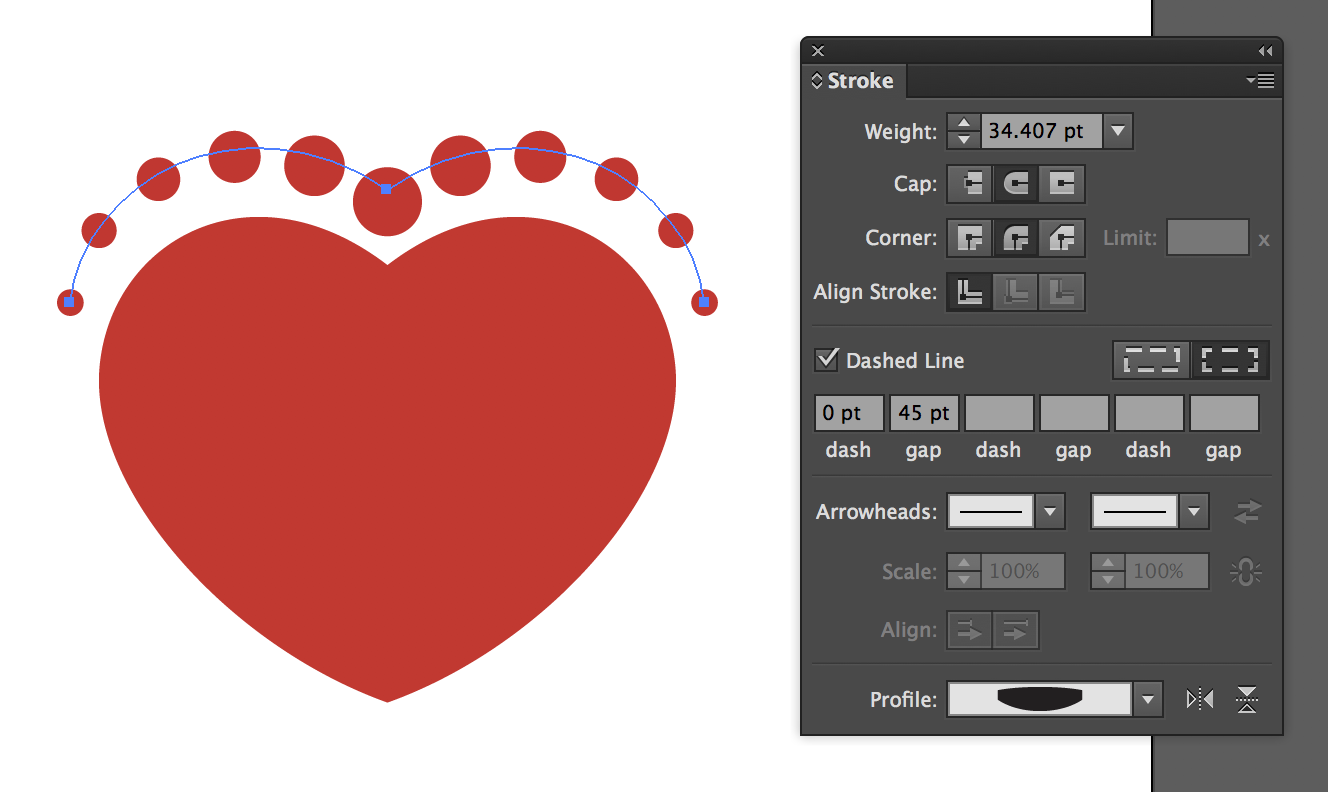
Not sure this is what you're looking for.
- Duplicate top half of heart shape
- Stroke it with a color
- Assign "Round Caps and Corners" in Stroke Panel
- Adjust "Dash Line" settings
- Just for fun try adding a "Stroke Profile" to vary the circle sizes

Copy link to clipboard
Copied
That is super interesting. I never tried that before. See you learn something never every time that you visit the Adobe Forums!

Copy link to clipboard
Copied
Make a heart. Make a copy of the heart. Make a circle. Turn the circle into a brush. Make it a scatter brush so that the circles don't distort. Adjust spacing and size as desired. Go to Object > Expand Appearance and ungroup to turn them into circles that you can select. Delete the extra that circles you don't want. Adjust the other heart scaling as needed to position with the circles.
If you want to make a brush where the circles aren't centered on the stroke, make a circle and duplicate it vertically. Make those 2 circles the scatter brush. Set Rotation relative to the path. Adjust size and spacing. Expand and Ungroup until you can select individual circles. Delete the extra circles.

Copy link to clipboard
Copied
jigneshtapase,
To create a path for the 10 circle to follow, you can select the heart and Object>Path>Offset Path by the desired distance from the edge of the heart to the centres of the circles; this may be cut symmetrically to fit the way/number/distances/sizes.
You may use a number of ways to create the circles, as already suggested.
Apart from that, you may consider an uneven number of circles to have one above the top corner point (as in post #3 by Ray), rather than two beside each other as planned (with 10 circles) which will give a rounded rather than pointy appearance.

Copy link to clipboard
Copied
Select your 10 small circles. Go to your Align panel, then select "Show Options". Then under "Distribute spacing" select the horizontal distribute space icon.
This should space out your 10 circles evenly.

Copy link to clipboard
Copied
Isn't it unbelievable, how many creative ways there are to achieve the same result ?
You can have a Blend object, a Text on a Path, a Scatter Brush, and even a cleverly dashed line with a profile (that last one really surprised me) ! So knowing as many features as possible helps to put them to use when you're designing something. It's not (or hardly ever) just a one-way solution. Keep that in mind while learning Illustrator...
Copy link to clipboard
Copied
That's why the "Right Answer" is not the best way to evaluate responses on this forum. There are usually several "right" answers. The solution chosen may depends on the user's skill level and personal preferences.

Copy link to clipboard
Copied
Here is yet another method.
Create 1 small dot. Save as Symbol. Need (12 copies)
Create 1 large dot. Save as Symbol
Center Align Heart with Large dot.
Offset heart with a stroke. Scissor cut at the bottom anchor.
Run Script: Distribute on the Path.
Delete offset stroke.
Delete the two bottom overlapping small dots.
Final as OP requested: 😉
10 small dots upper, one large dot bottom, (no distortion), evenly distributed, around a heart shape.
EZ edits!
Modify your symbols or Replace your symbols.
The script can be found here. Works with CC.
K


Find more inspiration, events, and resources on the new Adobe Community
Explore Now
 AdChoices