Exit
  • Global community
    • Language:
      • Deutsch
      • English
      • Español
      • Français
      • Português
  • 日本語コミュニティ
  • 한국 커뮤니티
0

How do I edit the end of a stroke?

Community Beginner ,
Aug 07, 2017 Aug 07, 2017

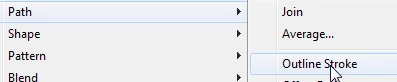
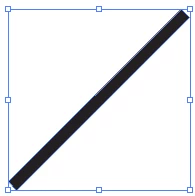
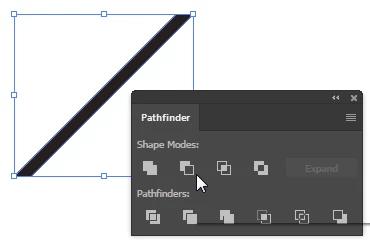
Im having trouble getting getting the ends of stroke the way I want them. Im trying to have a 45 degree stroke have a clean horizontal cut at the end, I cant get it to work so for now ive been using white blocks to cover the parts I want "cut" but of course when I want to convert the image to PNG for a logo design the white blocks are shown.. so my question is... how do I cut the ends of strokes to my liking?

stroke ends.PNG

22.5K
Translate
Report
Community guidelines
Be kind and respectful, give credit to the original source of content, and search for duplicates before posting. Learn more
community guidelines

correct answers 1 Correct answer

Community Expert , Aug 07, 2017 Aug 07, 2017

Allow me to give more detail.

  1. Draw the 45 degree angle line with the stroke thickness you want.
  2. With the stroke selected, choose Object > Path > Outline Stroke. This converts the stroke into a filled shape.
  3. Draw a filled shape over the outlined stroke. Select both objects.
  4. Since the Shape Builder tool didn't work for you, I'm changing the instructions to use Pathfinder > Minus Front.
  5. Draw a filled shape over the other end of the outlined stroke. Select both shapes.
  6. Again use Pathfinder > Minus Front.
  7. I
...
Translate
Adobe
Community Expert ,
Aug 07, 2017 Aug 07, 2017

In a logo in the end you would want to expand (outline) your strokes and actually cut the paths the way you need them to look.

During the creation process you might want to take a look at custom arrowheads. If all your strokes are at this angle then this might work. But still: when you're done: expand everything.

Translate
Report
Community guidelines
Be kind and respectful, give credit to the original source of content, and search for duplicates before posting. Learn more
community guidelines
Community Expert ,
Aug 07, 2017 Aug 07, 2017

After drawing your stroke, choose Object > Path > Outline Stroke.

Draw a filled shape over each end of the path that intersects it where you want to cut it.

Select all the shapes and  With the Shape Builder tool, hold down Alt (Windows) or Option (Mac) and click to subtract areas you want to delete.

Translate
Report
Community guidelines
Be kind and respectful, give credit to the original source of content, and search for duplicates before posting. Learn more
community guidelines
Community Beginner ,
Aug 07, 2017 Aug 07, 2017

only thing that happened was the filled shape disappeared, the stroke remained unchanged.

Translate
Report
Community guidelines
Be kind and respectful, give credit to the original source of content, and search for duplicates before posting. Learn more
community guidelines
Community Expert ,
Aug 07, 2017 Aug 07, 2017

Once the stroke is drawn, be sure to outline it before using the Shape Builder tool. Object > Path > Outline Stroke.

Translate
Report
Community guidelines
Be kind and respectful, give credit to the original source of content, and search for duplicates before posting. Learn more
community guidelines
Community Beginner ,
Aug 07, 2017 Aug 07, 2017

Yep I tried multiple times still nothing.

Translate
Report
Community guidelines
Be kind and respectful, give credit to the original source of content, and search for duplicates before posting. Learn more
community guidelines
Community Expert ,
Aug 07, 2017 Aug 07, 2017

Allow me to give more detail.

  1. Draw the 45 degree angle line with the stroke thickness you want.
  2. With the stroke selected, choose Object > Path > Outline Stroke. This converts the stroke into a filled shape.
  3. Draw a filled shape over the outlined stroke. Select both objects.
  4. Since the Shape Builder tool didn't work for you, I'm changing the instructions to use Pathfinder > Minus Front.
  5. Draw a filled shape over the other end of the outlined stroke. Select both shapes.
  6. Again use Pathfinder > Minus Front.
  7. I hope this works for you. Let me know.
Translate
Report
Community guidelines
Be kind and respectful, give credit to the original source of content, and search for duplicates before posting. Learn more
community guidelines
Community Beginner ,
Aug 07, 2017 Aug 07, 2017

It worked! Thank you very much!

Translate
Report
Community guidelines
Be kind and respectful, give credit to the original source of content, and search for duplicates before posting. Learn more
community guidelines
Community Expert ,
Aug 07, 2017 Aug 07, 2017

Glad it worked for you!

As Monika mentioned, the stacking order of shapes is important. When using Pathfinder > Minus Front, the topmost shape must be the one you want to delete. By the way, you can actually trim both ends of the line at once if you group the shapes that are doing the trimming, in this example that would be the two rectangles.

Once they are grouped they act as a single object. You can then select the outlined stroke as well as the grouped rectangles and choose Pathfinder > Minus Front.

If using the Shape Builder tool, the stacking order doesn't matter, but you must hold Alt or Option to subtract areas.

Translate
Report
Community guidelines
Be kind and respectful, give credit to the original source of content, and search for duplicates before posting. Learn more
community guidelines
Community Beginner ,
Jun 21, 2019 Jun 21, 2019

All these involve changing the stroke into a shape how do I do this if I want to keep the original line as a stroke? I ask because I want the stroke/path to draw in. I hope I'm clear.

Translate
Report
Community guidelines
Be kind and respectful, give credit to the original source of content, and search for duplicates before posting. Learn more
community guidelines
Community Expert ,
Jun 21, 2019 Jun 21, 2019

Yes, you are clear. However, it is not possible. The closest you could come to that would be to create a clipping mask to hide the ends of the stroke.

Draw a stroke.

Draw a shape on top that intersects the ends where you want to hide them.

Select both the stroke and the shape that is on top, and choose Object > Clipping Mask > Make.

When you want to edit the line, you can choose Edit Contents. When you want to edit the clipping shape, choose Edit Mask.

Translate
Report
Community guidelines
Be kind and respectful, give credit to the original source of content, and search for duplicates before posting. Learn more
community guidelines
Participant ,
Feb 26, 2020 Feb 26, 2020
LATEST

It would be great if Illustrator allowed modifcation the the angle of the ends of a stroke path, without having to use clipping masks or outlining the stroked path. I've always wondered why this was not an option. Having the ability to modify the angle on the fly would be much more convenient and time saving than the current method of using clipping masks or outlining and extracting. Especially for logos that require all clipping masks to be expanded (which requires an additional extra step).


I realize this isn't the place to mention feature requests, though I was curious if there's a reason this was never an implemented feature. 

Translate
Report
Community guidelines
Be kind and respectful, give credit to the original source of content, and search for duplicates before posting. Learn more
community guidelines
Community Expert ,
Aug 07, 2017 Aug 07, 2017

Dimka99  schrieb

Yep I tried multiple times still nothing.

Please show what you did step by step.

Always watch the layers panel.

And please be precise when describing what you did.

Stacking order of the shapes is really important in this. Are you perhaps trying to do them all at once? That's possible, but with a different function.

Translate
Report
Community guidelines
Be kind and respectful, give credit to the original source of content, and search for duplicates before posting. Learn more
community guidelines
Community Expert ,
Jun 21, 2019 Jun 21, 2019

Dimka,

Since you are using the same angle (45 degrees),

You may use a customized arrowhead in the triangular form that gives you an end sharpened at 45 degrees from one side (like a square with one Anchor Point removed which is also is how you can create it), probably you need a mirrored version too, see the heading Customize arrowheads (at the bottom) here:

How to apply strokes in Illustrator

You can make one for any other angle you may wish, too.

Translate
Report
Community guidelines
Be kind and respectful, give credit to the original source of content, and search for duplicates before posting. Learn more
community guidelines