- Home
- Illustrator
- Discussions
- Re: How do I select and move two control handles o...
- Re: How do I select and move two control handles o...
Copy link to clipboard
Copied
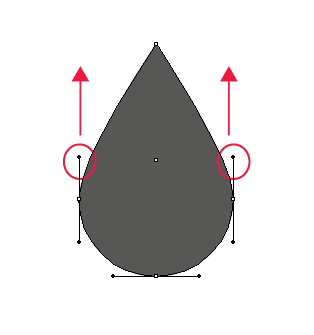
I am drawing a teardrop shape and want to select and move the two ringed control handles upwards at the same time so that the teardrop is exactly the same shape on both sides, is there any way to do this? Thanks.

 1 Correct answer
Miss Sparkles,
I apologize for the ambiguity of
over the Anchor Points with the Handles
As c pointed out, the over was meant as above/higher than vertically, rather than covering/including.
ClickDragging across over/above the Anchor Points will select the upper segments and reveal the Handles of the side Anchor Points and the top Anchor Points, but you will only affect the pair of (vertical) upper Handles of the side Anchor Points when you use the Up arrow (just as you will only affect the (horizont
...Explore related tutorials & articles
Copy link to clipboard
Copied
s,
The case shown in your images is so different to the OP case that it needs to be treated completely differently, based on the nature of Bezier curves, quite likely with the Handles used much more freely, simply as a means to obtain the desired shape.
What is seen in 3 is the unavoidable effect of at least one Handle becoming too long.
If you can show what you got in the end, including Handles, it is undoubtedly possible to find a way to obtain the desired shape without cutting the object.
Copy link to clipboard
Copied
Hi Jacob,
4 is what I got by cutting the anchor points at the top of 2 with scissors, then scaling the top objet (scaling height only).
On the bottom line is an unrelated problem. I realised in the process that cutting the anchor points one after the other creates uneven handles. On the second line, I cut the two anchor points simultaneously and symmetry of the handles was restored.
Copy link to clipboard
Copied
s,
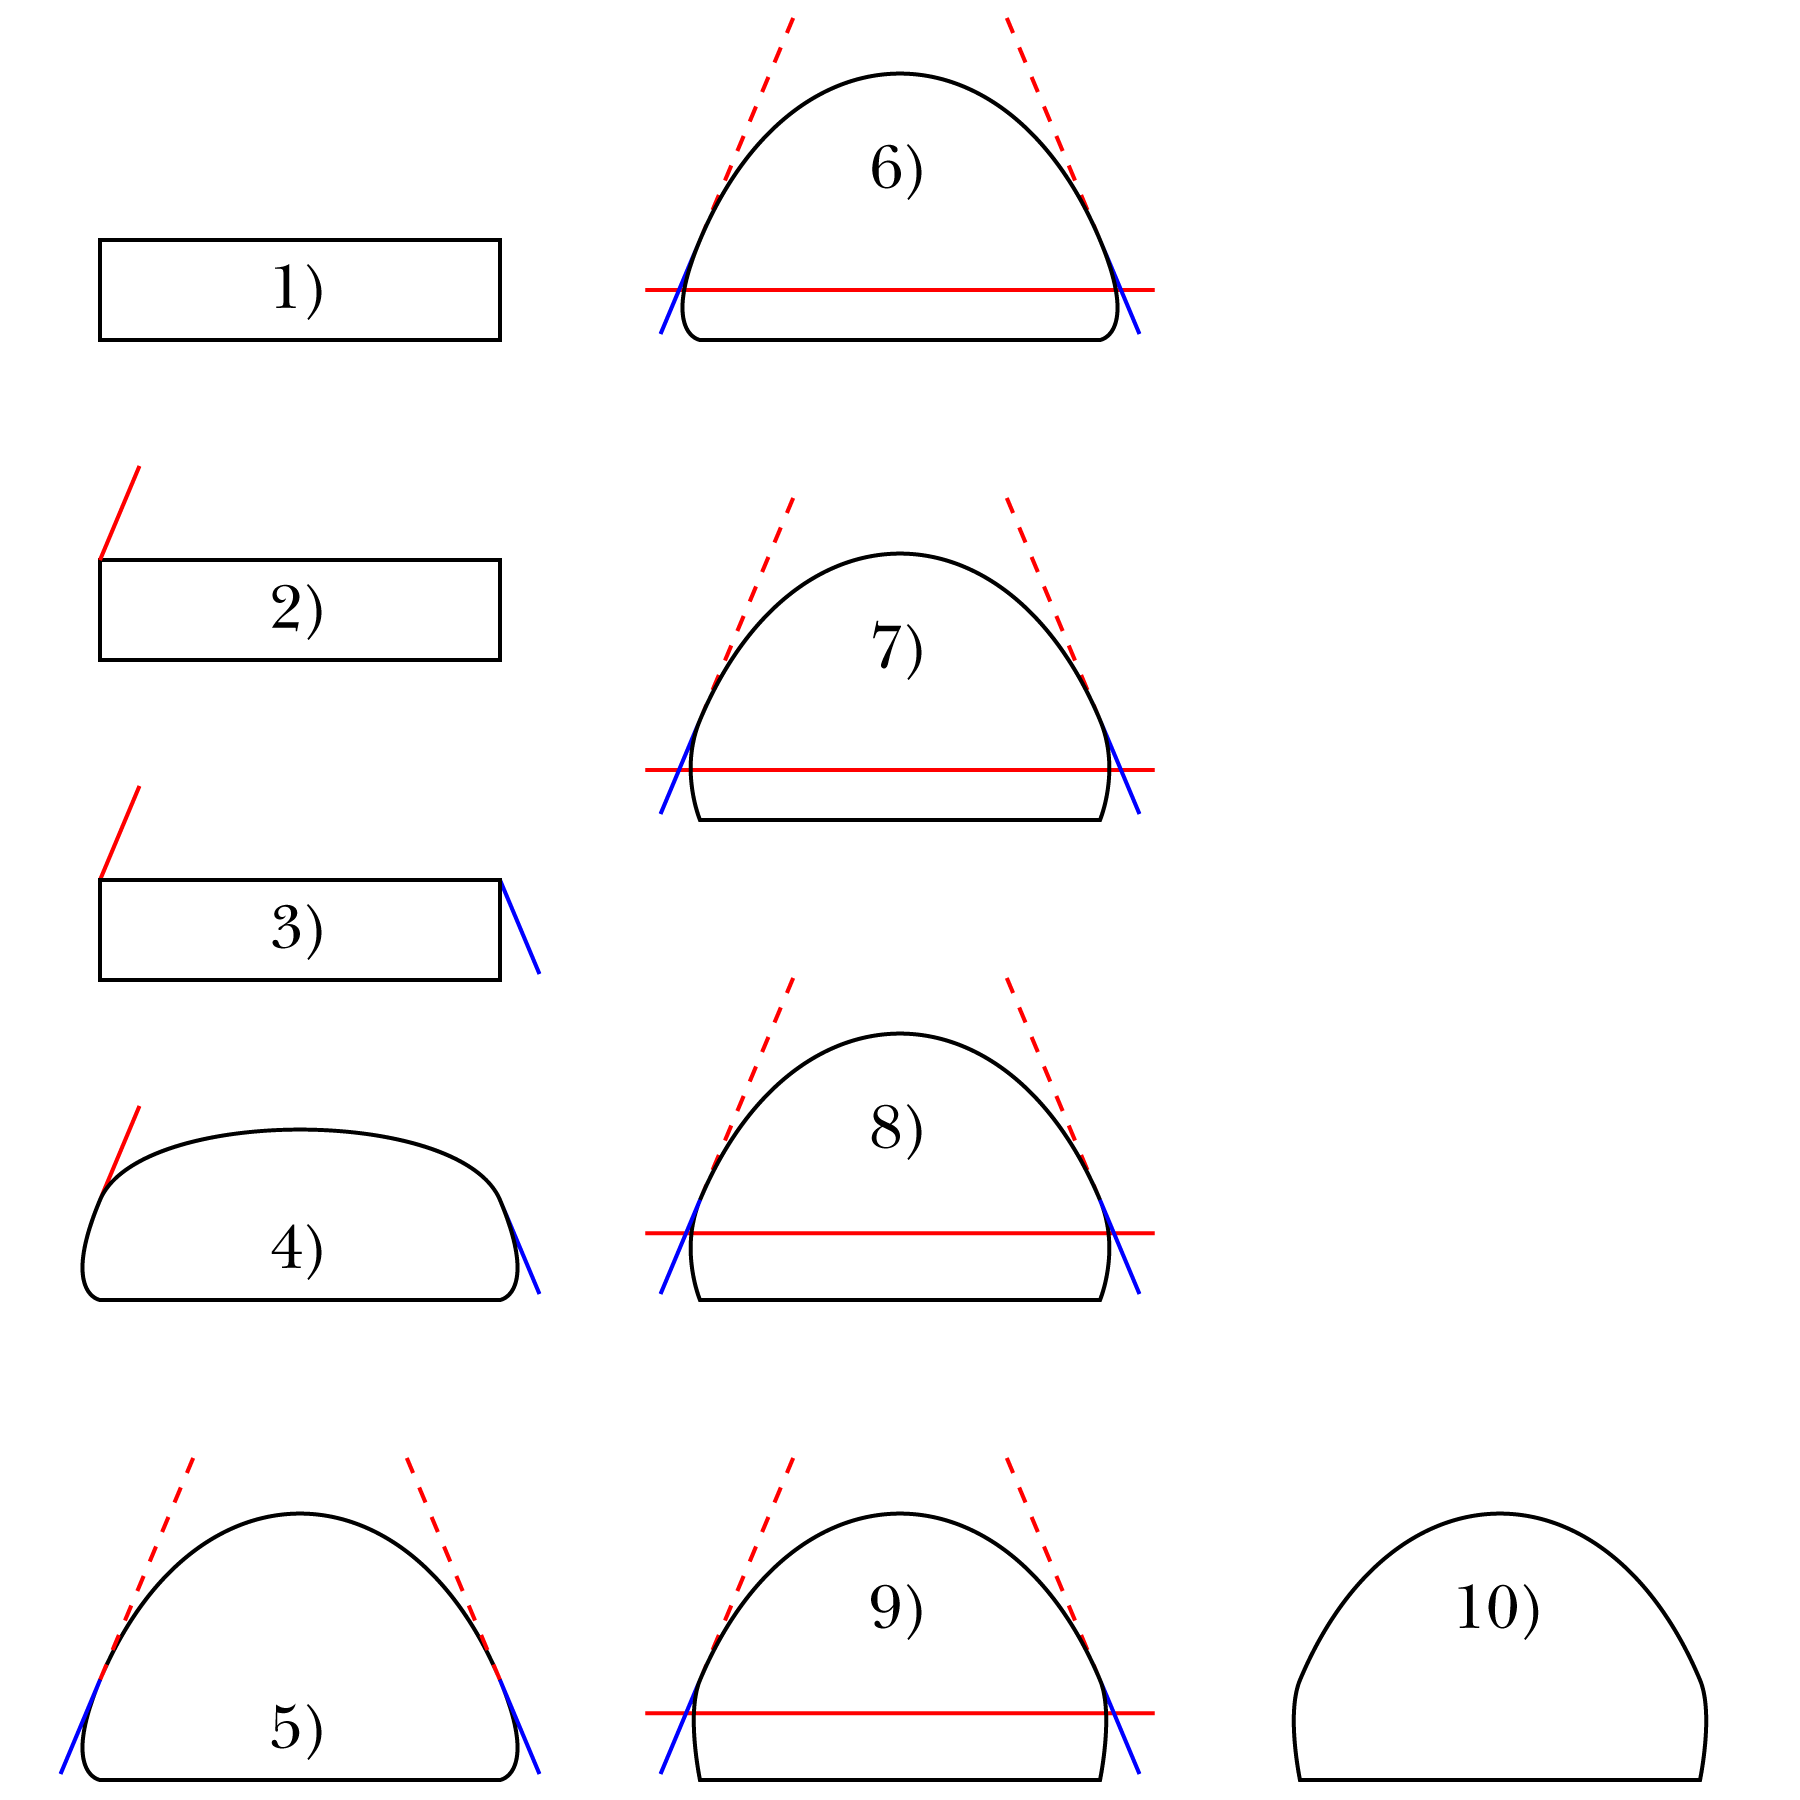
Based on my (mis)understanding that you wish to have a tight control of both shape and symmetry, working with Handles, without cutting the rectangle, here is a way with the help of the Line Segment Tool and with Smart Guides telling you when you are within snapping distance, steps shown below:
1) Create the rectangle;
2) With the Line Segment Tool ClickDrag upwards and inwards in the desired initial direction of the top curve from the top left corner Anchor Point, then change the colour of this guiding line to red;
3) Reflect the guiding line from 2) horizontally (or vertically), then ClickDrag it by its top left corner to snap to the top right corner Anchor Point, then change the colour of this guiding line to blue, then select the rectangle and bring it on top of the guide lines (you can Ctrl/Cmd + X + F);
4) With the Convert Anchor Point Tool ClickDrag from the top left corner Anchor Point to the end Anchor Point of the red guide line;
4) With the Convert Anchor Point Tool ClickDrag from the top left corner Anchor Point to the end Anchor Point of the blue guide line;
Now you have symmetrical Handles on the top corner Anchor Points and a symmetric flat top curve;
5) ClickDrag the left guide line by its top Anchor Point to snap to the top left corner Anchor Point, then change the colour of this guiding line to blue, then Direct Select the flat top curve, then ShiftClick each of the Handles or ShiftClickDrag over both, then use the up/down arrow keys to establish the desired top curve, still symmetrical;
This is the key change of shape;
6) With the Line Segment Tool create a red horizontal guide line for the bottom curves (shown half way up the rectangle), then bring it beneath everything else (you can Ctrl/Cmd + X + B);
7) DirectSelect the left lower curve, then ClickDrag the Handle along the blue guide line to the intersection with the red horizontal guide line to change the curve, then repeat for the right side;
To adjust the lower curves until satisfied:
8) Move the red horizontal guide line to a new height (shown two thirds of the way up the rectangle);
9) Repeat 7) for the new position of the horizontal guide line.
8) and 9) can be repeated until the right lower curves have been established.
10) shows the final shape opbtained in 9) without the guide lines.
Click/RightClick to get closer, Click again to get closer still
Edited by a small extension of step 5).
Copy link to clipboard
Copied
Hi Jacob,
Thank you very much for the time you spent coming up with such method. I would have never imagined something like it!
I reproduced everything on my end up to step 7 included (I didn't carry on with steps 8-10 as they were just adjusting the bottom shape). I think there was a typo in the second part of step 4, it should read something like: "4) With the Convert Anchor Point Tool ClickDrag from the top right corner Anchor Point [of the rectangle] to the [bottom] end Anchor Point of the blue guide line;"
You'll agree with me that this is very complex and that cutting the shape, scaling it, and then (if needed), rejoin the top part with the bottom part of the shape would be much quicker.
What I take away from this is that it is not (easily) possible to work with the handles if the two anchor points are on the same segment (unlike the OP). Perhaps something can be done in AI as a future improvement to allow control of two handles "in sync" in a wider use case than the OP.
Copy link to clipboard
Copied
You are welcome, s.
You have interpreted step 4) in my rather terse description just as I intended it.
And I agree that there are other and simpler ways without working simultaneously with symmetrical Handles.
If you can live with an Anchor Point at the top, one simple way of just drawing with symmetry that also work in CS4 is as follows:
1) Create a rectangle larger than one of the halves, thenCtrl/Cmd+C+F (hold Ctrl/Cmd and press C followed by F) to create a copy on top, then deselect and ShiftClickDrag by one of the far corners to snap so you have the two rectangles with one coinciding side;
2) Select both rectangles and Group them, then Effect>Distort&Transform>Transfor>Reflect with 1 copy, then lock both rectangles within the Group;
Now you have a frame to work within (you can set a copy aside to reuse for other mirroring tasks);
You can set the stroke to none to work undisturbed by them, relying on Smart Guides.
3) With the Pen Tool, ClickDrag (or just Click) on a suitable spot on the centre line, then drag the new path into the Group, and simply draw one half as an actual shape; as soon as you have the second Anchor Point you can (begin to see) the mirrored shape; you can use Ctrl/Cmd+Z to undo and then redo parts, and when finished you can switch to the Direct Selection Tool and adjust the actual shape and see the whole shape straight away;
4) Delete the rectangles when you are sure, then Shift+Ctrl/Cmd+G to Ungroup.
Copy link to clipboard
Copied
The workaround I used (cutting, scaling, and possibly rejoining the cut anchor points to the initial object) appears to me still to be much quicker and easier. That is unless there is a problem with cutting or scaling or rejoining that I am not aware of.
Copy link to clipboard
Copied
s,
"That is unless there is a problem with cutting or scaling or rejoining"
You can use all of those without problems if they serve the purpose.
As I understood it from your first attempts, you wished to have smooth upper Anchor Points on the rectangle, in other words Handles both ways in the same direction, and that cutting those corners was undesirable, and therefore I wrote:
If you can show what you got in the end, including Handles, it is undoubtedly possible to find a way to obtain the desired shape without cutting the object.
This led to the 9 step suggestion to solve a difficult task with serious restraints.
Copy link to clipboard
Copied
Hi Jacob. I understand. No, keeping the two sides of the handle straight at the anchor point wasn't my primary goal but it was a consequence of how I described the issue. What I wanted to do primarily was to alter the shape using handles only, and control the joint movement of the handles in a "symmetrical" manner.
Copy link to clipboard
Copied
I see, s, so more or less as I understood it.
In order "to alter the shape using handles only, and control the joint movement of the handles in a "symmetrical" manner", you can do it by performing this part of step 5) in the suggestion, and this is restricted to changing the length of the Handles while the direction is fixed:
ShiftClick each of the Handles or ShiftClickDrag over both, then use the up/down arrow keys to establish the desired top curve, still symmetrical.
You can set the Keyboard Increment as fine as you wish in the General Preferences.
This obviously requires that you have already established symmetrical Handles at the desired fixed angle, and that is the tough part.
Copy link to clipboard
Copied
Most of the replys here is demagogy.
Yes, the feature is lacking. You CAN'T select multiple curve bezel points at once.
It is a fact. God only know how you are going to get them mathematically even.
Copy link to clipboard
Copied
The only way I can see it working is by placing the handles on a grid.
But once off grid, or having non-symmetrical vector, one is out of luck.
The bezier curve has no selected-not-selected state, it only works with click hold.
Copy link to clipboard
Copied
I'm having trouble seeing the demagogy in the posts.
And also your answer is already there: use the VectorScribe plugin.
-
- 1
- 2
Find more inspiration, events, and resources on the new Adobe Community
Explore Now


