- Home
- Illustrator
- Discussions
- how is this effect created? budweiser logo
- how is this effect created? budweiser logo
how is this effect created? budweiser logo
Copy link to clipboard
Copied
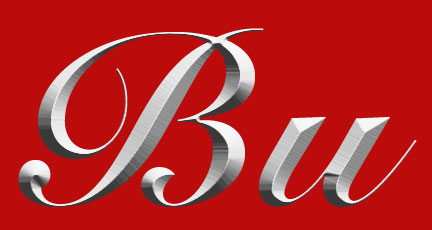
hey everyone, anyone know how this bevel is created in illustrator?
larger image at this link:
http://thescore.ibj.com/content/wp-content/uploads/2008/05/budweiser.jpg
cheers

Explore related tutorials & articles
Copy link to clipboard
Copied
Not by any instant "one click" effect; but by careful and artful rendering of paths with grads and/or blends.
JET
Copy link to clipboard
Copied
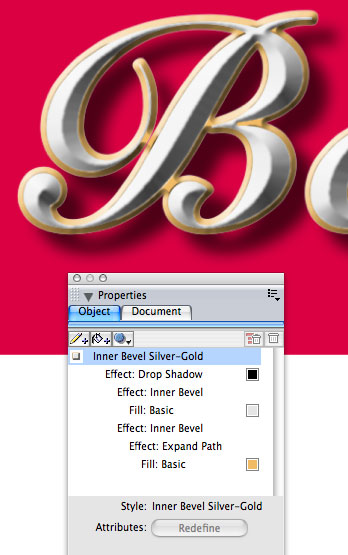
Which once you have achieved the look you want can be saved as a Graphic Style for later use.
Copy link to clipboard
Copied
I assume you want scalable vectors, right?
Photoshop is your friend.
1. Create letter outlines in Illustrator. Copy into Photoshop.
2. In Photoshop, apply an Inner Bevel/Hard Chisel layer style. Adjust so that the bevel falls as desired in the letters. Save as a JPEG.

3. Place the image in the Illustrator file, below the letter outlines, to use as a drawing template. Lock layer.
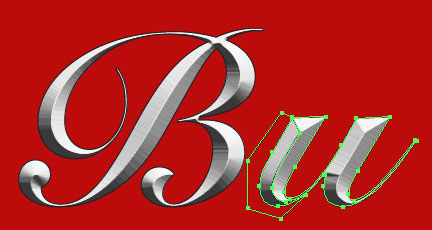
4. With pen tool, draw closed shapes that follow the inner planes, but fall outside the letter edges.

5. Use Pathfinder>Intersect to create individual sections.
6. Apply gradients to sections.
If you only need raster images for the web or small print jobs, FreeHand has an Inner Bevel Raster Effect that is quick and easy to use.

Copy link to clipboard
Copied
Hello Timpano,
Do you need this logo for work or for personal use? Becase I can show you different ways to do it using illustrator only. Please let me know.

Copy link to clipboard
Copied
Skullmaker, I would like to learn different ways to do it using Illustrator only, even if Timpano does not.
Copy link to clipboard
Copied
Hello Doug Katz,
No problem! I am not sure what is your level using Illustrator. So I am attaching an Illustrator file with different samples. Ungroup them and play with them. I did not want to recreate the complete Budweiser logo (I have projects pending), but part of it is done. Please let me know if there is something that you do not understand.
All of these samples are 100% illustrator. I hope this helps!
Copy link to clipboard
Copied
Tell you the truth that looks like it was done by eye.
Copy link to clipboard
Copied

Copy link to clipboard
Copied
But this doesn't tell us how you did it. Is this the tedious ta-da! of free-form path drawing and filling with gradients? Are there any mesh objects here? Is this a live trace of the original?
Copy link to clipboard
Copied
Hello Doug Katz,
Did you download the Ai file sample that I placed in this forum? (the file is called: DougKatz.ai)
On the tedious ta-da! file is only pen tool and gradients, but the Ai file sample (DougKatz.ai) also contains more complex tricks (like Mesh, Transparency, Mask, Blend, Etc.)
Please let me know if you know how to use the "Mesh" tool and how good you are using the "Pen" tool. Beause I do not use "Live Trace" (unless I want the trace an artwork to be: not exact or speciific "look").
You have to traced everything with the "Pen" tool. I do not use any extra plug-in or script. Only the Ai tools. (Please let me know if you can trace this attacched logo using only the "Pen" tool)
I can always attached the completed Budweiser logo, so you or anyone else can play with it and see how I did it.
But if you prefer, I can go step by step with you on a simple project. (Please note that I am using lousy version CS3)
P.S.: I recreated this attached logo using only the "Pen" tool
Copy link to clipboard
Copied

Copy link to clipboard
Copied
Skull, could you send me a v10 .ai file to peruse? In the meantime, I'll be grabbing your step-by-step's. I like Judy's example, but she missed the bevels in the font.
Copy link to clipboard
Copied
Copy link to clipboard
Copied
John I will try tomorrow, looks like today wont let me attach anymore files.
Let me try a trick that Wade showed me using forums. If I do it right you can see and download the JPEG.
URL=http://www.pixentral.com/show.php?picture=1fPALwofqRSsbLmKm29Rh1wf8Vift71]
I hope this helps!
PS: Please post a sample of what you did using one of these techniques.
Copy link to clipboard
Copied
Such amateurish work! How can you live with yourself Hans? How…tell me
that?
Copy link to clipboard
Copied
hey! I am desperate and I need the money.
Do not forget that I just scape from confinement (and they still looking for me). They will never take me alive! haha!
Haha! ![]()
Copy link to clipboard
Copied
Who said the goal was to take you alive? we can always stuff you!
BTW if you use the camera icon under the scene board to attach image files it will not be queued.
Of course very well done well done as is all your work,
Copy link to clipboard
Copied
It's my understanding that the OP only wanted to know how the bevel in the lettering, not the entire logo, was created.
Here's a fairly simple method for making a Faux Bevel.
1. Path outlines. If using type converted to outlines, use Pathfinder>Unite to create compound path.

2. You'll be using at least four copies of these compound paths, so duplicate paths.
3. Center layer: fill with horizontal gray/white linear gradient.

4. Top layer: Give a new compound path white fill, offset to left, mask with compound path of the lettering in its original position.

5. Note the the 'bevels' may not look clean, especially on fonts with connecting lines. Erase or delete unwanted areas.


6. Bottom layer: Apply gold stroke of desired width on a new set of outlines. Object>Path>Outline stroke. Fill with gold gradient.

7. Turn on all layers.

Your Faux Bevel is complete.
Copy link to clipboard
Copied
I think that is adequate but I do not think it is less time consuming then doing the whole thing with the pen tool. l as Hans has done.
Of course Hans is very very excellent with the tools like the pen tool and the gradient mesh.
Copy link to clipboard
Copied
Thank you Wade for your kind words. I liked the Judy's technique. You learn something new everyday!.
Since I am not good explaing things with words (or text) here is the "step by step" in photos. I hope this helps Doug Katz or anyone with the same question. It is very simple, but time consuming if you are not very experienced using the "Pen" tool. But it will give you a complete control of every single conner, reflections, etc.
So the next few posts are going to be just photos.
Copy link to clipboard
Copied
Copy link to clipboard
Copied
Copy link to clipboard
Copied
Copy link to clipboard
Copied
-
- 1
- 2
