Inspiring
December 18, 2015
Answered

How to add multiple strokes with offset path?

  • December 18, 2015
  • 1 reply
  • 6292 views

Hello,

I would like to create a script that can create multiple strokes with offset path ( incremental or decremental (user will enter value) )

Is it possible to add multiple strokes? I could not find any example in scripting reference or elsewhere.

Note: Blending does not give exactly the same results because sometimes especially when you're dealing with font outline paths it is being blended in wrong a way.

I'd be glad if someone give at least the main command in for loop.  I would try to do rest and will be sharing here as I find the solution.

Thanks,

Best Regards.

This topic has been closed for replies.
Correct answer Qwertyfly___

Hi again Qwertyfly...

First of all I'd like to thank you for your interest and support.

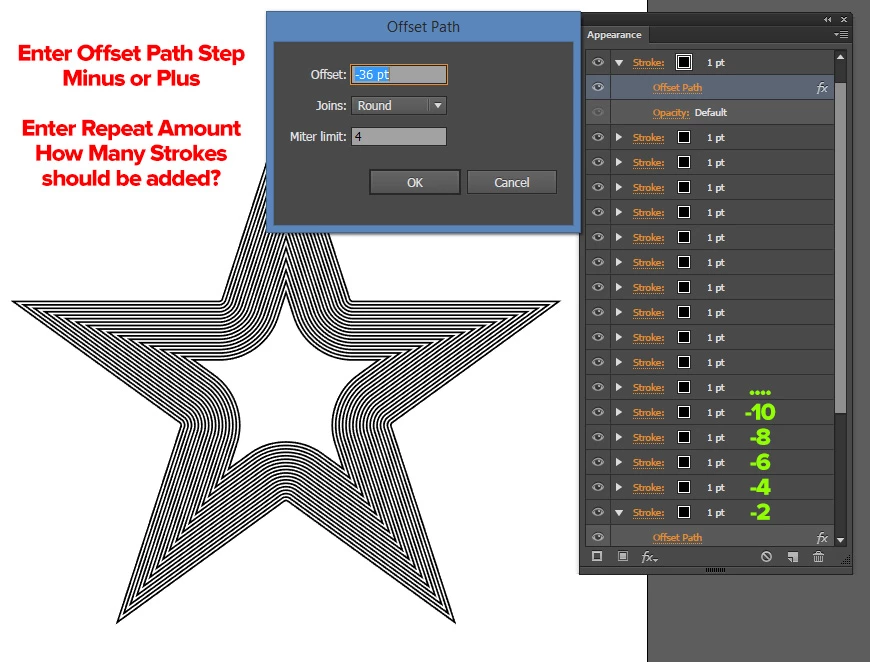
It's working but it open up a dialogue box, what I was trying to do is actually creating a loop with user specific values which creates say 10 px offset paths with new strokes. Like 2,4,6,8,10... offset values.

Also as you said it creates new action set each time. I tried unload action command.

Now I tried to mix this code with CarlosCanto‌ 's code. But as a newbie coder I could not find again It becomes an obsession to me.

I also tried adding xmlstring way in order to add user options.

xmlstring = '<LiveEffect name="Live Offset Path"><Dict data="R mlim '+miterlimitvalue + ' R ofst ' + offsetvalue + ' I jntp ' + jointype + '"/></LiveEffect>';

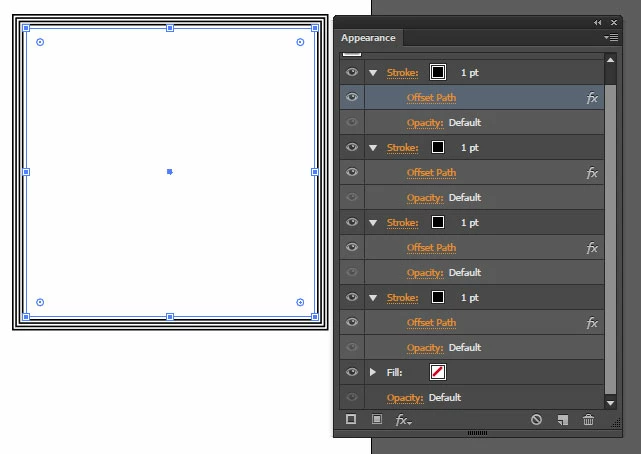
But this way it applies offset path outside of stroke which is not what I want.

What I really want is exactly in screenshot;

var idoc = app.activeDocument;

var ipath = idoc.selection[0];

var offsetvalue = '8';

var jointype ='Round';

var miterlimitvalue = '4';

var myAction = "OffsetPath";       

var mySet = "OffsetPath";       

xmlstring = '<LiveEffect name="Live Offset Path"><Dict data="R mlim '+miterlimitvalue + ' R ofst ' + offsetvalue + ' I jntp ' + jointype + '"/></LiveEffect>';

var actionStr = [   

'/version 3',   

'/name [ ' + mySet.length,

ascii2Hex(mySet),

']',

'/isOpen 1',   

'/actionCount 1',   

'/action-1 {',   

'/name [ ' + myAction.length,

ascii2Hex(myAction),

']',

' /keyIndex 0',   

' /colorIndex 0',   

' /isOpen 1',   

' /eventCount 2',   

' /event-1 {',   

' /useRulersIn1stQuadrant 0',   

' /internalName (ai_plugin_appearance)',   

' /localizedName [ 10',   

' 417070656172616e6365',   

' ]',   

' /isOpen 0',   

' /isOn 1',   

' /hasDialog 0',   

' /parameterCount 1',   

' /parameter-1 {',   

' /key 1835363957',   

' /showInPalette -1',   

' /type (enumerated)',   

' /name [ 14',   

' 416464204e6577205374726f6b65',   

' ]',   

' /value 2',   

' }',   

' }',   

' /event-2 {',   

' /useRulersIn1stQuadrant 0',   

' /internalName (adobe_commandManager)',   

' /localizedName [ 16',   

' 416363657373204d656e75204974656d',  

' ]',

' }',   

'}'   

].join('\n');    

try { 

       app.doScript (myAction, mySet); // missing action doesn't trigger an error, but it brings up Illustrator warning about action not being available - Click on "Stop" to continue                                                                               

       app.unloadAction (mySet, myAction); // unloads action but it keeps the set folder, loading actions keep duplicating folder actions 

    } 

    catch (e) { 

        var f = new File('~/ScriptAction.aia');

        f.write(actionStr); 


        app.loadAction (f); 

        app.doScript (myAction, mySet); 

        ipath.applyEffect(xmlstring);

        f.close();

        f.remove();


    } 

function  ascii2Hex (hex) {

    return hex.replace(/./g, function (a) {return a.charCodeAt(0).toString(16)})

}


OK, I'm going to assume your on windows going by the screen shot in the opening post.

here is a completely different approach.

this uses executeMenuCommand so is only compatible with CS6+

and is Windows only as it uses VB

//-------------------------------------------------------------------

// Offset Path in apperence panel

// Script by Qwertyfly

// contact tristan@qwertyfly.com

// version 0.1 beta

//-------------------------------------------------------------------

//number of offset paths

var Qty = 5;

//amount to offset

var Offset = -5;

//units to offest in

var Unit = "px";

//time to wait in milliseconds before sending keys.

// more time is slower but more stable

// I was able to run this with it set to 0, but a little bit of a pause is a good idea.

var wait = 10;

//-------------------------------------------------------------------

function FillDialog_Windows(distance){

    var VB = [

        'WScript.Sleep ' + wait + '',

        'Set WshShell = WScript.CreateObject("WScript.Shell")',

        'WshShell.SendKeys "' + distance + '"',

        'WshShell.SendKeys "{ENTER}"'

        ].join('\n');

    var VBgo = new File('~/go.vbs');

    VBgo.open('w');

    VBgo.write(VB);

    VBgo.close();

    VBgo.execute();

}

function MakeStroke(offset){

    app.executeMenuCommand('Adobe New Stroke Shortcut');

    FillDialog_Windows(offset);

    app.executeMenuCommand('Live Offset Path');

}

for(var i = 1; i<Qty+1; i++){

    MakeStroke(i*Offset + Unit);

}

1 reply

Silly-V
Legend
December 18, 2015

You can try to apply multiple graphic styles. I am not sure and have no time to test, but you should be able to make a graphic style of a stroke with an offset path in it. Then you can use the script to apply this graphic style using the graphicStyle.mergeTo() method- notice that artStyles in the OMV documentation are actually mislabelled as they are really "graphicStyles". Let me know if it works!

Inspiring
December 18, 2015

I'm still searching, in one article it is written that;

" Unfortunately, the documentation does say; Scripts cannot create new graphic styles."

On the other hand I guess I have found a solution ;

app.executeMenuCommand('Adobe New Stroke Shortcut');

command creates new stroke. Now time to find offset then collect them inside of a loop.

Thanks.

Silly-V
Legend
December 19, 2015

Hi Silly-V‌;

I got it, made some tests and working but except of applyEffect

I could not find how to add stroke (offset path should be under stroke in appearance panel)

I guess applyEffect command only works with effects as its name says:)

Working ;

//xmlstring = '<LiveEffect name="Live Offset Path"><Dict data="R mlim '+miterlimitvalue + ' R ofst ' + offsetvalue + ' I jntp ' + jointype + '"/></LiveEffect></ai:Stroke>';

Not Working;

xmlstring = '<stroke><SolidColorStroke caps="none" joints="miter" miterLimit="10"/></stroke>';

What I'm trying to do is create a for loop;

And script should create stroke with offset path 2 px, then another stroke with offset path 4 px and goes on according to user's input value, do you think it's possible?

Thanks.

Regards.


Okay, I'm going to try and help test it. First, your xml strings are wrong, 1st one and 2nd one.

Here is the correct syntax:

    var offsetEffectXML = '<LiveEffect name="Adobe Offset Path"><Dict data="R mlim '+ 4 + ' R ofst ' + 4 + ' I jntp 0"/></LiveEffect>';

So I tried to first add a new stroke and then apply this effect, but it did not work- because the appearance panel focus , even if it was materialized during this command, does not remain for the live effect to get attached to the stroke- it rather gets attached to the general art piece, which is useless.

However, if you were to copy and duplicate your target path item, the visual appearance of this would be achieved- although it will not be a single path with many strokes.


I tried to do a loop where this is applied to the path which repeatedly is nested within new groups, but not only did this effect not produce desired results as the effect was not applied to stroke (how I found out about this), but it took a very long time by the 10th iteration to render this simple effect, due to the many nestings.


It is also possible to have an existing graphic style which can be applied, I tried this with the group method and it did work. Unfortunately, exactly because of the limitation of not being able to place an effect into an appearance stroke via script, the graphic style has to be pre-made.

This worked, but relies on existing style and grouping. Grouping is necessary so that the style is not prevented from being applied due to existing instance of this style already being present on the target item.

    var doc = app.activeDocument;

    var p = doc.pageItems[0];

    for(var i=0; i< 3; i++){

        var newGroup = doc.groupItems.add();

        newGroup.name = "Parent Group_" + i;

        p.move(newGroup, ElementPlacement.INSIDE);

        p = newGroup;

        doc.graphicStyles['MyStyle'].applyTo(p);

    }

I also tried to mess with compounding an offset path stroke effect by using a transform effect in a combination, but it doesn't work that way, of course.

There's probably some strange way yet to be discovered which could deal with this issue, including maybe some way to apply the effect to a stroke..