• Global community
    • Language:
      • Deutsch
      • English
      • Español
      • Français
      • Português
  • 日本語コミュニティ
    Dedicated community for Japanese speakers
  • 한국 커뮤니티
    Dedicated community for Korean speakers
Exit
0

How to add picture to checked picture placeholder in AI template

Community Beginner ,
Dec 21, 2021 Dec 21, 2021

Copy link to clipboard

Copied

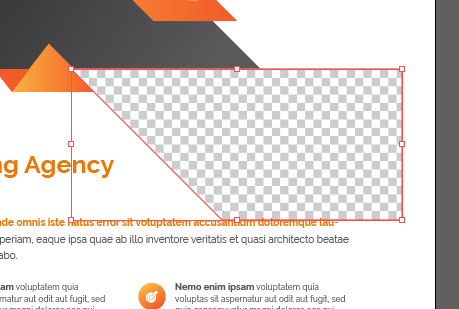
Hi guys, Im in AI and using a downloaded template for a flyer Im making. The template has a checked area for a photo to be inserted, and I have successfully added a picture to this area previously...but dont know how I did it and now cant replicate that! You can see the checked area in the screen shot below, and it has an angled edge that automatically shapes my rectangle picture to this same edge shape. When I 'place' an image there it just pastes as a rectangle shape and I cant trim it to match the shape of the checked area.

Does anyone know how I can paste my own picture in the checked area so it automatically takes the cheque shape and shapes my pictures edge to match?

Thanks heaps if you can help.


Michael22345737v5ds_0-1640092547439.png


TOPICS
Draw and design

Views

240

Translate

Translate

Report

Report
Community guidelines
Be kind and respectful, give credit to the original source of content, and search for duplicates before posting. Learn more
community guidelines
Adobe
Community Expert ,
Dec 21, 2021 Dec 21, 2021

Copy link to clipboard

Copied

If the checked area is in a clipping mask, you could paste your image into the mask. But without seeing the layer structure I can't know if this is the case.

Votes

Translate

Translate

Report

Report
Community guidelines
Be kind and respectful, give credit to the original source of content, and search for duplicates before posting. Learn more
community guidelines
Community Beginner ,
Dec 21, 2021 Dec 21, 2021

Copy link to clipboard

Copied

Hi Doug, thanks so much for your reply. I must confess Im not sure how to check if its in a clipping mask? (total rookie learning here!)

Can I send you another screen shot to help see whats what?

Cheers

Votes

Translate

Translate

Report

Report
Community guidelines
Be kind and respectful, give credit to the original source of content, and search for duplicates before posting. Learn more
community guidelines
Community Expert ,
Dec 21, 2021 Dec 21, 2021

Copy link to clipboard

Copied

It does not look like a placeholder, more like a transparent area.

If you position your image in a layer below it, it would show in that area.

Votes

Translate

Translate

Report

Report
Community guidelines
Be kind and respectful, give credit to the original source of content, and search for duplicates before posting. Learn more
community guidelines
Community Beginner ,
Dec 21, 2021 Dec 21, 2021

Copy link to clipboard

Copied

Thanks a lot Ton!!!!

Next question...dare I ask...how do I position my image in a layer below the transparent area? 😕


Votes

Translate

Translate

Report

Report
Community guidelines
Be kind and respectful, give credit to the original source of content, and search for duplicates before posting. Learn more
community guidelines
Community Expert ,
Dec 21, 2021 Dec 21, 2021

Copy link to clipboard

Copied

Can you show a screenshot of the layers panel with the object selected?

You can see all the objects in the document in the layers panel, and move them in front/behind each other.

Votes

Translate

Translate

Report

Report
Community guidelines
Be kind and respectful, give credit to the original source of content, and search for duplicates before posting. Learn more
community guidelines
Community Beginner ,
Dec 21, 2021 Dec 21, 2021

Copy link to clipboard

Copied

Yes, heres the panel shot. Well, I did something  like you said, (i think?) and this happened! Does the picture need to be linked' to the one above it to work maybe?

Michael22345737v5ds_0-1640096019146.png

Michael22345737v5ds_1-1640096268722.png

Michael22345737v5ds_2-1640096305490.png


Votes

Translate

Translate

Report

Report
Community guidelines
Be kind and respectful, give credit to the original source of content, and search for duplicates before posting. Learn more
community guidelines
Community Expert ,
Dec 21, 2021 Dec 21, 2021

Copy link to clipboard

Copied

The underlined item (Clipping Path) is acting to 'clip' everything in the clip group.

You need to add your image to that clip group. You can simply drag it into it in the panel.

Votes

Translate

Translate

Report

Report
Community guidelines
Be kind and respectful, give credit to the original source of content, and search for duplicates before posting. Learn more
community guidelines
Community Beginner ,
Dec 21, 2021 Dec 21, 2021

Copy link to clipboard

Copied

thanks Doug i really appreciate it - sorry im back at work now but will give it another bash tonight.

thanks again

Votes

Translate

Translate

Report

Report
Community guidelines
Be kind and respectful, give credit to the original source of content, and search for duplicates before posting. Learn more
community guidelines
Mentor ,
Dec 21, 2021 Dec 21, 2021

Copy link to clipboard

Copied

As it's transparent, put it on the very bottom

Close the "Design" layer stack (just for ease of use), create a new layer under it, place your image on the new layer.

Votes

Translate

Translate

Report

Report
Community guidelines
Be kind and respectful, give credit to the original source of content, and search for duplicates before posting. Learn more
community guidelines
Community Beginner ,
Dec 21, 2021 Dec 21, 2021

Copy link to clipboard

Copied

LATEST

Thanks Met1 i will give that a go. im starting to understand how this works thanks to your explanation. thanks heaps, much appreciated, youve given me some hope at 3:20am!!!  🙂

Votes

Translate

Translate

Report

Report
Community guidelines
Be kind and respectful, give credit to the original source of content, and search for duplicates before posting. Learn more
community guidelines